| |
About
This is Annie Whitsed's Crazy World a world where I stitch the joys and chaos of life into beautifull crazy quilts. email annie@loopylace.com
April 2024
| M |
T |
W |
T |
F |
S |
S |
| « Nov |
|
|
| 1 | 2 | 3 | 4 | 5 | 6 | 7 |
| 8 | 9 | 10 | 11 | 12 | 13 | 14 |
| 15 | 16 | 17 | 18 | 19 | 20 | 21 |
| 22 | 23 | 24 | 25 | 26 | 27 | 28 |
| 29 | 30 |
|
All That Jazz
Annie\'s Website
Bags-of-Fun
Blogroll
Websites


|
|
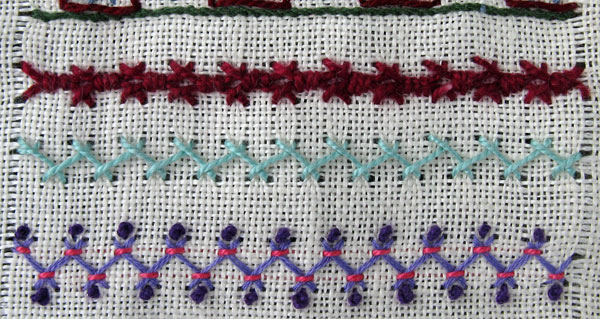
I am having fun with my band sampler, today I went to a friends place for a bar-b-que and it is very portable and easy to stitch on while talking.

The Top stitch is 2 rows of herringbone, the second row, pink, stitched into the gaps of the first row, to get the woven effect, with each alternate (upstrock stitches) pass the needle under the blue thread…both colours are 4 strands of stranded cotton thread.
The middle row is closed herringbone with increasing and decreasing stitch widths, worked in a fine silk thread.
The bottom row is using herringbone (3 strands cotton) to hold down the ric rac braid trimmed with Pistil stitch and Colonial Knots worked with a thick, soft silk thread, the trim is only on one side because that is all of the thread that I had.
|
Happy Australia Day to my fellow Aussie Readers I hope yo had a lovely day…I spent a quite one watching the cricket and Australian open tennis on TV (I don’t know what is happening to me the older I get the more sports I enjoy watching) and while watching the box I got a few stitches done on my sampler.
First up I did Fancy Hem Stitch, which I found in one of Sharon’s books a few weeks back, its stitched with #5 cotton pearl thread.
I was then at a loss as to just what stitch to do next with so many to choose from…to give me some direction I decided to repeat TAST, last year I did my TAST stitches on crazy quilt blocks which was a good idea because amongst other projects they helped me get Mum’s Memory Quilt finished…This year I will work the stitches and variations on my sampler so that I will have a record of them all in one place…
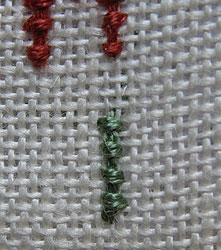
TAST week 1 stitch was Herringbone Stitch and the next seam on my sample is the basic herringbone which I worked with #5 cotton pearl thread.
On the bottom row the basic stitch, worked with 2 strands of cotton, is a little wider and is trimmed with short straight stitches worked with pearl 8 cotton crochet thread and French knots worked in a linen thread.
|
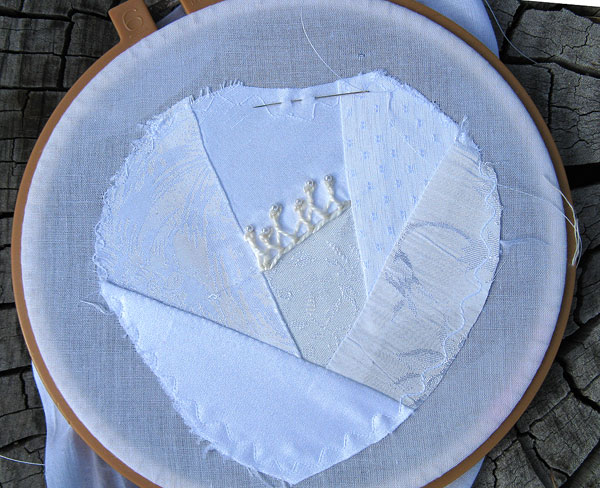
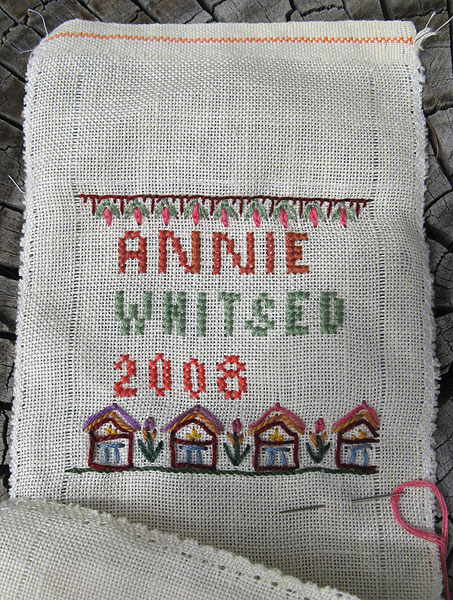 This is my Band Sampler…The fabric is 25 count Linen…The pulled threads to define the edges are 3.5 inches apart…I am using my leftover scrapes of thread so the colours will be random. This is my Band Sampler…The fabric is 25 count Linen…The pulled threads to define the edges are 3.5 inches apart…I am using my leftover scrapes of thread so the colours will be random.
I started it with A header row of Buttonhole stitch (3 strands of stranded cotton thread) which I trimmed with Detached Chain Stitch (green 2 strands of stranded silk, pink 3 strands of stranded cotton)
For my name and the year I used the same cross stitch alphabet as I used on my Stumpwork Sampler, (teracota is 2 strands cotton, green is 2 strands silk and th pink is 2 strands of cotton)… I started my first name in the centre so that it would be centred but had very carfully MISScalculated the centre…oops nothing for it but start the surname and year in a line with it.
For my first seam sample I have done a row of houses, a stitch from Carol Samplers book ‘Treasury of Crazy Quilt Stitches’
…I had to alter the roof because I hadn’t left enough space, so it is a little bit cramped and after so many years of working on crazy quilt blocks with the extra thickness of the foundation and seams to stitch through I am having a little trouble, even using a hoop, with my stitch tension on the single piece of fabric and the countable threads are a little distracting after doing so many freeform stitching but I am sure I will adjust to both and am thrilled to have it started.
|
 When visiting Sharon yesturday she was stitching her sampler together, Have you seen Sharon’s Sampler? it is worth a look, and we were talking Samplers. When visiting Sharon yesturday she was stitching her sampler together, Have you seen Sharon’s Sampler? it is worth a look, and we were talking Samplers.
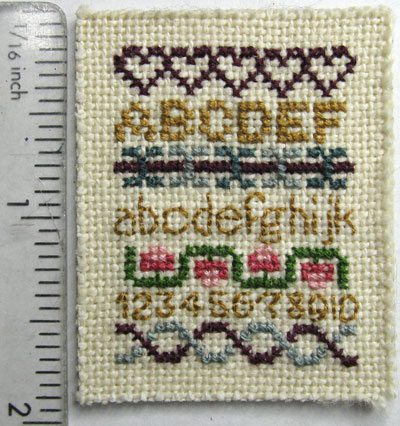
I loved samplers from the first one that I saw and wished that I had learnt on a sampler…The first samplers I saw where cross stitch Alphabet Samplers an I made a miniature one of them in 1995 but it was the long band samplers that I really fell in love with…I have started them before but not got anywhere with them and although I have made a few small samplers over the years unlike Sharon who made all of hers the same width mine are all different widths, and I have done thread samplers like the Spanish Knotted Feather Stitch sample below…
Another difference between Sharon’s and mine is that most of hers are on linen, I had done mine on calico (muslin), it just doesn’t have the same ambiance as linen does…I made my Stumpwork Sampler on a nicer fabric and it is my favourite of what I have done.
The Samplers that I really, really fell in love with when I learnt about them are the 4 inch wide band samplers that where kept in the sewing boxes of days gone by to record new stitches as they were learnt because they had no books/internet to reference…These darling band samplers were not lined so that the backs of the stitches could be seen (being able to see the back can help when working out how the stitch was done)…Wanting to make one with the back showing means that I don’t want to start with knots, I did know how to start with a couple of tiny back stitches but sometimes those stitches can be seen, today Sharon solved that problem for me, she tought me about waste knots, a term I have never even heard before, which work simple by knotting the thread to hold it in place while you stitch the first few stitches, working them over the thread on the back to hold it in place, then the knot can be cut off leaving a neat start to the seam.
By the time I left Sharon’s I had a 4 inch wide lenth of linen with the edges zig zagged and threads pulled on either side to line up the start and finish of the stitches…I have got it started but I am tired and going to bed so it will be tomorrow before I take and edit those photos.
|
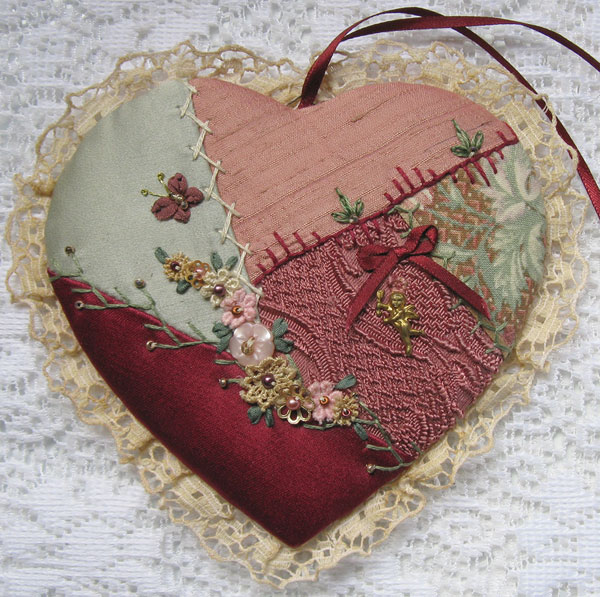
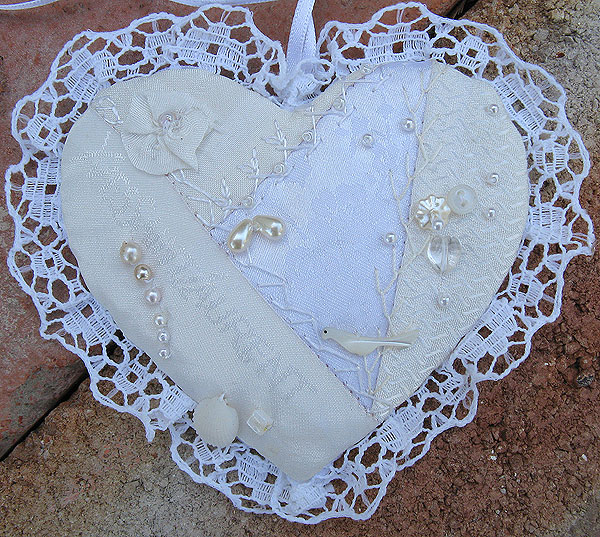
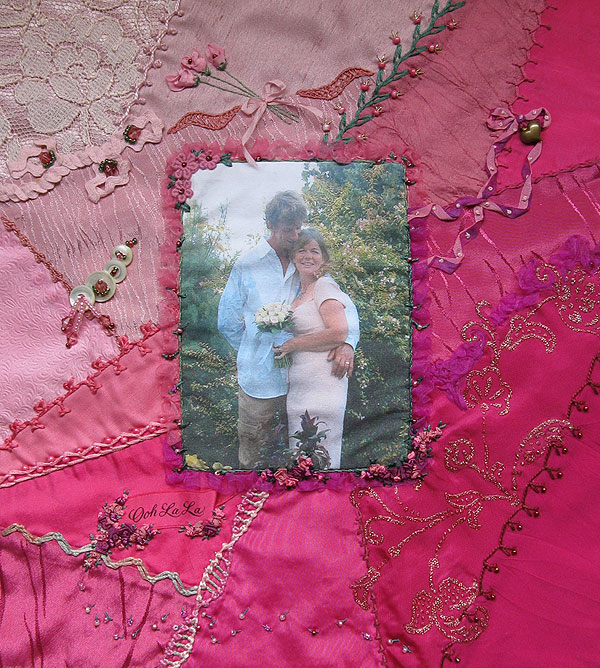
This year I am aiming at cleaning up and putting everything I have used for a project away before pulling out another…I am also looking for the next pattern I want which requires excursions into unsorted boxes from the past…while I am working towards this aim I will take the opportunity to share another heart from the past, this one made in 1997 is 5.5 inches wide and keeps the embroidery very simple so that it forms a nice background for the featured flower trail and silk ribbon butterfly.
|
Last nights post was so long with so many images to manipulate that I lost track and forgot to do the final image of the finished Heart…I remembered that I had not done it this morning, when I was at the post office sending it on its way.
To Finish the embellishments I put a bride and groom charm in the centre and balanced it with the silver butterfly on the upper right and the silver heart charm on the left, I like the single spot of colour provided by the pink stone in the middle of the heart and the bow around the heart charm balances the texture of the flowers…Then the big question when is a piece of crazy quilting finished? Was it finished or not, a part of me was saying Yes the section above the bride & groom charm looked empty but any charm/bead/button that I tried there distracted from the rest of the heart so it probably is finished but that area does look empty, the best of the beads I had tried was some little stars, I tried them again, to big but what if I use silver metalic thread to embroider stars, with a scattering of stars the heart was finished.
|
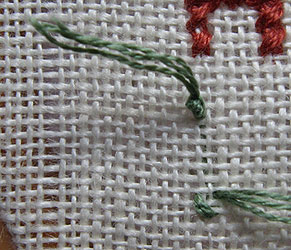
On the last seam I did a Double Feather Stitch with Colonial Knots.
Then before adding embellishments I cut a window template to help place them, which is just as well because I found that the flower trail was cramped on the edge, fortunatly I had enough in the seams to make the heart about 1/4 inch bigger which gives just enough extra space so that it isn’t cramped.
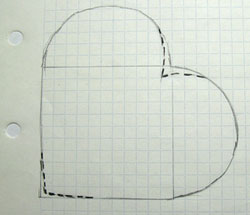
To Draw a basic heart shape Draw a square and then draw a half circle on 2 edges…to make it slightly more shapely, I then deepen the indent at the top just a little and slightly curve the point at the bottom, curving the bottom or just snipping of the very tip of the point will prevent the point poking through the fabric when you cover it.
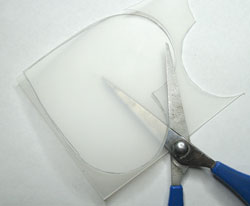
Trace the heart onto template plastic or any stiff plastic.
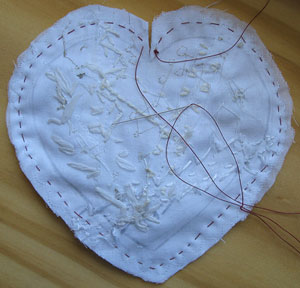
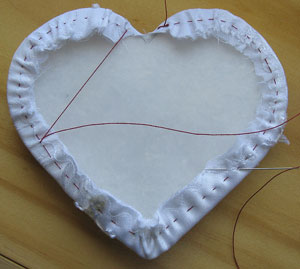
I Draw the finished size of the heart onto the back of the crazy piece and Run a gathering thread around the edge, Use a big knot and start at the top of the heart…clip into the V at the top.
Layer a finished size piece of batting the the platic heart shape in the centre of the crazy piece and pull gathering to back of plastic…
Lash the back from side to side with the thread until the fabric heart is firm over the plastic.
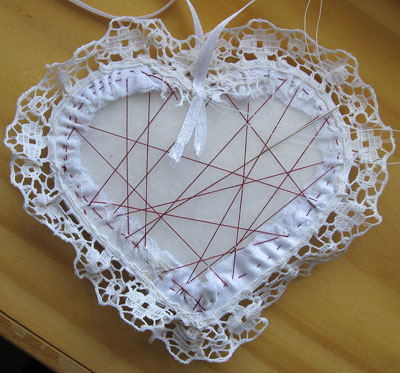
Stitch lace around the edge and add a ribbon (mine is long enough to hang over the arm and hang down.
Cut the plastic template and batting for the back just a tiny bit smaller then the front and cover with fabric…I also cut a smaller piece of batting to put between the front and back to compensate for the thicknes of the gathered fabric around the edges.
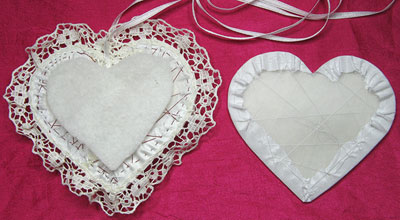
Ladder Stitch the two halves together by alternating stitches through the fold at the edge of the back…
With small stitches through the fold at the edge of the front.

 Make My Day Award Update…I would like to thank the following blogs for also tagging me for the Make My Day Award, Thank you All Make My Day Award Update…I would like to thank the following blogs for also tagging me for the Make My Day Award, Thank you All
Rengin, Elizabeth, Susan, Marty, Julia.
|
I have added a seam of Up and Down Buttonhole Stitch which I flipped from side to side and trimmed with white and silver beads.
A Seam with Ric Rac held on with Herringbone Stitch and trimmed with Pistil Stitch and Colonial Knots.
And a seam with a flower trail composed of lace flowers with bead centers and Silk ribbon leaves.
|
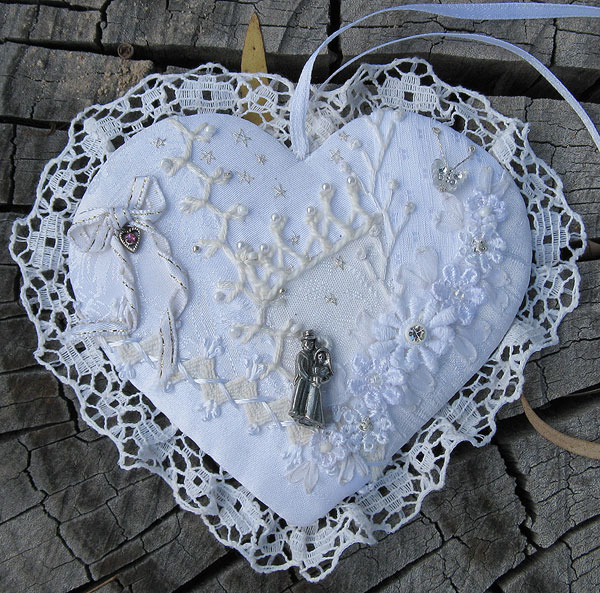
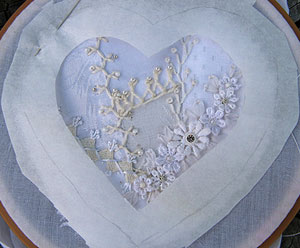
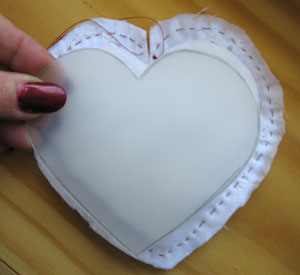
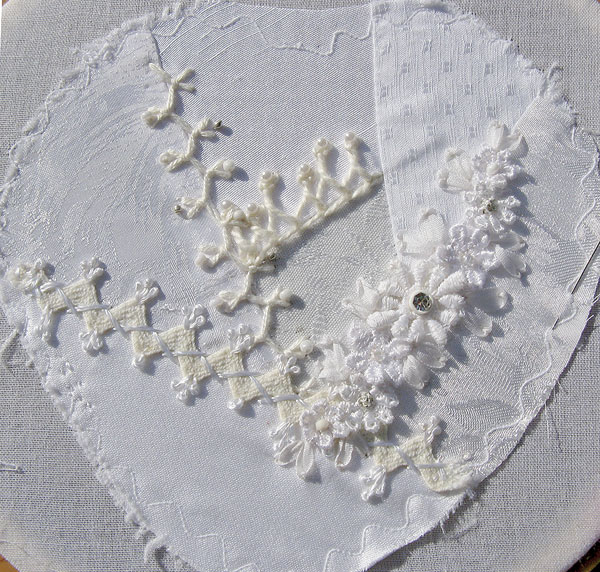
I want to make a little something for a young friend who is getting married at the end of the month and I only have a few days because it has to be sent overseas…I remembered this little white heart that I made as a class sample in 1991 (including the lace edge it is 4 inches across)…
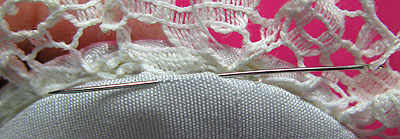
…It will only take a couple of days to make and using the first one as a model I have pieced a new one…the first seam is a crested chain stitch, with alternating stitch lengths and a pearl at the end of each stitch….I don’t normally work in a hoop but because this is a small piece I thought I would try using a hoop, I ams till decideing wether I like the hoop or not.
|
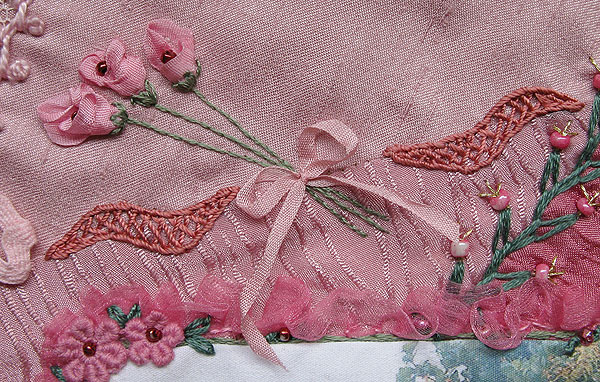
The last time you saw this seam it had 4 of the pink herringbone shapes, I didn’t like it and couldn’t think of what I could add that would make me like it, what to do? I decided to unpick the last 2 shapes I had added but that didn’t help me immediatly because I had marked the top shape on the front of the fabric with a pencil and an eraser didn’t work to remove it…
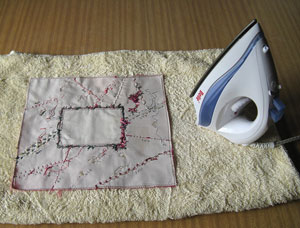 …more thinking time but I was at a complete loss as to what I could do to cover it and had almost decided to restitch it…more procrastination because I didn’t want to restitch it, what to do? Take the plunge and wash the block I always hesitate before washing a block but sometimes it has to be done, I massaged a small amount of dishwashing detergent into the marked area, rinsed the block thoughly, layed it flat to dry and placed it face down on a fluffy towel (the embellishments don’t get squashed because they are cushioned by the towel) and ironed it on the back. …more thinking time but I was at a complete loss as to what I could do to cover it and had almost decided to restitch it…more procrastination because I didn’t want to restitch it, what to do? Take the plunge and wash the block I always hesitate before washing a block but sometimes it has to be done, I massaged a small amount of dishwashing detergent into the marked area, rinsed the block thoughly, layed it flat to dry and placed it face down on a fluffy towel (the embellishments don’t get squashed because they are cushioned by the towel) and ironed it on the back.
This time I covered the center part of the seam with a soft pink bow and used 3 Stem Stitched Stems to lead the eye off center to the 3 pink Silk Ribbon Flowers, To make the flowers I used about 2 inches of 7 mm wide silk ribbon, I folded the ends to the middle, loosly rolled the ribblon and pushed and pulled it into shape as I stitched it on, tiny green detached chain stitches neaten the bottom of the flower and a dark bead gives detail to the top.
Umm despite the problem and delay of having to wash the block I am glad that I unpicked because I am happy now and the finished block is below.
|
|
|

