The last couple of weeks have been unusually buzy with a vaiety of activities happening, one of those activities was getting a new, well second hand but new to me Lap Top Computer, very exciting but has meant installing programes and getting it set up, some of which is know done and with a bit of time to spare now I can catch up what I have been doing on my sampler.
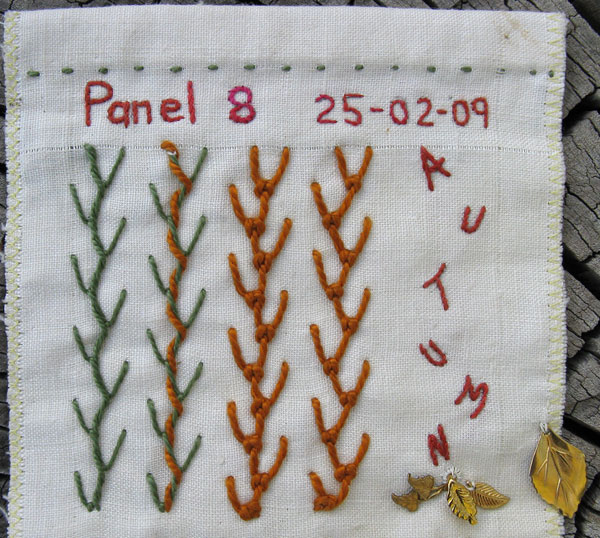
These are a couple of feather stitch variations from The Batsfords Encyclopedia of Embroidery Stitches by Anne Butler…Sharon reviewed this book when she found it.
The first 2 lines are whipped feather stitch, the first one is whipped in the same thread and the second line is whipped with a contrasting thread…
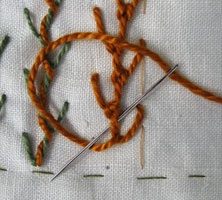
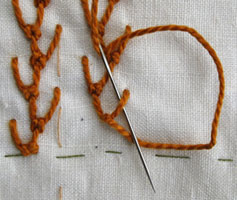
The 3rd line is knotted feather stitch, it has the knot formed on the central side of the thread…in the 4th line I was testing wether there was much of a visual difference if I formed the knot on the outside edge side of the thread, there is more shape to the central spine of the stitch.
The last line is recording Autumn, I was playing around with doing big block letters down the line when a friend visited and suggested having the letters smaller and falling down like Autumn leaves.
|
 This is the 7th panel of my sampler (The first 6 panels can be seen here)…It brings the total length to 27 feet 2 inches…This panel is made up of 3 fabrics, the middle one being the one I printed my memorial to the floods and bushfires and where I joined it onto the bottom fabric I covered the seam by painting about 1/2 inch below the seam and a bit over the seam with brown paint and then used random feather stitches to add a touch of green vegetation for the new growth that will come. This is the 7th panel of my sampler (The first 6 panels can be seen here)…It brings the total length to 27 feet 2 inches…This panel is made up of 3 fabrics, the middle one being the one I printed my memorial to the floods and bushfires and where I joined it onto the bottom fabric I covered the seam by painting about 1/2 inch below the seam and a bit over the seam with brown paint and then used random feather stitches to add a touch of green vegetation for the new growth that will come.
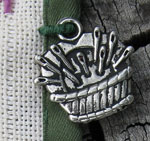
The Tags/bookmarks down the side of this panel are a sewing charm to mark the samplers anniversary, an Australia map charm to mark Australia day and a heart to mark Valentines day.
|
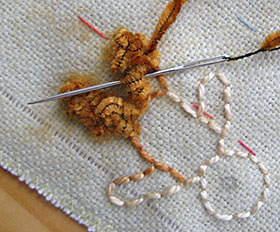
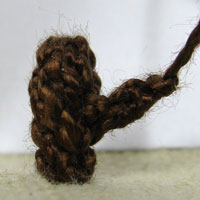
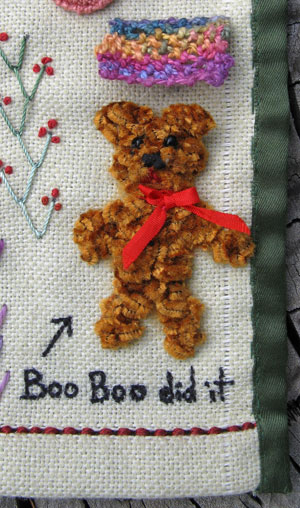 Last week when sewing with Sharon she pulled some brown chenille out of my box and suggested that I could stitch a teddy bear with it…I drew a bear shape and used pearl thread to back stitch around it, I was glad that I thought to do longer back stitches because the chenille needed the extra space…for the legs and arms I trellis stited down one side and then as I stitched the second side I laced the thread through the first side between each stitch, for the body I die a row of trellis down both sides and then laced the 2 sides together down the centre, the head is spiral trellis stitch, the ears, which are not attached to the fabric are a row of 3 sitches and a row of 2 stitches. Last week when sewing with Sharon she pulled some brown chenille out of my box and suggested that I could stitch a teddy bear with it…I drew a bear shape and used pearl thread to back stitch around it, I was glad that I thought to do longer back stitches because the chenille needed the extra space…for the legs and arms I trellis stited down one side and then as I stitched the second side I laced the thread through the first side between each stitch, for the body I die a row of trellis down both sides and then laced the 2 sides together down the centre, the head is spiral trellis stitch, the ears, which are not attached to the fabric are a row of 3 sitches and a row of 2 stitches.
 I named him Boo Boo because he reminded me of my child hood bear who was in turn named after Boo Boo, Yogi Bear’s offsider…And what did Boo Boo do? I blamed my child hood bear for the naughty things that I did and this little Boo Boo left brown fluff on Sharon’s floor. I named him Boo Boo because he reminded me of my child hood bear who was in turn named after Boo Boo, Yogi Bear’s offsider…And what did Boo Boo do? I blamed my child hood bear for the naughty things that I did and this little Boo Boo left brown fluff on Sharon’s floor.
|
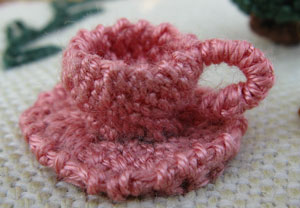
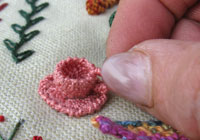 I used a fine silk thread for this little Tea Cup and Saucer and it was somewhat tedious to stitch but I will do tedious if it means I can make cute things. I used a fine silk thread for this little Tea Cup and Saucer and it was somewhat tedious to stitch but I will do tedious if it means I can make cute things.
I started with a flat spiral trellis stitch circle for the centre of the saucer and worked a couple of extra rows around the outside edge, next time I will do a smaller circle to start and more rows around the edge.
For the cup I stitched a circle of back stitch on the saucer stitched a row into them, increased a little on the second and third rows to give the cup shape and continued to add rows until the cup was high enough…For the handle I made some loops of thread the size of the handle and worked trellis stitch over them, it similar to a buttonhole loop but the trellis stitch doesn’t twist like buttonhole stitch does
|
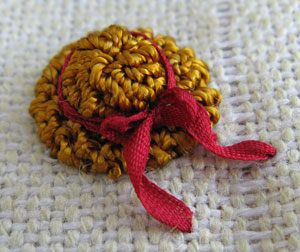 When I was Stitching the tree I kept looking at my wonky pyramid and thinking that if it was round it would look like a hat…ummm a hat couldn’t be to difficult to do, actually it turned out to be very easy. When I was Stitching the tree I kept looking at my wonky pyramid and thinking that if it was round it would look like a hat…ummm a hat couldn’t be to difficult to do, actually it turned out to be very easy.
To stitch a Hat start by following Just String Blogspot’s Trellis Stitch Instructions and stitch 2 rows, decrease from the first row so that the hat brim sits flat on the fabric, stitch 2 rows without decreasing, then decrease to the centre of the hat crown, adjust number of rows in each section to make different sizes and styles of hat…decorate to taste, I used silk ribbon which I stitched on so that it wouldn’t slip of and then formed a bow by making a loop and hold it in place with a stitch and then making a second loop and stitch it in place, I then threaded the ends of the ribbon to the back.
Hats come in many styles and can be decorated in such a multitude of ways I would love to see any hats that others make so if you do make a trellis stitch hat could you drop back and leave a comment with a link to where we can see yours?
|
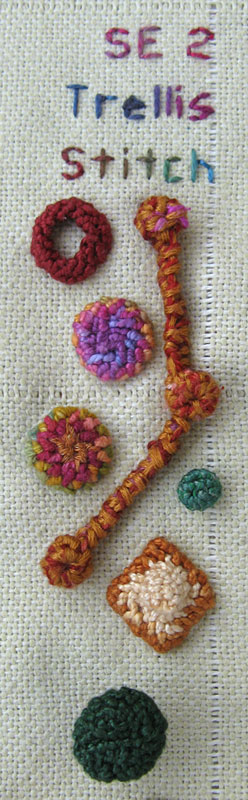
When Sharon showed me her Trellis stitch samples I was excited because I immediately thought of some cute things that I could do with it and I have had more ideas since…but first things first I have to learn how to do Trellis Stitch instructions.
Thank you Just String Blogspot for the clear instructions.
The mechanics of the stitch, wrapping the thread over and under the needle is much the same as a twisted chain so that bit was easy, getting the tension and when/how much to increase/decrease took a little practice although I am finding that it is very forgiving and a missed stitch or an extra stitch doesn’t stand out.
I started with a ring and a couple of circles, the second one changing thread for the middle of the circle…I then moved onto a wall with towers at the corners…The little green spot is a bush not very exciting in itself but I started with just a few stitches and increased a little before decreasing and as I was increasing it was forming a funnel shape and I realized that Trellis stitch wil make great Fungi shapes.
Next I did a pyramid, a wonky pyramid because I decreased to quickly.
while I was stitching the pyramid I was looking at my bush and thought, a little bit bigger with a brown trunk and it would be tree…
To make the tree I started with 4 stitches set in a square and worked spiral trellis stitch till it was about 1/2 inch high and then added a branch to the side.
To make the top of the tree I worked 4 rows of Trellis stitch increasing each row at which point I joined the branch.
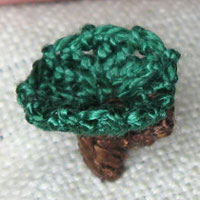
I then worked 1 row without increasing and then decreased to the top of the tree.

|
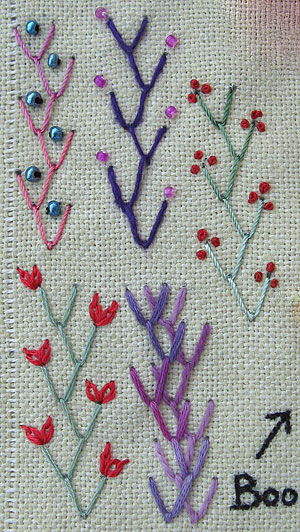
The top 3 lines are simple ideas for using beads or Colonial Knots to trim Feather Stitch.
Detached Chain Stitch also makes a lovely trim for Feather Stitch.
The last line is another idea for overlapping rows this one has the 2 rows side and partially overlapped.
|

This variation of overlapped feather stitchs is one that came out of my TAST feather stitch experiments.
I did the first line in 2 colours so that you can see how the second row of stitching shares the top holes of the first row but has a shallower V.
The shape of this stitch can be varied by changing the depth of the V and the angle on the needle when working the second row.
|
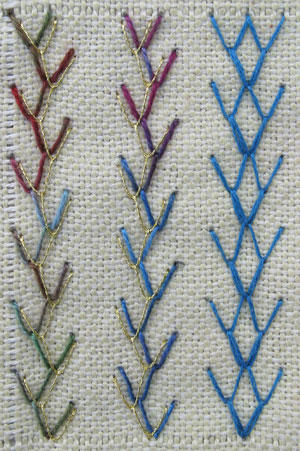
These Feather Stitch Variations are formed with 2 rows stitched in the same direction and overlapped.
The first 2 rows have the main feather stitch shadowed with a metallic thread.
The third line has the 2 rows half overlapped with some of the stitches in the second row superimposed over those on the first row.
|
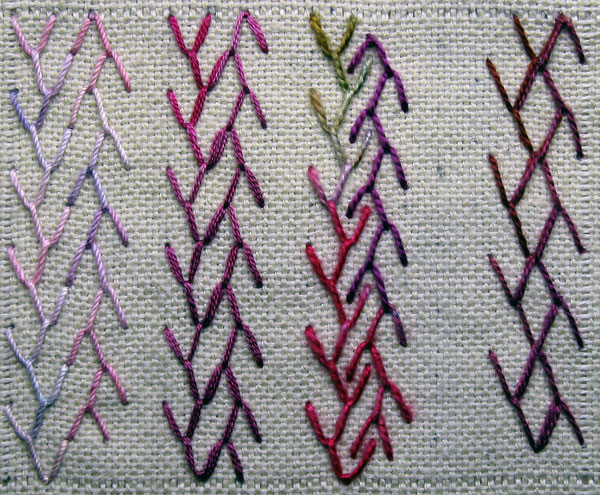
This lot of Feather Stitch are variations formed by stitching 2 rows in opposite directions.
The first line has the 2 row side by side.
The second row has the arms of 2nd row overlapping the arms of the first row.
The third line has the 2nd row staggered.
The last row has the 2nd row of stitching overlapping the first so that 2 sections of the stitch overlap.
|


