Annies Crazy World


  • About

    This is Annie Whitsed's Crazy World a world where I stitch the joys and chaos of life into beautifull crazy quilts. email annie@loopylace.com
Locations of visitors to this page Subscribe with Bloglines
 
TAST Week 35 Shisha Stitch August 31st, 2007

shisha ideas in visual journalShisha stitch and Sharon has illustrated a different method than the one I knew so the first thing to do was to try Sharon’s directions

Sharon B\'s method for shisha

Conclusion I love Sharon’s method for anchoring the shisha to the fabric but prefer the stitch I have always done around the edge.

I then played around with doing a knotted stitch to hold the threads in place, rather than the stitch around the edge, I was looking for a lacey effect…A bit messy, The varigated thread makes it look confusing and I din’t really know what I was doing but I will give it another go because I think that it has potential.

knotted shisha

More Shishas tomorrow when hopefully I can get some better photos than I have been able to take tonight.

How to Make a Christmas Stocking – Detail 392 August 30th, 2007

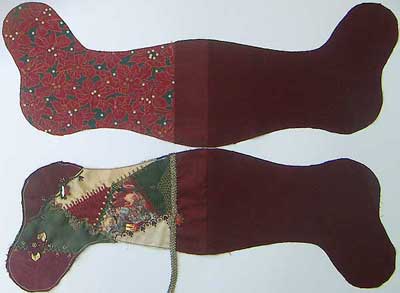
Constructing christmas stocking step 01To Make the Christmas Stocking

Cut out a back the same size as the front and put a matching band on it.

Cut out 2 linings…(Optional….I cut the linings 1/2 inch shorter at the top so that when the lining is pushed into the stocking the outside rolls 1/4 inch to the inside, which creates a neat top as there is no chance of the lining showing.)

Using a 1/4 inch seam, sew the front to the front lining and the back to the back lining as per illustration.

Iron the seams towards the outside ends.

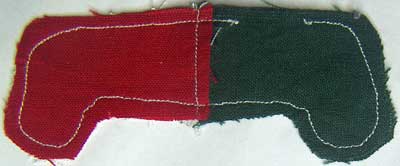
Place front/lining unit right sides together with the back/lining unit, matching the joins…Stitch together using a 1/4 inch seam, leaving a gap in the straight section of the lining.

And this is one I prepared earlier (the miniature sewn with contrasting threads shows the stitching line better than the photo I took of the real one)
Constructing christmas stocking step 02

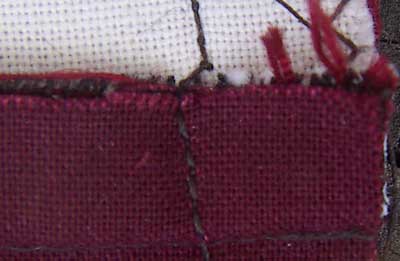
Another Optional refinement…At the fold line of the outside and lining, (which is at the edge of the seam if you have cut lining shorter or on the seam if you have cut the lining the same size as the outsides) increase the seam allowance by about 1/16th of an inch, this makes the lining slightly smaller so that it fits inside better.
Constructing christmas stocking step 03

Clip curves on the outside pieces (it is not necessary to clip the curves of the lining).

Turn stocking right side out through the gap in the lining.

Before slip stitching the Gap Closed I stitched the Braid across the back of the stocking top…I wasn’t going to bead the back section of the braid but it did look a bit bland…and is beaded.
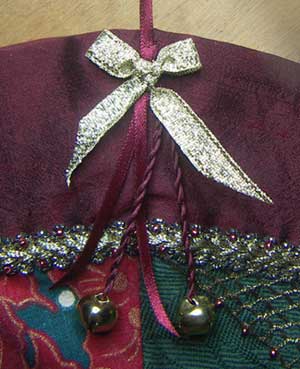
Hanger and trim for christmas stockingFor the Hanger I like to use about a 12 inch length of satin ribbon so that I get a long hanger that is easy to slip over whatever it is to hang from…

The bells are hung with Twisted Ribbon, for which you can use silk or satin ribbon or thick threads.

I Finished the top with a bow tied with a metalic gold ribbon.

A TIP…When stitching the Hanger and Trim on, thread on a bead each time the needle is at the back of the fabric…This turns the potential mess at the back into a sparkling secret.
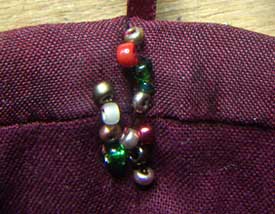
Behind the trim on a christmas stocking

Add your name and the date and your stocking is finished.
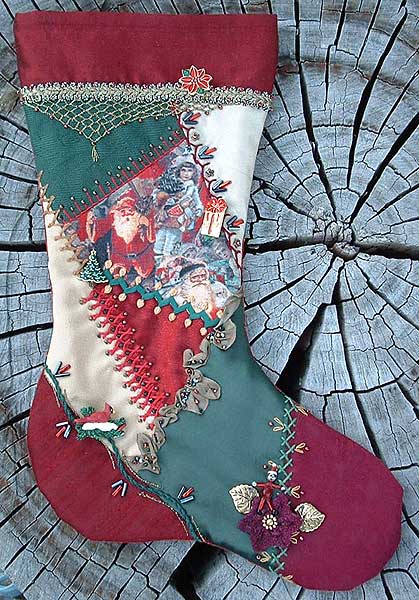
The nearly finished Christmas stocking

Santa’s Elf August 29th, 2007

Poinsettia Button Christmas tree charm Gift Shaped Button

Crazy quilting finishedI have declared the front of this stocking finished after adding a Poinsettia button, a Christmas Tree charm (An earing with the post bent into a shank), a Present shaped Button and an Elf…

I liked Susan’s suggestion of an elf in the net at the top of the stocking…I did look to see what elfs I had, even though I knew I didn’t have any small enough…as it turned out I didn’t have any elves of any size but I did find a red bead doll that looked a bit elfish, to big to put in the net but he could sit on the flower at the bottom but I thought that he did need a hat…and as I thought it I remembered my miniature frying pan handle made from Finger Nail Acrylic…He now has a lovely Santa Hat.

Elf Bead Doll

Luna Eclipse over Canberra, Australia August 28th, 2007

Luna Eclipse Luna Eclipse Luna Eclipse Luna Eclipse

4 inches of Lace – Detail 391 August 27th, 2007

On the bottom of this stocking I needed things that would move the red on the heel and the toe into the next patches…The bird button does it on the heel side but I have been at a loss as to what to do on the toe because my tree idea, which was going to have a trail of buttons leading onto the toe, didn’t work and none of the buttons I have was big enough…

Lace FlowerTonight I went to my friendship quilters group, I took the stocking and my sewing box which had some charms and a few bottles of beads in it, I didn’t think that I had enough to do anything with but I never stitch much at meetings as I usually spend most of the time talking…When I opened the sewing box to see just what I did have in it there was a 4″ piece of dark red lace which I had picked up of the floor and tossed into the box earlier in the day…Ummm it was the right colour, I gathered it into a circle and with the addition of a few beads and a couple of leaves I had a flower which has done just what I wanted it to do…I often amazes me how inspiration works, at home with a vast stash to choose from I was unable to find what I wanted and then away from home with only a 4″ piece of lace and a few beads to work with I found the inspiration for what I wanted to do.

bottom of stocking

Detail 390 August 26th, 2007

Trim on Stocking

The trim looking crooked last night wasn’t my photography but a crooked trim, I corrected it a little but it still has abit of a bump….I beaded across the top and around the edges of my fly stitch shape and added a straight stitch tassel at the bottom…I think that it does still need a charm or button but no inspiration has as come.

The new stocking top August 25th, 2007

new top on stocking

I got the new top on the stocking and have stitched the braid on (the photo looks as if it is stitched on crooked but I think that it is just my camera angle)…I wanted to add some embroidery that would give the bottom of the braid and uneven edge but didn’t want what I did to carry around to the back where I won’t be able to sew the braid on till after I construct the stocking and extra embroidery would be awkward to do, so I have done rows of Fly stitches that don’t go all the way to the edges and tapper of more sharply on the right side than they do on the left side so that I have ended up with an asymetrical shaped net…what I am going to do with it next I don’t know but do know that it will include red beads because now I have used the darker red top the upper area of the stocking now needs some brighter red.

It’s Time August 24th, 2007

basket of mixed fabricIn Theory my fabrics are stored in boxes, sorted by colour…In practice they are crammed into baskets that I tip out on the floor to find what I want because for many years now I have taken fabrics out of the boxes but put non back into them.

Today when I was tipping the fabrics from one of the baskets on to the floor to look for dark red fabric for the top of my stocking, I looked at the pile and decided that it was Time that they were sorted and put away…

They are not put away yet but I have gathered up the baskets and bags of fabric and sorted them into rough colour groups which I will iron and put away one colour at a time…Actually I think it was wanting all the pink fabrics together that motivated me to get them sorted…I want the pink fabrics for an Album cover that I would like to have made by the end of September…

fabrics sorted into colour groups

Reversing August 23rd, 2007

Christmas buttons and charmsMy Christmas charms and Buttons are stord in a shallow box that originally held some fancy christmas cards, I have lined one segment of it with match box trays so that I can see most of the charms at a glance.

An embroidered iron on tree took my fancy but the colours were to bright for this stocking so I painted it with acrilic paints…I like the result and it will look lovely stitched on with metalic thread and beads for decoration..but not on the green background where I was planning to put it…

Painted christmas charm

christmas stocking with original topMy next thought was to choose a trim to go across the top, which I did but when I pinned it in place I decided that I really did need to change the top to be a darker red to balance the colours that I used on the heel and toe of the stocking…

I have done the reverse sewing necessary to remove the top that was there but chooseing a new top and stitching it on is going to have to wait until tomorrow.

Repetition – TAST Week 34 – Detail 389 August 22nd, 2007

Combination stitch

Repetition is a way of unifying a crazy quilt block and I have used a little repetition on this the last seam on the christmas stocking…I didn’t repeat the whole of the seam but just repeating the arrangement of the Bugle beads on Detail 379 has balanced the block nicely…For the rest of the seam I did a wavey line of Portuguese Stem Stitch…I added the gold line of stem stitch because the beads are widely spaced and the seam needed a little extra to finish it.

Tomorrow I will pull out the box of christmas buttons and charms.