Annies Crazy World


  • About

    This is Annie Whitsed's Crazy World a world where I stitch the joys and chaos of life into beautifull crazy quilts. email annie@loopylace.com
June 2006
M T W T F S S
« May   Jul »
 1234
567891011
12131415161718
19202122232425
2627282930  
Locations of visitors to this page Subscribe with Bloglines
 
Day 10 – ShiSha Mirror June 30th, 2006

Day 10 detail - Shi-Sha

Todays detail is a Shi Sha surrounded with a combination of detached chain stitch and fly stitch sealed with a colonial knot…

If you have ever tried to sew on a shi sha and given up in disgust I will encourage you to give it another go…as they are not that difficult once you know the tricks and are worth mastering because they are a lovely embellishment and the technicque can be ever so handy for attaching many interesting items to your crzy quilts.

items that can be attached with shisha

Shi Shas are held in place with straight stitches, the difficulty with sewing shi shas on is holding them in place while you do the first four stitches…to overcome this I suggest that you start with a sequin or coin charm that has a hole in it so that it can be stitched in place and wont fall out while you are trying to figure out where the next stitch goes…OR Learn/practice the stitch sequence on a circle drawn on some scrape fabric, then when you move onto the shisha you will know the stitch and can concentrate on holding it in place with your thumb.

Drawing a circle on the Fabric is what I did for my sample because it solved the problem I was having with the flash on the shi sha.

shi-sha 01shi-sha 02shi-sha 03shi-sha 04

These are the first 4 Straight Stitches that hold the shi sha in place…don’t pull the support stitches tightly as they need some movement so that they can be pulled closer to the edge when you do the edge stitching.

shi-sha 05shi-sha 06shi-sha 07shi-sha 08

Another 4 Straight Stitches complete the support structure for the edgeing.

how to hold shi sha

When you start you will possibly find it easier to go come up and go down as 2 motions, once you understand how the support structure works you will find that you can go down and come up with one motion.

shi-sha 09 blanket stitch

Step 1 of the edgeing stitch is worked by slipping the needle under all the threads from the centre to the edge of the shi sha and looping the thread under the needle as you do for a blanket stitch.

shi-sha 010 holding stitch

Step 2 is a small back stitch beside the shi sha which anchors the step 1 stitch to the background.

Repeat these 2 steps….

shi-sha 11 finishing the edge

The edge stitches can be close together as in the top of my sample or spaced apart as on the bottom of my sample…

POSTSCRIPT posted 31st Oct 2007
Sharon B has illustrated Shisha stitchfor Week 35 of Take a stitch Tuesday…She has shown a different method of anchoring the Shisha to the fabric and of the surrounding stitches…I have tried her method and love the way she anchors the shisha, but I prefer the method I have described above for the surrounding stitches.

Day 9 June 29th, 2006

Day009 detail

Another flower trail…

This one has a Plastic Flower in the centre.

To the right is a scrunch flower that looks a little different than in the day 5 detail because I used a wider ribbon.

To the left is a gathered silk ribbon rose, see below for how to make it.

At the ends are lace flowers cut from larger lace pieces.

Leaves are stitched with detached Chain Stitches done with Silk Ribbon.

Gathered Silk Ribbon Rose

knot and running stitch

Bring the needle to the front of the fabric.

Tie a knot in the ribbon about an inch from the fabric.

Do a running stitch from the knot back towards the fabric.

Put the needle back through the fabric near to were you came up.

the Rose

Pull the ribbon through to form a delightfull little Rose.

Day 8 – Loopy Ribbon June 28th, 2006

Day 008 bead trail and looped ribbon

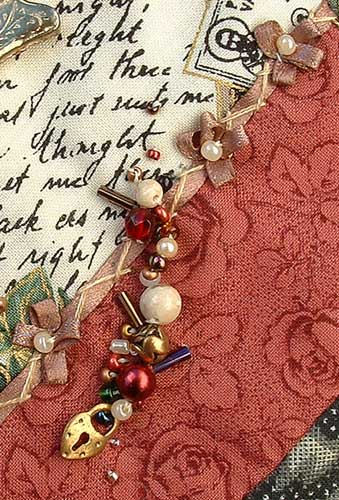
Todays detail is a bead trail that crosses over a looped ribbon seam treatment.

For bead trails make a selection of mixed sized beads and decide where you want your bead trail to be.

Stitch the biggest beads along the centre line with random spaces between them.

Fill the spaces with medium sized beads.

Then nest bugle and seed beads along the edges.

Finish with a scattering of seed beads at each end.

For the Looped Ribbon seam treatment I created the ribbon loops as described below and then worked Herringbone Stitch over the ribbon between the loops.
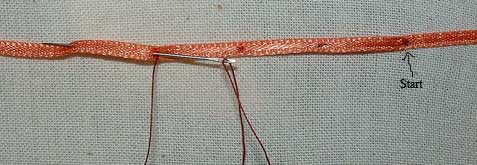
long stitches on the bottom

Make a secure backstitch at the start point which is the point that you want the looped rosette to form.

Put the needle through just the ribbon at the start point and make a long stitch (approx5/8″ 1.5 cm) at the back of the ribbon.

Take a tiny stitches on the top of the ribbon and long stiches on the back until you have 4 stitches on the back of the ribbon, finishing with the thread at the front of the ribbon.

Note: the loops will be half the length of your long stitches and and the number of long stitches is the number of loops that will form.
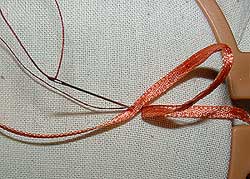
take thread to the back

Stick the point of the needle through the ribbon and back through the background next to the start point and pull excess thread through to the back…
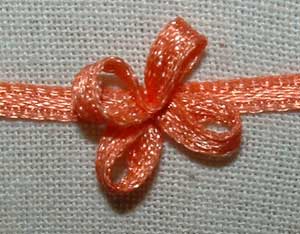
loops form when thread is pulled quickly

When the ribbon begins to gather pull remaining thread through with a quick tug, the quick tug snaps the loops into a more regular formation then a slow tug does.

loops can be rearranged and held in place with tiny stitches and beads can be added to the centre.

This one is for Bob June 27th, 2006

designing bob

This image is for Bob so that he can see that his apron is being worked on, which is what I am doing today.

Posted in Not Crazy || 1 Comment »
Day 7 Detail June 27th, 2006

Day 007 Chain

2 Charms and a Chain…sounds more like a magic spell then an embellishment but an embellishment it is and one that can have great impact for very little effort.

Stitch on 2 charms and connect them with a short length of chain…

Positioning the charms so that one is higher than the other causes the chain to fall at a more random/crazy angle.

When the charms are placed in neighbouring patches the chain breaks the seam it is crossing forming a bridge between the 2 patches which creates movement, leading the eye around your block.

Day 6 Detail June 26th, 2006

Day 6 Button Cluster

Button Clusters can be done with the plainest of buttons which can be made to sparkle with beads…

An odd number of buttons works best and overlap the buttons as you stitch them on so that they do cluster.

Individual beads can be sewn in each hole.

Several beads can be bunched on top of the button by coming up through one hole, threading on several beads and going down through the other hole.

The dangling beads are done by comming up through a hole in the button, thread on desired length of beads, select the end bead and go through it only once before putting the neddle back through the rest of the beads in the dangle and the same hole in the button…leave thread a bit loose when securing thread on the back, if thread is to tight the dangle will stick up instead of dangling

Day 5 Detail June 25th, 2006

When looking for a detail for today I realize that I have always put more detail into the embellishments than what I do into seam treatments because it is the embellishments that I love stitching…So from now on my details will be mainly embellishments…Enjoy

Day 005 detail

The flower in the centre is made with a 3″ length of 3/8″ satin ribbon, stitch the ends together to form a circle run a gathering thread along one edge, gather tightly and stitch onto background with a bead in the centre…The white flowers are what I call scrunch flowers (instructions below)…a cluster of green beads at each end makes leaves for the arrangement.

To make the scrunch flowers you need about 3 1/2″ of Satin Ribbon.

Day 005 A

Overlap ends of ribbon and stitch to background.

Day 005 B

About 1/3rd of the way around the ribbon, run a gathering thread across the ribbon.

Day 005 C

Take a stitch through the background and tighten till ribbon gathers to form the first petal.

Day 005 D

Run a gathering thread across the ribbon half way along the remaining loop.

Day 005 E

Take a stitch through the background and tighten till ribbon gathers to form 2 more petals.

Day 005 F

Manipulate the petals to shape them and use beads for the flower centre.

Day 4 Detail June 24th, 2006

Day 004 Detail

The five lines for the music and the Treble cleft are Backstitch worked with a single strand of stranded cotton embroidery thread….The Musical Notes are Short detached chain stitches with a straight stitch.

Day 3 detail June 23rd, 2006

Day oo3 detail

This seam is Herringbone stitch worked in a silk buttonhole twist thread…a simple seam treatment that is made interesting and individualized by the use of different sized beads.

Day 2 June 22nd, 2006

A commenter asked if the line below my day 1 detail was part of the design?…When I made the vest I had no idea what design was, I had seen one partially embroidered crazy quilt block, I had probably seen a photo of a victorian crazy quilt in a quilting book and I knew how to do the basic embroidery stitches, from there I was winging it and I suspect that when I was making the vest I did the line of chain stitch along the seam and then decided that the seam needed more and added the vine. So the line is a part of the crazy quilt design process of adding to a seam treatment until you like it but not a necessary part of the design as a seam treatment as illustrated by the seam on the other side of the vest where I used the same vine but instead of being beside the seam I wandered it across the seam.

Day 002

Which brings me to my day 2 detail…It is interesting to look back and see that even when I had no idea of what I was doing I was using a mix of techniques and instinctively creating little pictures within the crazy…I created this one by doing short lines of brown Stem Stitch to represent the earth. The stems of the mushrooms are Satin Stitch the tops are done in Long and Short Stitch outlined with Stem Stitch to give them a neat edge. A few tiny green straight stitches become grass around the stem of the mushroom. The cloud is applique whish I stuffed to make it a little puffy, the rain is lines of light blue Stem Stitch with Detached Chain Stitch splashes as the rain runs of the mushrooms and hits the ground….I used DMC stranded embroidery threads for the embroidery and the mushroom charm was on a necklace from my teenage years…Umm I was also instinctively incorporating memorabilia into my crazy work.