| |
About
This is Annie Whitsed's Crazy World a world where I stitch the joys and chaos of life into beautifull crazy quilts. email annie@loopylace.com
April 2024
| M |
T |
W |
T |
F |
S |
S |
| « Nov |
|
|
| 1 | 2 | 3 | 4 | 5 | 6 | 7 |
| 8 | 9 | 10 | 11 | 12 | 13 | 14 |
| 15 | 16 | 17 | 18 | 19 | 20 | 21 |
| 22 | 23 | 24 | 25 | 26 | 27 | 28 |
| 29 | 30 |
|
All That Jazz
Annie\'s Website
Bags-of-Fun
Blogroll
Websites


|
|
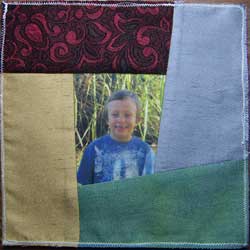 I didn’t think that I was going to get any stitching done today, there is not a lot more to do till I get the last photo so I took the opportunity to spend a few hours in the garden this afternoon…then late this evening I received the last of the photos and as I am up late anyway to watch Le tour de France I have been able to piece it and have also pieced my mum’s block which I have left till last. I didn’t think that I was going to get any stitching done today, there is not a lot more to do till I get the last photo so I took the opportunity to spend a few hours in the garden this afternoon…then late this evening I received the last of the photos and as I am up late anyway to watch Le tour de France I have been able to piece it and have also pieced my mum’s block which I have left till last.
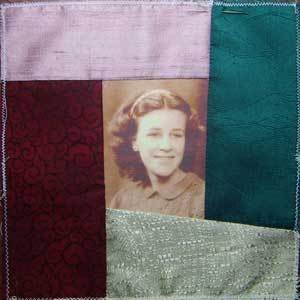
This is the same photo as a friend and I used to make the journal quilt below as a sample for her book A moment in time, available from Creative Living Media...You will notice that mum is facing a different direction in the photos that is because I flipped the image for this quilt so that she looked into the quilt instead of off to the edge.

|
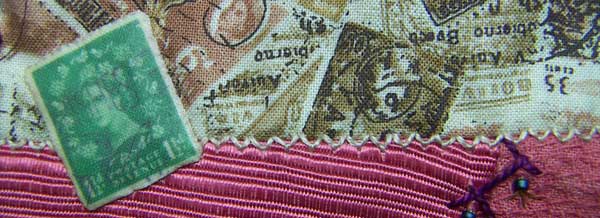
On this seam I did tiny Fly Stitches to mimic the perferations on the edge of stamps…I have also used t shirt transfer to make the extra stamp, I will probably add more stamps to this seam but will wait until I have stitched the seam at the side.
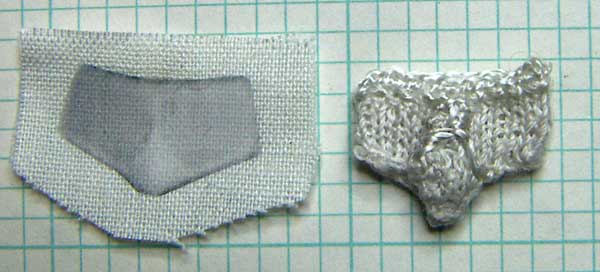
 The plan was to use T Shirt transfer for the Y Fronts on the line but I have been unable to get a clear transfer and then today when I assembled all the garments and took a good look the T shirt transfer looked flat and out of place against all the 3 dimensional garments…so what else could I do but knit them…I used a single strand of stranded embroidery thread for the knitting and a white rayon thread to define the lines at the front and to work 2 rows of buttonhole stitch around the top for the elastic…and I won’t tell you that there is an opening in the Y Front. The plan was to use T Shirt transfer for the Y Fronts on the line but I have been unable to get a clear transfer and then today when I assembled all the garments and took a good look the T shirt transfer looked flat and out of place against all the 3 dimensional garments…so what else could I do but knit them…I used a single strand of stranded embroidery thread for the knitting and a white rayon thread to define the lines at the front and to work 2 rows of buttonhole stitch around the top for the elastic…and I won’t tell you that there is an opening in the Y Front.
|
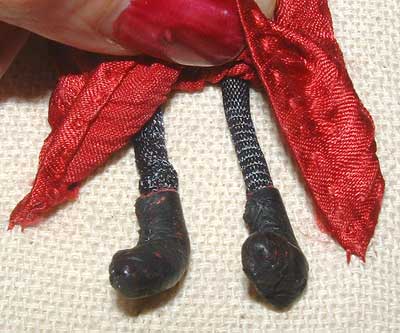
When I showed this sampler to my sister before she looked at anything else she lifted the skirt and said “yep, they’re thin enough”, as if it couldn’t be a self portrait if I had made fat legs lol.
I made the legs with a pipe cleaner, I threaded it into a piece of tubular knitted floss to look like black stockings and I made the boots from scraps of soft Leather.
In this detail you can also see how I have hemmed the skirt and stitched it to the background down the sides…
I got the crinkles in the skirt by wetting the fabric, twisting it tightly and letting it dry before untwisting it…The little black top is Needlelace.
And here is the completed Sampler…I have sized the image to be the exact size of the Sampler.
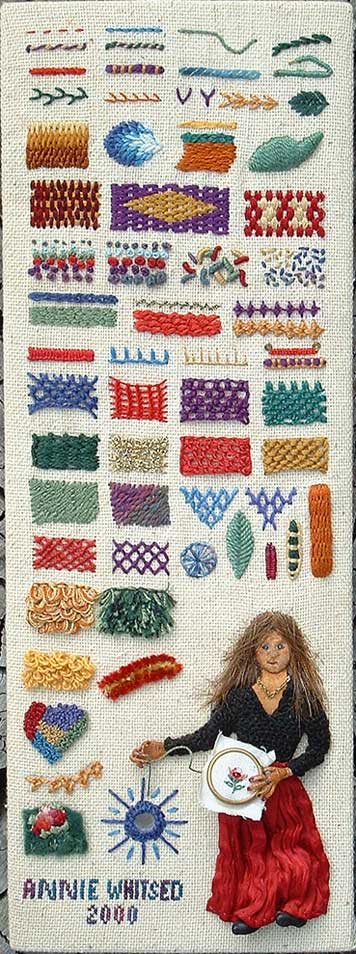
And that is the 100th detail in the 100 days and with it I would like to send up 3 Cheers for Sharon and her wonderful ideas…Hiphip Hooray, Hiphip Hooray, Hiphip Hooray Thank you Sharon.
And thank you to everyone that has been a part of the 100 days…everybodies participation and enthusiasm has been wonderfull.
And stay tuned for detail 101 because from me the details haven’t finished…they may not be every day as the first one hundred have been but I still have a lot of work left to document.
|
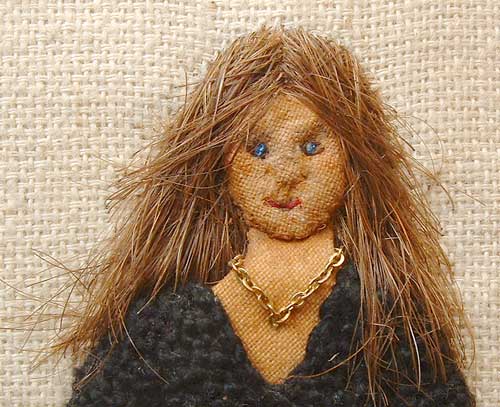
The Stumpwork Face is made like soft sculpture dolls…I made a padded oval shape and then I used tiny stitches, pulled tightly, to shape the face…The eyes are a blue french knot and brown straight stitches, the mouth is red back stitch with paint to add extra shading.
I used strands of my own hair, including a few of the grey ones, to finish the head…I had strands about 20″ long, I used a short quilting needle, doubled the hair and tied the ends…I started each strand on the front near the bottom and edges so that there is some hair ends in the finished piece, I came up very near where I went down…the stitches on the back are tiny so as to waste the least amount of the hair …the stitches on the front are quite long but they sort of criss cross each other holding each other in place and helping to build up the thickness…I finished each strand with a quilters knot with the tails on the front…
|
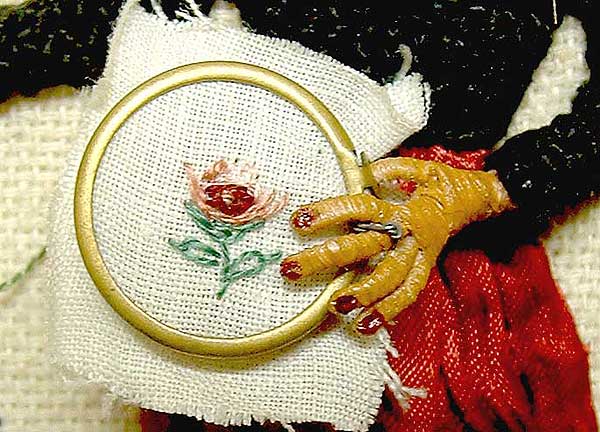
Tonights detail is a Stumpwork hand…I think that because of my combined loves of embroidery, applique, miniatures and whimsey it was inevitable that I would fall in love with stumpwork as soon as I saw it but it was the stumpwork hands that truely captivated me…Magnified as it is in my detail it is not the most glamorous of hands, it is even somewhat clunky but you don’t see that when you see how small it is, to help you the piece of linen in the hoop is 1″ square, what you see is a cute little hand with fingers that can be posed, I think that it is incredibly detailed for such a small size.
See below the image for how to make these stumpwork hands…I painted the hands after making them and used nail polish as the finishing touch…I attached it to the hoop by stick the thumb through the loop of the charm and wiring a finger to the hoop, leaving the wire exposed as a ring on the finger…the needle in last nights hand was the eye end of a size 12 quilting needle.
To make a stumpwork hand, first make 5 fingers…
Make fingers by wrapping flesh coloured thread around a piece of beading wire…I glued the start end to the wire for ease of handling.

Fold the wire in half and carry the thread to the fold end.
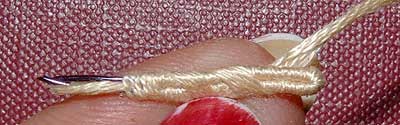
Wrap the thread back towards the cut end of the wire, glue to hold in place.
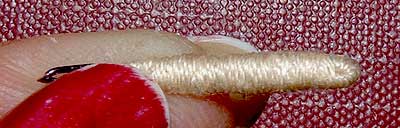
When you have 5 fingers hold 2 side by side and wrap thread around once, add an index finger and wrap thread around twice, then add the little finger and wrap the thread around several times before adding the thumb and continue winding thread towards the wrist…Look at your own hand to get rough proportions of finger length and placement.
|
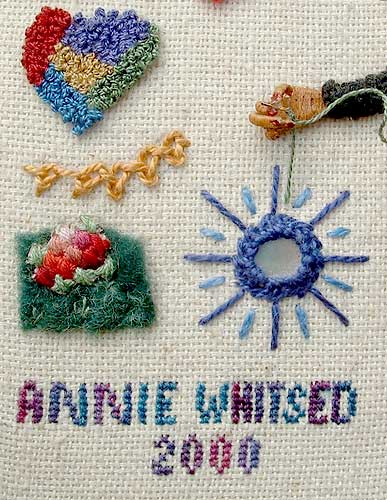
Up until this point on the sampler all the stitches are from Stumpwork Books, tonights detail includes a couple of other techniques that I thought could be included with traditional stumpwork.
The first of them is Punch Needle.
Also up until this point I had written down the names of all the stitches but neglegted to add the last few so I am not sure what stitch the gold thread is but have looked at several stitches that it could be and I think that it is Braid Stitch but worked looser than the instructions in the link.
To the right is a Stumpwork hand…more about stumpwork hands tomorrow night.
Felt provides a nice texture that can have finer detail embroidered onto it.
A Shi Sha would make a nice Sun. From memory I think that this was the first shi sha that I had cut from a CD, I like the idea of combining the very old and the very new…To cut CD’s warm an old CD in hot water and use heavy duty scissors to cut to shape, some CDs cut better than others, so you may have to try a few to get a good cutter and use the part of the blades that are furthest from the point of the scissors.
I used Cross Stitch for my name and the year.
|
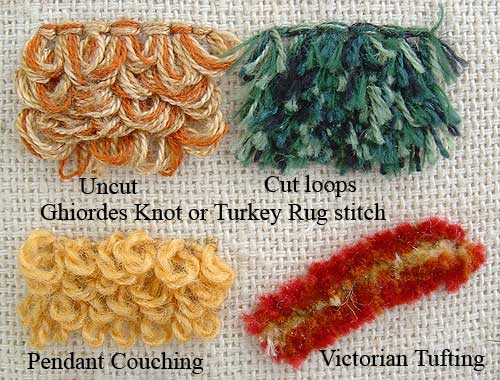
Ghiordes Knot or Turkey Rug stitch
Victorian tufting is done by doing a narrow row of herringbone stitch (gold thread) and then doing another row of herringbone stitch (red thread) over the first row…then cut down the middle of both rows and trim to an even length.
|
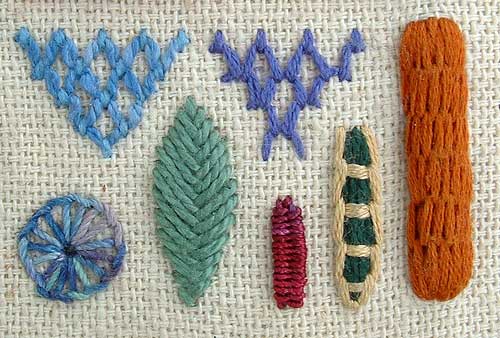
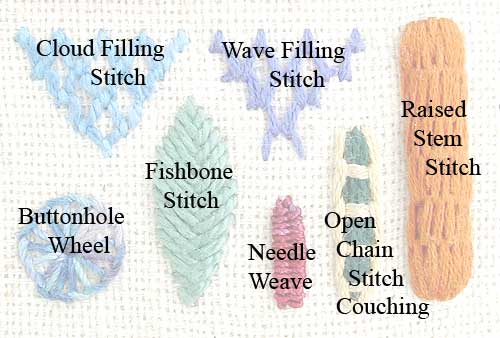
Cloud Filling Stitch, Buttonhole wheel, Fishbone Stitch, Needle Weaving, Open Chain stitch
|
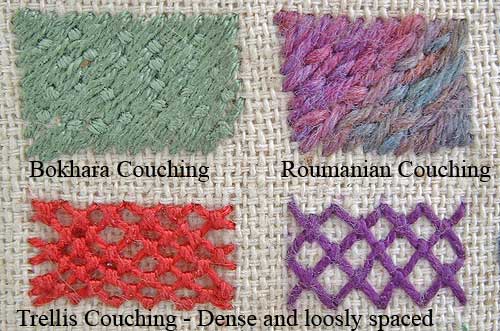
Bokhara Couching, Roumanian Couching, Trellis Couching
|
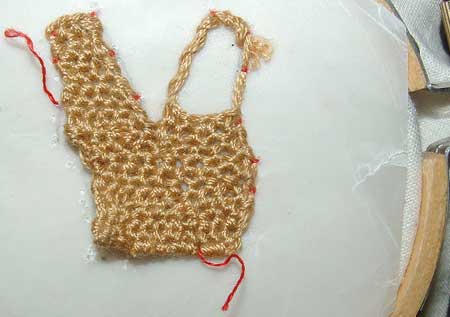
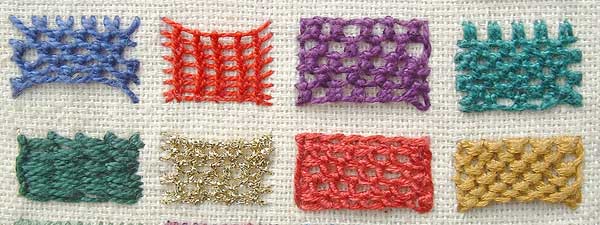
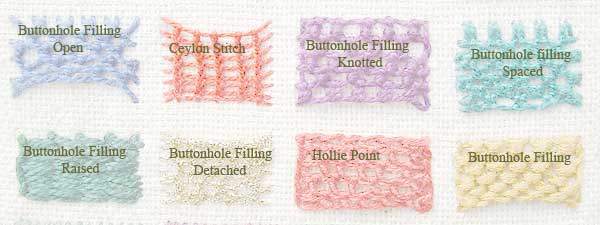
The basics of doing needlelace are to have a base to draw the pattern and work on, in my sample I have calico stretched into a small hoop with the pattern drawn on tracing paper. Thread or wire is couched to the pattern outline, I use a bright contrasting thread for the couching so that it is easy to see when it is removed at the end…The area inside the couched threads is filled with Buttonhole filling stitches which are done done on the surface, in my sample I still have the top right portion to fill…when the area is filled the couching thread is removed leaving you with a free standing piece of lace.
Tonights Detail is some of the many Buttonhole filling patterns used for needlelace.
|
|
|

