The last few days are a bit of a blur, with out warning a virus struck me down, made me ache all over and sapped my energy, sicker than I have been for many a year, today I am still feeling weak but am much improved on the last couple of days and hoping to better tomorrow.
When I sat down to write the above I saw that it was the 19th May which is my blogging anniverary, my 4th as My first post was 19 may 2004.
|
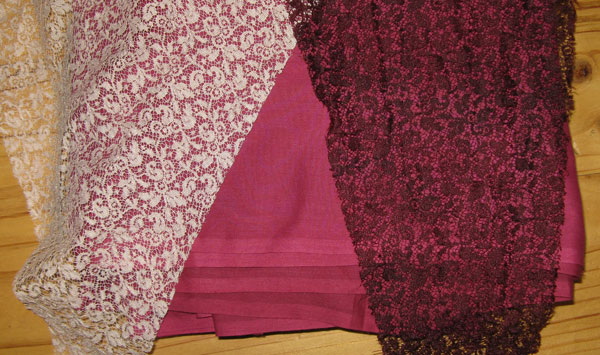
A couple of weeks ago I posted about dying the lining for a lace cape, when I had it rinsed and dry it had washed back to a pink colour which was far lighter than what I wanted, last week I got to the shops to get a different dye and have now redyed the lining…
Now I like the colour, only problem is that I put a piece of the lace in the dye bath just to see what colour it would go and it took the colour so well and looks so lovely against the lining that I am now going to have to dye the lace too.
|
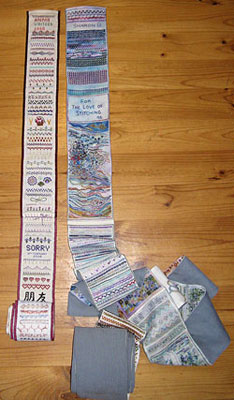
The seam I showed on Friday night was the last seam on the 3rd panel of my band sampler…I have spent the last couple of nights putting the ribbon binding down the sides and joining it to Panel 2.
 As I explained when I joined the first 2 panels I am joining the panels so that they are securely joined in the long band that I want but can be unjoined, seperating them for display and rejoined for secure use and storage. As I explained when I joined the first 2 panels I am joining the panels so that they are securely joined in the long band that I want but can be unjoined, seperating them for display and rejoined for secure use and storage.
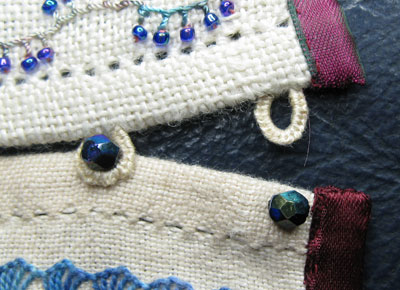
This join falls within the buttonhole section so I wanted to use buttonhole stitch for the join, I laced the first join through a row of buttonhole stitch on the end of each panel and I wanted something different for this join, after some thought I remembered buttonhole loops that can loop around beads which is just what I have used.
On the back for security I have done a row of obvious tacking stitches that can be easily removed and replaced when seperating for display.
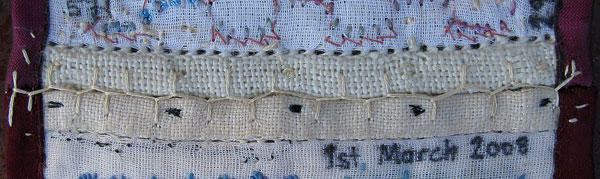
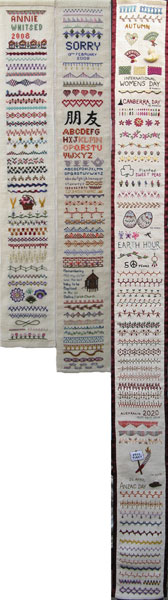 As you can see in the image of the 3 panels, this panel was somewhat longer than the first 2 panels. As you can see in the image of the 3 panels, this panel was somewhat longer than the first 2 panels.
Total Length is now 9 1/2 feet.
|
 When we started building the castle in my garden it was just a castle but whilst building it we have had such fun and decided that we really need to have a castle party, I suggest that it would be nice to have it while my brother will be here in July so that Lily’s cousins to could share the fun, it also gives me a deadline to have the castle finished and I respond well to deadlines. When we started building the castle in my garden it was just a castle but whilst building it we have had such fun and decided that we really need to have a castle party, I suggest that it would be nice to have it while my brother will be here in July so that Lily’s cousins to could share the fun, it also gives me a deadline to have the castle finished and I respond well to deadlines.
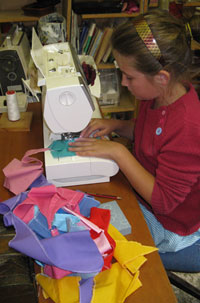
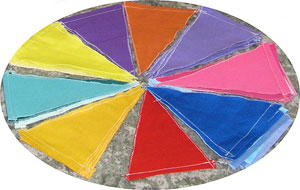
So party planning has begun…I am being guided by Lily as to what we need for a castle party, Pennants to decorate with are on her list and today we made Pennants…Lily went through my quilters cottons and pulled out the bright plain colours, I cut the shapes and then she zig zagged the edges and stitched a hem. After they were all sitched and ironed she arranged them into a colour pie.
|
This week we got another 2 rows of bricks layed which brings us up to window sill hight.
We also got the road base onto the rest of the path to the front door, once the clay paths had a hard almost burnished surface but after years of drought the clay surface has become a fine dust that infiltrates the house, the road base path has dramatically reduced the amount of dust inside.

|

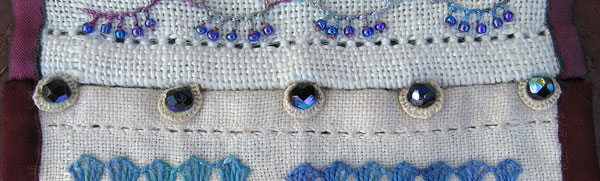
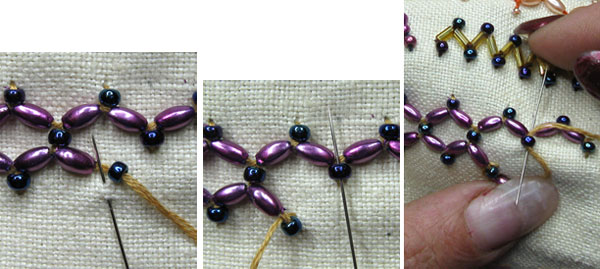
This seam is 2 rows of beaded cretan Cretan Stitch that have their central arms overlapped and sharing the bead.
The first row is worked with the puple rice beads down the centre and the seed beads on all the arms.
When working the second row… For the outside stitches across the bottom put a rice and a seed bead on the needle before working the stitch…For the overlapped/share a bead stitches in the centre put just a rice bead on the needle before putting the needle through the bead from the first row, hold the loop of the thread out of the way with your thumb then work the stitch under the bead.
|
 Have you seen Sharon’s post about A tale of two samplers? Have you seen Sharon’s post about A tale of two samplers?
It was interesting to see our samplers side by side, mine was inspired by Sharon’s and they have things in common such as both are long band samplers, both are recording stitches (many of the same variations, both are recording personal/cultural/ historical events, some threads can be found on both samplers and both samplers have 58 cm (22 3/4 inches) of Herringbone Stitch variations.
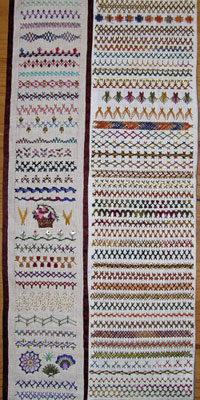 Both our samplers having the same length of Herringbone stitch variations was, as Sharon said spooky, particularly so because within that length our composition of the stitches is very different, Sharon has 39 variations and I have 34 and when you see them side by side our colour choices are quite different too. Both our samplers having the same length of Herringbone stitch variations was, as Sharon said spooky, particularly so because within that length our composition of the stitches is very different, Sharon has 39 variations and I have 34 and when you see them side by side our colour choices are quite different too.
To me seeing the 2 samplers side by side it is the differences that stand out far more than the similarities and I love how each of our samplers has its own unique personality.
A couple of readers have let me know that they are stitching along on there own sampler and I wonder if there are many others that are stitching along too, I would love to see images of other stitch band samplers.
|

I started this seam putting seed beads on the arms and central sections of the Cretan Stitch, for the seed beads I made the arms closer together which fits the seed beads but after I started I just didn’t like it, I tried adding another coloured bead to the pattern which was a little better but I so liked how the rice shaped beads worked the other night I still wasn’t happy with this one so I finished mid seam and used the rest of the seam to experiment with Bugle beads which give more shape to the seam and worked much better.
|
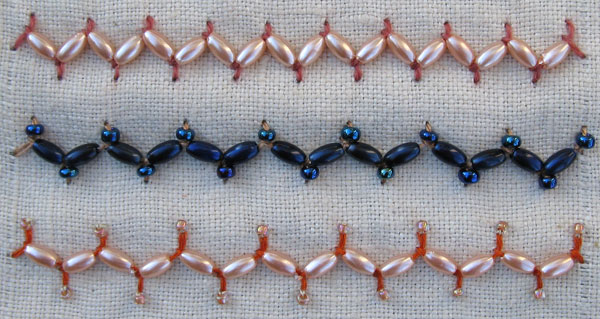
Top Row…Last night I put seed beads on the central sections of the Cretan Stitch, tonight I have replaced them with rice shaped beads.
Middle Row…again I used the rice shape beads in the central sections and added a seed bead to each arm, I think that this one worked really well.
Bottom Row…I thought that the top seam would look nice with additional seed beads added seperatly to the ends of the arms.
|

Last night I put beads onto the arms of the Cretan Stitch, Today I have put beads onto the spaces between the arms.
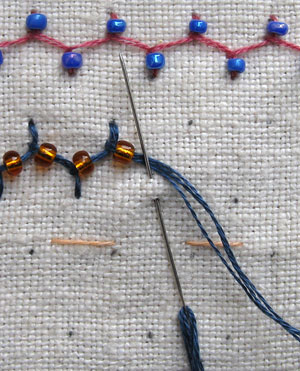 I have also taken an in progress photo to show how I put the bead on the thread while stitching the seam…you do need to use a thread that will fit through the eye of a needle that will fit through the hole of the bead… I have also taken an in progress photo to show how I put the bead on the thread while stitching the seam…you do need to use a thread that will fit through the eye of a needle that will fit through the hole of the bead…
The black spots in the photo are the pencil spots that I use to mark the position of the stitches when the thread count of the fabric is to many to count.
This photo also shows a finer point of how I form the cretan stitch…You can see that my needle is at a slight angle with the point of the needle coming up a thread width behind where it went in for the end of the arm, the reason I do this is because if I make the stitch straight up from the end of the arm then that next thread pull push the arm thread to the right causing the arm to be on a slight angle and look slightly bent but when the stitch is done at a slight angle as illustrated then it will sit beside the now straight arm thread.
|


