| |
About
This is Annie Whitsed's Crazy World a world where I stitch the joys and chaos of life into beautifull crazy quilts. email annie@loopylace.com
April 2024
| M |
T |
W |
T |
F |
S |
S |
| « Nov |
|
|
| 1 | 2 | 3 | 4 | 5 | 6 | 7 |
| 8 | 9 | 10 | 11 | 12 | 13 | 14 |
| 15 | 16 | 17 | 18 | 19 | 20 | 21 |
| 22 | 23 | 24 | 25 | 26 | 27 | 28 |
| 29 | 30 |
|
All That Jazz
Annie\'s Website
Bags-of-Fun
Blogroll
Websites


|
|
Originally Blogged 20 May 2005
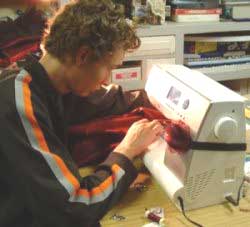
The dress was nearly finished before I left, with a little help I had the skirt in one piece, the godets had stitched in perfectly and on the right is a photo of my son zig-zagging the seams while I cut out the lining for the top which I got stitched in so that all I had to do was stitch the side seams and attach the skirt, problem was that I had lost the measurement for how wide I needed the arm hole and there was nobody else awake at that time to redo them for me.
My flight from Canberra to Newcastle was a bit novel as I flew from Canberra up to Brisbane where I waited 2 hours before flying down to Newcastle, for those of you that are not familiar with Australia that is about 2,000 kilometres of flying to finish about 400 km from where I started.
With assistance to pin the side seams it didn’t take me long to finish the dress…When we got the 2 dresses together they were similar but not the same, The bride had cut her crazy quilted panel wider than I had and my neckline, even after I had made it higher, was still lower than hers.
It was to be a garden wedding but we had to go to plan Z and decorate inside when it turned out to be a rainy day. We draped the curtain lace that was to decorate the arch around the lounge room window in much the same way as it was going to go on the arch and decorated it with bunches of cream and dark red roses we made from wide paper ribbon…initially it was disappointing that it rained, particularly when people in other parts of oz have forgotten what rain is, it is so long since they have seen it, but the decorated window looked lovely and made a nice backdrop for the service and being inside was cosy and somehow seemed to make everyone very friendly so that guests that didn’t know each other when they arrived fell into easy conversation with each other, another thing that contributed to the friendly atmosphere was that it was a self catered wedding with guests bringing a plate instead of a present, there was many willing helpers to put the food out on the tables and to clean it away after the meal and they all said that they had enjoyed being apart of the wedding….(*note for non Australian readers, when we are asked to take ‘a plate’ to a function it is implied that there will be food on the plate…and it was a lovely variety of food that was laid out on the table).
A friend who is a hairdresser did our hair and makeup and we did look beautiful…see new photo in my side bar.
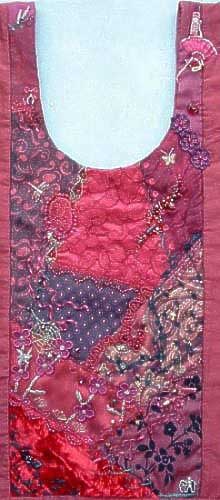
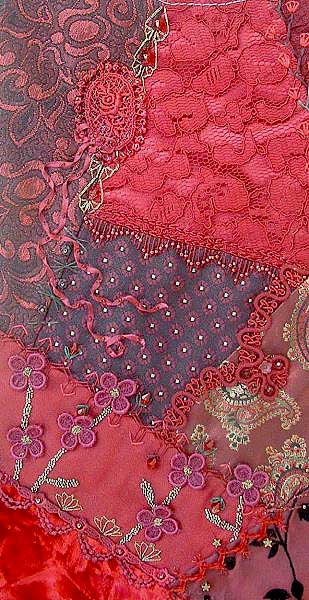
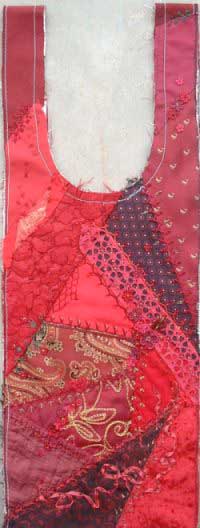
The unfortunate thing about the rain making it an indoor wedding is that the lighting was dim and it was crowded making photos hard to get back far enough to take photos and I don’t think that we got a good full view photo of us wearing the dresses…Ooops, when I get to see all the photos I will choose the best of them to show you and I am going to visit Sharon on the weekend and get her to take a full shot photo in daylight hours…In the meantime here is the finished front Panel and I Have put a large image of it on Flickr. Thank you to all who have sent me comments today it is lovely to know that you have all enjoyed the making of my dress…
Originally Blogged on 23 May 2005 – Loose Ends and A Good Laugh
When I told my sister this tale she cracked up laughing and said that I had to blog it…
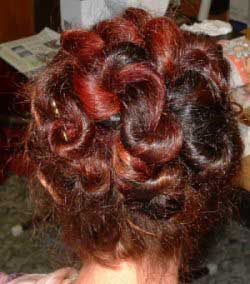
So let me set the scene…Sunday afternoon, the mission was to get a good photo of the Bridesmaid dress and I organized for my sister to do my makeup, my niece to do my hair and for Sharon to take the photos…I had a disorganized morning and wasn’t ready when my sister and niece arrived so they had a cup of tea while I had a shower…when I came down after my shower my sister had her first laugh as I had put on the undergarments and then pulled on purple tracky pants, yellow ankle socks to protect the stockings and red walking shoes and with it a pretty floral top which I had chosen because I didn’t want a garment that I had to pull off over the hair, it was a funny look….I gathered up makeup, hairbrush, hairbands and bobby pins, my sister did my makeup with instructions for touching up the lipstick and then my niece did my hair managing to get a resonable copy of the style that it was done in for the wedding…I like how it shows off all the different colours in my hair.
With hair and makeup done I packed up the dress and shoes and drove over to Sharon’s…in the car on the way over I noticed that I had forgotten to paint the 3 fingernails that I had removed the polish from, must remember to hold my hands behind my back…by the time I got to sharon’s there wasn’t much light time left so I slipped the dress and shoes on straight away and we went outside, 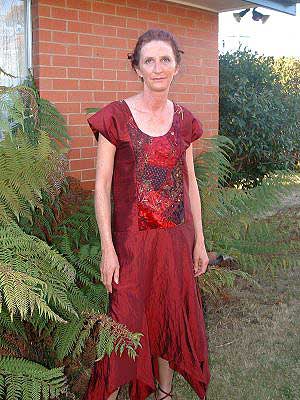 the postion of the sun limited where we could take them but there was a nice spot out the back and Sharon checked the surrounds so that the lights wouldn’t be coming out of my head etc and took about 20 photos….and If I didn’t told you that the nails should have been dark red and that I forgot to put the earings on you probably wouldn’t notice…you probably wouldn’t even notice that I forgot to touch up the lipstick….and the photo probably even looks OK to you….but the postion of the sun limited where we could take them but there was a nice spot out the back and Sharon checked the surrounds so that the lights wouldn’t be coming out of my head etc and took about 20 photos….and If I didn’t told you that the nails should have been dark red and that I forgot to put the earings on you probably wouldn’t notice…you probably wouldn’t even notice that I forgot to touch up the lipstick….and the photo probably even looks OK to you….but
…but I can’t look at it without laughing because when doing my hair my sister had put bobby pins in to hold the curls that were to fall softly down the side of my face…and I, ditze that I am, forgot to take the bobby pins out….Sometimes I do wonder about myself…hope that you have all had a good laugh too…
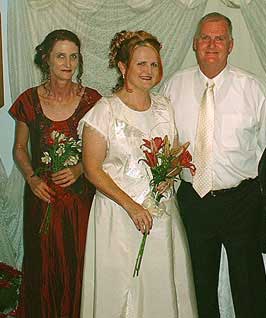
Photo of the bride and groom…Jan and Bob
And the wedding report finsihs the details on My Brides Maids Dress.
|
Originally blogged 02 May 2005 – 2 days and counting down – decision time.
I spent most of today doing anything and everything other than stitch on the dress, late afternoon I started sewing the last of the beads and charms on but it wasn’t till I visited my sister this evening that I figured out why I was delaying cutting the fabric, it was because I wasn’t happy…the skirt of the brides dress is 6 gores with lace godets but when I went shopping for burgundy lace I only found one that would have been ok and it was way to expensive for just ok so I didn’t get it…my other alternative was organza and I love the colour of the organza I have but it didn’t seem right…my sister suggested doing them in the same fabric as the skirt…did I have enough???…Yes, I had bought a little extra because I knew that I could use it in swaps and the fabric is wider than I thought …decision made and I am happy now…next question do I need to line the skirt? I will decide that tomorrow after I have had some sleep…goodnight
Originally Blogged 03 May 2005 – 1 day…that is 24 hours to finish.
Late this afternoon I was hitting the panic buttons…the crazy patchwork is done, everything is cut out but I had not thought about how I was going to hem the godets…naroow lace would be easy but I don’t have any, I did some experiments, binding them with organza tried silk ribbon but neither looked any good…was starting to think that I would have to hand hem them…do I have time???…not then I didn’t, Tuesday nights I play in a 10 pin bowling League with my daughter and she interupted my panic insisting that it was time to go…we did go, I played 3 above average games, had a good night and came home much calmer…and thinking clearer, I thought to try the roled hem foot on the sewing machine, it worked well and all the edges are hemmed….and now I am going to spend of few of my remaining hours sleeping….
Originally 04 May 2005 – Confession Time
it is 6.25am…My Bags are packed and I am leaving in 10 minutes to catch the plane …and it is just as well that I have a couple of days still before the wedding because…… the dress is not finished……
Photos and wedding report next week…Byeeeeeeeeeeeeeeee
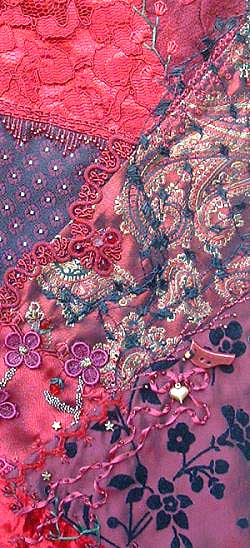
Originally Blogged 19 May 2005 – The Embellishments on my Bridesmaid Dress
The embellishments are my favourite part of crazy quilting and here are the finishing touches that I came up with for My Dress.
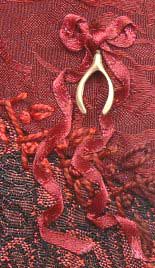
On the top left shoulder I added another ribbon (and I have just noticed that I forgot to do colonial knots over the tacking stitches). This bow together with the 2 lower down on the block created a nice visual flow and movement through the block…It also gave me a place to put my wishbone, I particularly wanted to include the wishbone because for the first wedding that I ever went to (I think that I was about 12), my cousin had collected chicken wish bones for months, gilded them and tied them to the name place cards with a cerise coloured ribbon bow, I have always remembered those gilded wishbones and associated them with weddings …and this charm is an example of how obsessive I can be to get the effect I want, I started with a brass charm but it was to bright a gold colour so I undercoated it, spray painted it with a light gold and then a coat of spray lacquer, a very subtle difference that the photo doesn’t show but it matches my memory better.
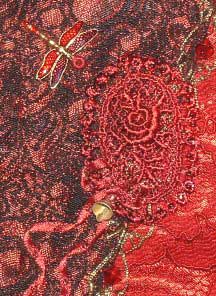
I bought The Dragonfly charm on my overseas travels last year and being the perfect colour he had to go on….The bell that I put under this bow was not the perfect colour, It was a silver earring, the only bell I could find that was small enough but having gilded the wishbone I figured I could gild the bell too.
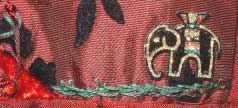
In the Bottom right hand corner I added a small iron on elephant because I collect elephants and the bride has made an elephant quilt.
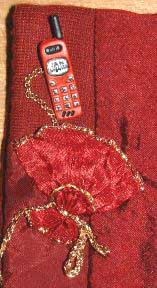
This is the ribbon fan that I made to go on the back of the dress and then didn’t use…It is on the right shoulder and overlaps onto the rest of the dress…behind the fan is concealed a tiny pocket into which is chained a mobile phone…the phone is hidden because phones don’t belong at weddings but the whimsical side of me had to include a phone in this piece because of the many many hours that we have spent on the phone, this dress was designed over the phone but even before we lived in separate towns when we lived less than 5 minutes drive apart it was on the phone that we could most conveniently meet…The Mobile phone was a silver button that I bought at Beadies shop in Amsterdam, my son painted it red to match the dress.
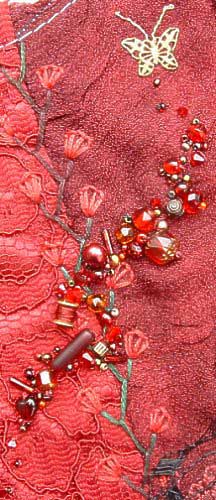 And this is the finished Bead Trail. And this is the finished Bead Trail.
Just for the record Today is my first anniversary as a blogger.
|
Originally Blogged 01 May 2005
That is 3 days to finish the crazy patchwork and Make the Dress……My sister came over today and checked my measurements so that I could draft the pattern for the skirt….Ooops when I had done the rough measurement for how long to make the foundation I located my hips about 4 inches below where it is, means losing the bottom of the crazy, I don’t want to do that…and don’t have to because we looked at the neck line decided that it really was to low and that I could shorten it a bit on the shoulders….After doing the adjustment I realized that I had misunderstood the original phone directions for making the neck line pattern and as it happened the difference that I was wrong by was 4 inches…Lucky for me that these 2 OOOpses that could have caused me problems actually canceled each other out.
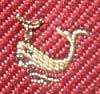
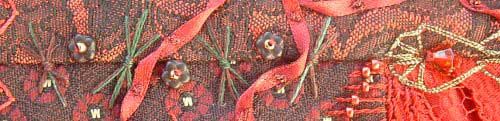
My friends all tease me about the detail that I add to my crazy quilts and then they turn around and encourage me…one dear friend, who is ringing me daily to check progress and hurry me on, did insist that a couple of the whales should have a water spout….Magnified it is an odd shaped spout but cute anyway…
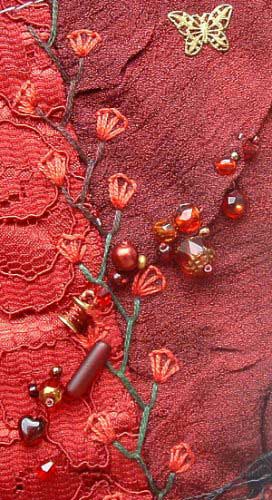
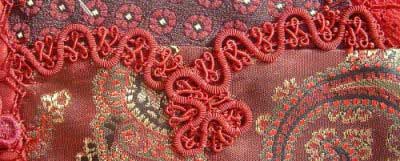
The last of the embellishments is a bead trail…When doing bead trails I start by making a mix of a variety of sizes shape in suitable colours and you can mix in buttons and charms…I tip the beads where I want the trail to be and move them around to find a nice line, when I do this in class the response from the class is always the same “that looks great” they say “but how do you stitch them in that arrangement”, my reply is “I don’t, they look great when I tip them out however they fall, the same beads will look great when you stitch them on” and I tip the beads back into a container… I then start stitching….I stitch the bigger beads along the line, the photo below is the charms and bigger beads for this trial… how close together I stitch them depends on wether I want a light trail or a heavy trail, this one is to be a light trail….Next I will add medium sized beads and then seed beads, I will photograph each stage so that you can see how the trail builds up.
The biggest bead in the middle is a beautiful bead that my son bought for me in England and I wrapped the red thread onto the tiny cotton reel charm, the thread helps it blend in and it looks reel cute with thread on it.
Amazing..the spell checker didn’t find a single miss spelt word tonight…that has never happened before…
|
Originally Blogged on 30 April 2005
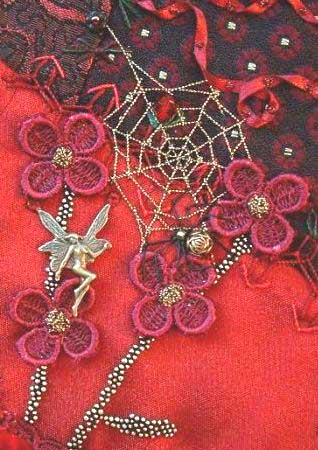
A Spider and his web…Spider webs were a lesson to me that perfection is not always perfect…I can and in the past always have stitched perfectly shaped webs but if you look at a spiders web it is intricate and delicate but not perfectly symmetrical and you can often see where the spider has repaired them….I am just getting the hang of stitching mine a little bit uneven and imperfect and I like them much better so when it comes to crazy spiders webs imperfection is perfect….
In the bottom right corner I have added another small piece of the hat lace with a glass flower and leaf beads.
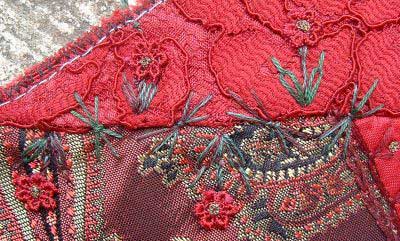
This is one of the short seams on the shoulder, the 3 big flowers are a peice of lace made from 2 different threads that dyed different colours, by itself it didn’t look like much but with a smaller lace flower and a crystal added to each flower it looks great…the flower on the right is still loose and I will stitch it down after the seam is stitched.
|
Originally blogged 28 April 2005
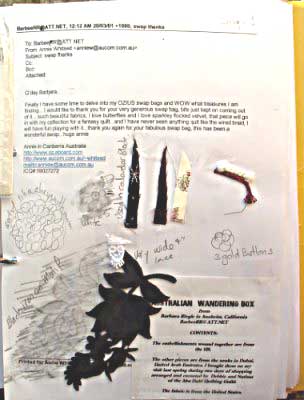
Last night Sharon called me fussy…and I can’t deny it…before seeing her last night I had decided that my dress needed a black lace flower on the right hand side just above the fabric with the black flowers, I found only a few black lace flowers in my stash none of which was the right size and colour but there was one large iron on motif that I could cut a small flower and leaf from and I cut the piece off, thought that I should photograph the motif to show you how I adapted it and I remembered that it had come in an oz/usa swap baggie so I may have had a photo…I looked in my records and found that it was the first swap and I had done a pencil rubbing because it was before I had a digital camera, so I took a photo of the journal page with the motif…..
…after taking the photo I moved the folder, pulled another folder from the shelf to find a date for a note that I had made on the page, put the folder back on the floor to rephotograph it but when I went to put the motif on the page again the top bit was in my hand but the other bit, the bit I wanted, was gone, where I do not know, after searching the area of the room I was in, my son did a search and we have both kept an eye out for it but it is not yet back from warp world, which according to my sister is where lost things go…
Having given up on finding it my first question to Sharon when I saw her was did she have a small black lace flower, she didn’t and when she looked at the dress she didn’t think that I needed it, which most likely means that I don’t but I had it in my head and started thinking of what else to do, could I dye one? No it would be grey rather than black, what about buttons? Or silk ribbon…it was at this point that she called me fussy…well Sharon there is no black flower on the patch and the bird button is perched on the bow…but I still have to plead guilty to being fussy because what I have done instead is to cover most of the patch with a piece of hat netting/lace which has muted the patch and softened its edges which is what I had been trying to do…..It took some stitching on because I had to catch it all over but worth it because I am happy now.
Admin note: More than a year later I found that missing piece of black lace on the kitchen floor with no clue as to where it had been all that time….
|
Originally Blogged 26 April 2005
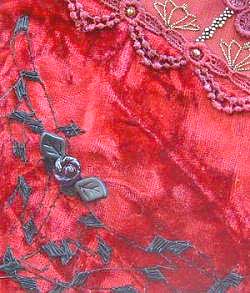
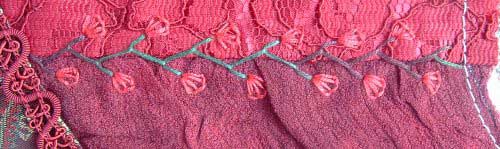
The first part of this seam is wheat stitch which is one of the stitches that I did on the back but this time I put a tiny flower shaped bead between the wheat stitches, I made this seam dark and muted so that it would blend the 2 patches together so the eye would see the 2 as one shape, a stand out seam would have emphasized the square shape of the spotted fabric…The seam on the right is a buttonhole stitch variation done with metallic thread which holds its shape well.

I have also split this seam by using different stitches. the left side is a cretan stitch whipped with chenille thread and trimmed with straight stitches and star beads….the right side is double feather stitch trimmed with seed beads.
This photo shows how I finished the seams that I had started the other night…I really like the big flowers but they do dominate the lower section which means that I have to keep other embellishments to a minimum and the dark spotted patch in the middle was still looking very squarish…beads scattered under the twist in the braid clashed with the big flowers so I simplified it by putting just a few beads in the twist of the braid…I was still having trouble balancing the block and creating flow until I moved the ribbon bow up near the lace motif that I had stitched up the top, the bow works well with the motif, the ribbon tails bring the lighter colour down, break up the spotted fabric and have started to create movement on the patch….and unless I come up with a bright idea whilst I sleep the movement will be continued with another bow across the bottom patches…..
|
Originally blogged 23rd April 2005

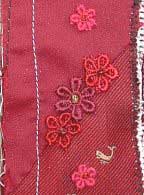
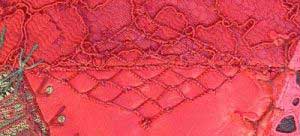
This seam is straight stitches with a bead on each stitch, the beads run along the stitches so it is a fun stitch to play with…I had called this seam finished but keep looking at it thinking that it isn’t integrated into the patch above, I think 2 lines of chain stitch along the lace side of the seam will pull it together…
Feather stitch trimmed with buttonhole stitch flowers.
I stitched this braid straight along the seam and was adding colonial knots along the edge but I didn’t like it, so I took it off and put it back on with a twist in the braid….I don’t normally take stitches out but I am having trouble with this front piece because it doesn’t have many seams and several of the ones it does have are long straight seams and doing things like putting the twist in the braid help to break the long lines up and lead the eye to other parts of the block…..I plan to put beads in amongst the twist and dribble them down the patch below.
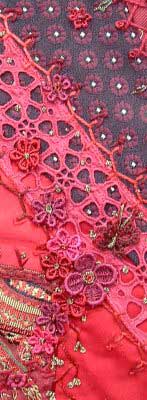
The bottom seam is a lovely piece of lace that has a lovely variegation of colour from one end to the other, I will add beads in the centre of the flowers and think that I will put a little flower above the lace midway between each flower…The top seam is 2 slightly offset rows of Cretan stitch to which I will add a stitch or a bead to the points….And the fabric between the seams, it is an organza and the gold is like tiny beads on the surface, loved it on the bolt, love it as a piece of fabric but as a patch the gold lines stopping suddenly at the seam annoyed me, I put the flowers over the end and I like the way they looked but the gold was to long for stems, more lace flowers lower on the stems solved the visual problem that I was having with the fabric.
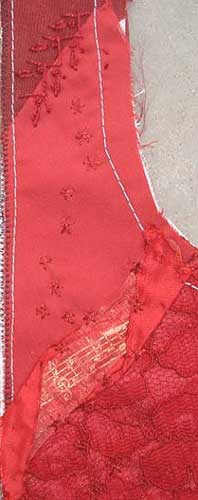
And I have bought the fabric to make the rest of the dress…It is Silk Duponi in a Dark red/Burgundy colour that looks different in different lights.
|
Originally Blogged on Thursday, 14 April 2005
I got all of the seams that I had planned stitched today…
I photographed the Bow before doing the colonial knots on the second tail so that you can see how the knots change the look of the ribbon….
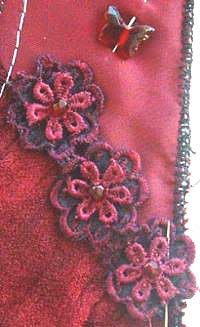
This is the flower trail as planned plus a tatted butterfly.
I initially pulled the ribbon with the musical notes out of my stash because I liked the notes as the bride has a beautiful singing voice and the colour fitted….when I auditioned the ribbon on the seam I decided that the gold notes where to Glitzy and bold for the rest of the piece and I put the ribbon to the side…A mutual friend visited, when she spied the music on the ribbon she picked it up and said that it had to go on for the brides beautiful singing, I told her that is why I had it out but that I had decided not to use it….when I was telling my sister about it she agreed that it was to glitzy but asked if it could be twisted to fit on and started twisting it, we decided that with less of the gold showing and with the dark straight stitch stars it would blend in and that was the plan….but when I pinned it in place and stood back from it the gold was still to bright…I thought about taking it off and finding something else but I liked the line of the ribbon and did want to use then I thought of covering it with organza ribbon and that worked well to mute the gold sos that it blends in…..I like the way the stars connect it to the seam above which is a feather stitch variation with colonial knots and detached chain stitch….
This seam is herringbone stitch with detached chain and colonial knots alternating along the edges.

I have carried the flower trial through by adding just a few flowers to cover this seam.
And I covered this last little seam with Detached Chain Stitches with a long seal off stitch arranged in a zig zag pattern and done in the green/burgundy variegated thread….and with this seam the Back of my dress is finished…and here it is, I have also put a Big picture on flicker.
|
Originally blogged on Wednesday, 13 April 2005
Last night my answer to Mary’s question about how I approach embellishing crazy quilts was that ‘It Just Happens’ …well I thought that it did just happen but talk about Live and Learn…Blogging my dress and explaining what I am thinking as I make it is teaching me more about how I think than I have learnt in 20 years of just stitching…Today my sister, Janice came over, she is not a crazy quilter but has a good design eye and is always happy to brainstorm any problems that I have and today there was several embellishments that I sought her opinion of….After Janice left and with Mary’s question in the back of my mind I realized that It Doesn’t just happen…When doing the embroidery I decide the detail as I go but my decisions are influenced by knowing the overall effect that I want to achieve and stitch, thread type, colour etc are chosen with that in mind…As the piece nears completion, I stand back from it and work out what it needs so that the finished piece will be balanced and work as a whole piece and I actually start to plan the embellishments, which is what I did with Janice this afternoon.

I didn’t get much stitched tonight so I will tell you the ‘plan’ and we will see how much it changes as I stitch it tomorrow….Firstly that dark fabric that I was covering the other night was still to big so I cut some of it off …what to replace it with? The whale fabric maybe but I wandered if I wanted to use it just to be contrary so I looked for something else, I found another plain fabric that would work but I kept looking at the whales, I needed an unbiased opinion which I got from my Son, he to has a good eye and has often helped me by giving another eyes view…I held it far enough away from him that he couldn’t see that it was whales on the fabric, I showed him the lighter coloured fabric first and he said ‘needs something darker’ I showed him the whale fabric and he said perfect colour, so the Whales are back…Janice’s opinion was biased, she likes whales…
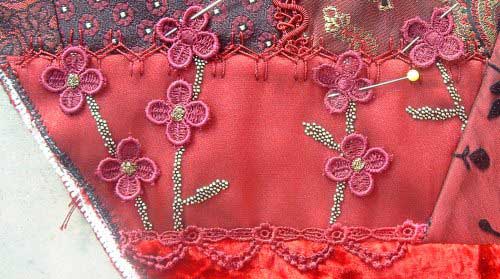
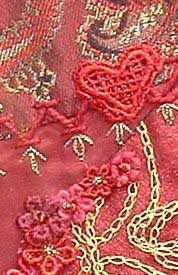
Above the flower trail I have added a dark pink Lace heart because the pinkish lace at the top still needed more balancing.
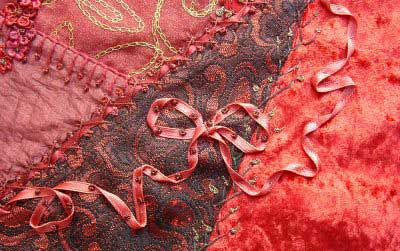
Across the bottom 2 patches I will use a dark pink ribbon, tied in a bow with long tails stitched in place with colonial knots…as well as bringing a little more pink into the lower part of the block, the twisted tails add a feeling of movement and will lead the eye around from the bottom of the flower trail and back up towards the top of the block.
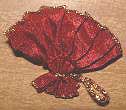
Yesterday I made this fan to cover and soften the square angular piecing just to the right of the centre of the block ….It is lovely and stand out Fancy and after discussing fancy embellishments last night I decided not to use it, it will look great on my Box Top…..When Janice was here we started trying different lace motifs on the spot, I call this auditioning embellishments and it is when the crazy piece will talk to you which is what it did when Janice put a couple of the little flowers there, a little cluster of them looks as good as the fan and work better than the fan because by repeating the flowers I am not adding a new fancy element and I can scatter them up over the lace and onto the dark patch which will break the solid area of the pink lace and add movement.
And I have a plan for the top left seam but you will have to wait until tomorrow for it because I am going to bed now…………..
|
Originally Blogged on Tuesday, 12 April 2005
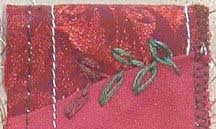
At this point with nearly all the seams done and not many embellishments to go on I am starting to think about balancing the overall look of the piece….one way that I do that is to repeat some elements and as this seam is on the opposite side to the one where I used the green/burgundy variegated thread it was a good place to put another hint of the green….I did Wheat Stitch which I angled across the seam, it looked to sparse so I added Detached Chain Stitches in the gaps but they looked so like leaves I just had to add stems and the lace flowers….Truth is I should have stopped with the wheat stitch because the bride chastised me today for making my stitches ‘to fancy’ lol… but without realizing it I have made them fancier than I intended…I had interpreted simple as using the basic stitches and thought that I was doing well to do the whole back without a bead, button or charm which are the things I think of as fancy but forgot that whilst the basic stitches are simple/easy to stitch, when you combine them they look fancy…with that thought in mind I can see that the wheat stitch was simple, not sparse and that the flowers although simple to stitch on, do make the seam fancy…Ooops, just as well the bride knows me well and I won’t be made to take them off…It is going to be very interesting when we get the 2 dresses together because in the meantime her other friends have coaxed her into adding more beads and lace than she had intended to and I think that on close inspection mine may have fancier stitching than hers but On the day mine will blend into the Garden setting and it will be her dress that sparkles.
This seam was to be this variation of Fly Stitch

To make it a little different I thought that I would make the Fly Stitch wider, while I was doing the first row I thought that it would look nice with multiple rows, which is what I did, tapering them into a point….It was also only going to be on one side of the seam but it didn’t look quite right so I mirrored the pattern onto the lace patch and even though the stitches can barely be seen on the lace the seam does look finished with them there…I put a Colonial Knot on each point to emphasis the diamond that was formed.
Mary-Frances commented …. That is absolutely GORGEOUS! I can’t wait to see it all together.
So, we were chatting at our last crazy quilting meeting about different approaches to embellishment….do you plan it all out ahead or does it just “happen”? We decided that CQ folks seem to do one or the other.
My Reply ….”It Just Happens” …. I have a loose plan of what colours I want and what stitches and embellishments might suit the theme of the piece that I am working on but have no idea of what I am going to do until it happens… When I was doing my Diploma of Visual Arts and Crafts I had problems in my Visual Diary class because I couldn’t explain to my tutor that I could not pre plan a piece of crazy quilting, because of being frustrated with her insistence that I had to plan a piece of crazy before stitching it, I missed learning that Visual Journals can be used for crazy quilting and are a valuable resource for crazy quilters…. Several years Later Sharon explained Visual Journals to me in a way that I could understand…. she said to me that I was “the back of an envelope girl” and with that I understood Visual Journals which I now love, I still scribble things on the backs of envelopes but now some of them get glued into my journal before getting lost…Visual Journals are great for recording and developing ideas, techniques and instructions and for making the loose plans to get started but the actual crazy quilting still just happens and I can’t imagine not being able to change my mind mid stitch as I did with the second stitch I showed you tonight.
|
|
|

