| |
About
This is Annie Whitsed's Crazy World a world where I stitch the joys and chaos of life into beautifull crazy quilts. email annie@loopylace.com
April 2024
| M |
T |
W |
T |
F |
S |
S |
| « Nov |
|
|
| 1 | 2 | 3 | 4 | 5 | 6 | 7 |
| 8 | 9 | 10 | 11 | 12 | 13 | 14 |
| 15 | 16 | 17 | 18 | 19 | 20 | 21 |
| 22 | 23 | 24 | 25 | 26 | 27 | 28 |
| 29 | 30 |
|
All That Jazz
Annie\'s Website
Bags-of-Fun
Blogroll
Websites


|
|

I have got my Box Top restarted, for one of the seams in the centre where I am doing cream on cream I chose a thick rayon thread that stitches up with a lot of texture and then looked back through my sampler to find a stitch that would suit the thread, I chose Detail 592 which is a detached chain stitch variation.
|

Above are the finished Twin Stockings you can see larger images on my website Here and Here and below they hang above the fire place with the rest of the family’s stockings.

|
Click Here For instructions How to make a Christmas Stocking
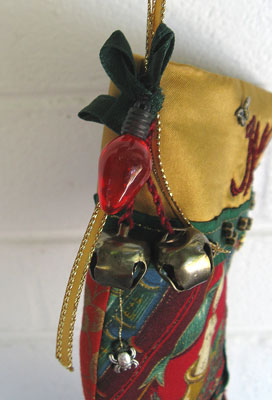 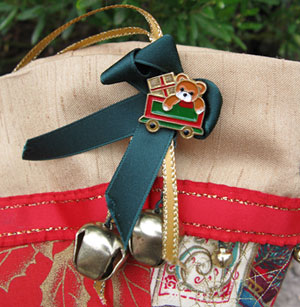
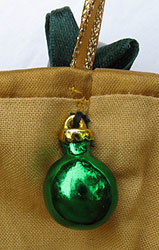
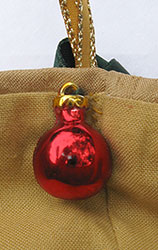
The last thing to done to finish the Christmas stockings is to add a hanger with bells and trim…Click here for instructions how to twist ribbon for the bells…For the twisted ribbon I had some lovely red ribbon for the stocking on the right but it was just to soft to hold any sort of twisting, until this point I had been alternating the red and green trims doing each a different colour but I didn’t have another red ribbon to hand and picked up a some green ribbon, I did ask my son what colour the ribbon should be and he said red because the other one was green but said I you expect to be red and I like to do the unexpected so the question is does a green ribbon suit this stocking, and we decided that it did and I put red back up into the area with a red christmas light (this one is bigger than the little green christmas light in last nights detail)…Both the Christmas lights ended up on the same stocking instead of one on each, a little oops in concentration but then I was doing right for what was visually best for the hanger trim and again having them both on the same stocking is the unexpected which I like.
  On the inside of the stocking I usually use beads to cover the stitches from sewing the hanger and trim on but for these stockings I have used christmas bauble buttons to cover the stitches. On the inside of the stocking I usually use beads to cover the stitches from sewing the hanger and trim on but for these stockings I have used christmas bauble buttons to cover the stitches.
I have just realized that with Finished in the subject I maybe should have images of the finished stockings here but they are going to have to wait till tomorrow.
|
When I am working on a project I have way more ideas and charms than I can ever fit on but as I go I filter them out and now when I am down to the last couple of charms needed to finish this stocking it is a matter of deciding which of the many charms I most want to fit on and then seeing if I can make them fit, some I can find a place for others just won’t go on.
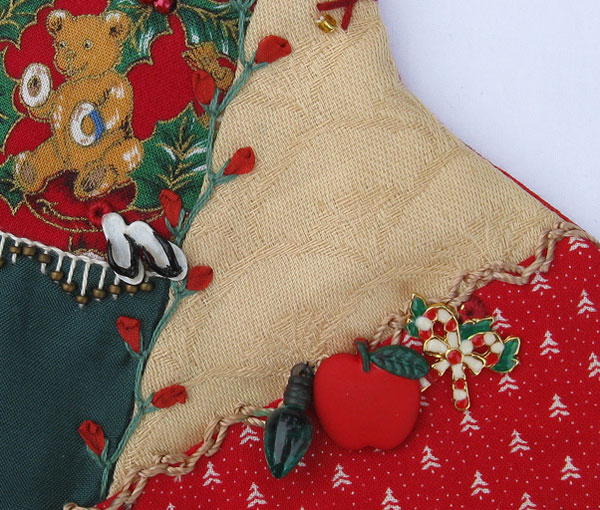
The apple in this detail is the fruit that the cherries on the other stocking match with. The apple is for The Big Apple, New York and I wanted to match it with something that represented the USA, first thought was a flag but that thought didn’t last long, still I have a small stars and strips bead which I had hoped to find a place for but some bits just don’t fit and I couldn’t find a place to put it…Actually I almost gave up on the apple to, I was surprised that the apple was hard to fit as it is red and green and very Christmassy in colour and am often amazed at how something little can make a difference, When I just had the apple and the candy canes where they are they looked as if they were sitting on top of the piece not a part of it, then when I dropped the little green light next to them the grouping worked.
The thongs are a match for the beaded thongs that I did on one of the original stockings, they are a tiny charm and I tucked them in the corner where the teddy bear might have left them before he sat down.
If I have confused anybody with which stocking is which and what is on which stocking, I do apologize but I am not surprised, towards the end of making them I did have to have them both in front of me while I was thinking about them else I was having ideas for a seams and embellishments that didn’t work on the stocking I was thinking of at the time.
|
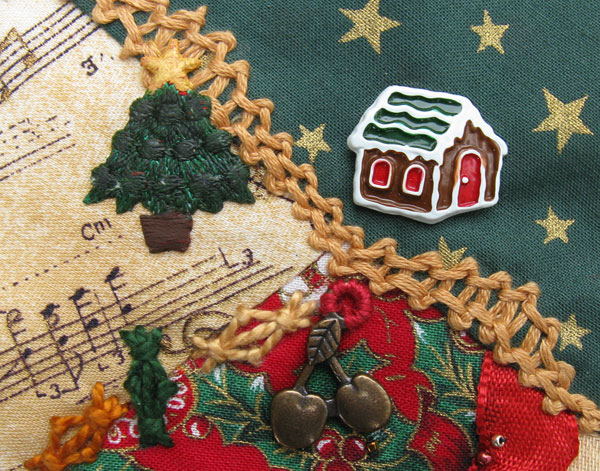
I would normally not put so many charms/motifs so close together as these 3 are but I do like how this lot looks on the block…
The iron on tree motif worked well to cover a glitch in the stitching and the star on the tree links it to the fabric above…I chose the Cherry charm as a pair up with a piece of fruit that will go on the other stocking, cherries are a seasonal Christmas fruit in Australia but not be in the northern hemisphere where these stockings are to live so I wanted to hide the cherries and I liked the way they blended into the holly print on the fabric behind them…The Gingerbread house is there because I still felt that the stocking needed something else so I was going through the Christmas charms/buttons that I had and when I put the gingerbread house in the curve of the stitching it just looked so right that I looked no further, I had found the something that this stocking needed to finish it.
|
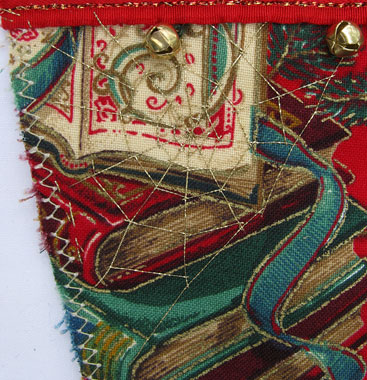
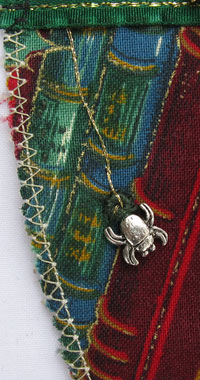
In the Victorian era spiders webs were considered a symbol of good luck and it has become traditional to stitch a spiders web into crazy quilts…I don’t put spider webs onto every piece of crazy work I do sometimes it suitable to a block and I didn’t put a spiders web on any of the first 4 stockings but since then I have learned that there is a Christmas Spider Story and for that story I have stitched a web onto one of the twin stockings and put a spider on the other.
There seems to be several versions of the Christmas spider story This Christmas spider story seems to be the more common version but I did like This version of the Christmas spider story.
Click here for instructions how to stitch a spider web .
|
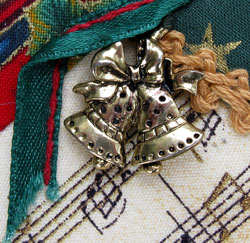 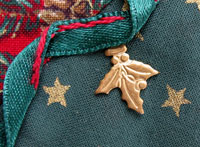
 The Holly leaf is the same as and the bells similar to charms on one of the first stockings. The Holly leaf is the same as and the bells similar to charms on one of the first stockings.
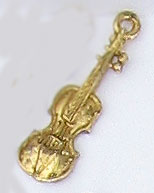
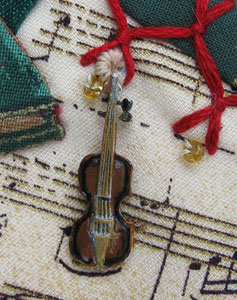
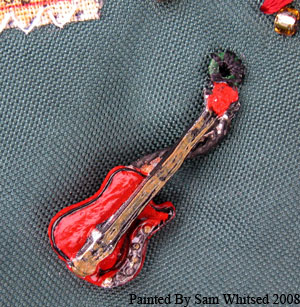
Music is very much apart of Christmas and a theme that has run through All the stockings with the music fabric and different musical instruments….The image on the left is an unpainted Violin charm, the next image is the same Violin charm after my son Sam had painted it…I love how how much more detail can be seen on the charms after they have been painted and the Red Guitar painted up even better than I had hoped it would, it is a real cutey.
|
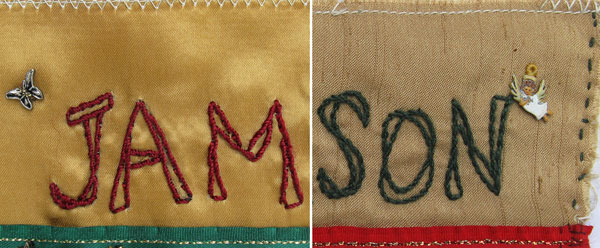
With all the seams done it was time to put the names on the tops of the stockings…Stem Stitch done with a red rayon thread and a green silk thread.
The fabric on the left was not easy to stitch on and rayon thread was not a good choice of thread to use on it but It was the red colour I wanted and like the finished texture of the stitch…and I like what happened to the lettering because of it, my original intention was to fill in the spaces on the letters but when the red rayon on the gold satin was so difficult to stitch with I decided not to fill the spaces and I like how light and airy the letters look.
I finished the tops with a butterfly on one and an angel on the other…The angel is the same charm that I put on the cover of the book but unlike the one on the book that I intended to be hidden this one I wanted to be seen, even though it is a very tiny charm the fine paint work done by my son Sam does make it visible.
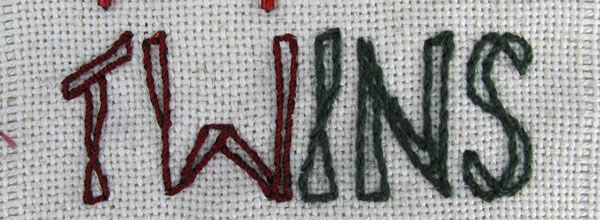
On my sampler I have written twins to represent the type of stitching and the threads that I used, I thought that it would be a nice way to finish of the twin stocking section on my sampler.
|
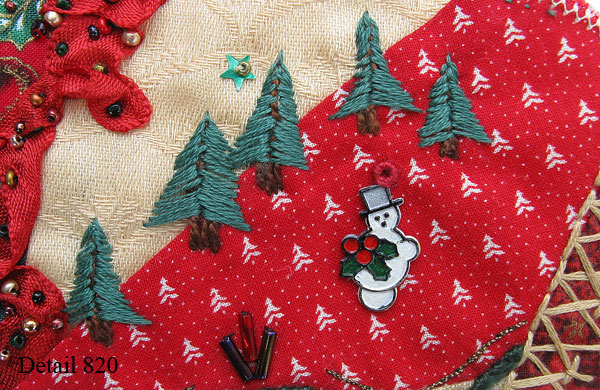
This is the last seam on this stocking and I thank Sharon for the idea, I was pondering what to put along the seam when I went to visit her, to balance the over all stocking I knew that I wanted to emphasis green along the seam, and because of the position of the seam on the block I knew that the area needed a focal point and I had the snowman charm…Sharon looked at it and suggested repeating the trees beside the train track on the other stocking, perfect the trees are the green that I needed and they make a lovely background for the snowman creating the focal point that I wanted.
The green star is also from sharon, when I was visiting a couple of weeks ago there was just 2 green sequin stars in the dish of beads she was sorting, she asked if I wanted them for the stockings and I said yes I will put one on each stocking, (some of you may have noticed them tacked on the toe of one stocking with detail 810), where I put them so I wouldn’t loose them, the other is above the bear in the wagon in last nights post.
|
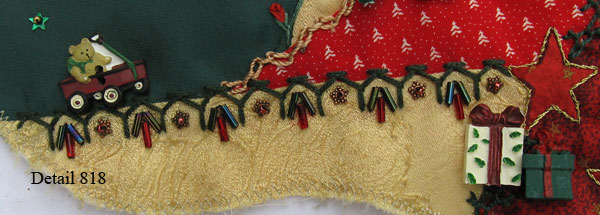
This seam is a combination stitch being Chevron Stitch on the top side and Cretan Stitch on the bottom side…Along the bottom side I put star shaped beads in every second space and in the alternating spaces I used groups of Bugle beads that link to the bugle beads that I used to trim a different stitch on the same seam of the other stocking. I like the way trimming a seam with alternating embellishments gives more shape to the edge of the seam.
This is the last seam on this stocking and I have started adding embellishments, on the left a bear in a wagon button on the right a gift shaped button (a shank button) and a gift shaped charm. In this post I explained that I was choosing charms that would make a find the matches type game, the Gifts are a match up for the gifts I embroidered under the tree on the stocking you can see here.
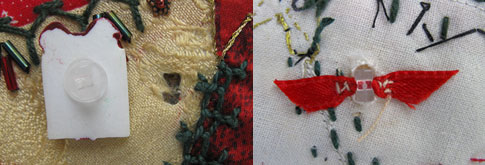 I added that the gift button had a shank because when shank buttons are stitched on the surface of a crazy block they tend to wobble, normally that wobble is is of no concern to me and if I do want the button to sit still a few beads around the shank will stabilize it but sometimes, very occasionally, I do want the button to sit flat on the fabric… I added that the gift button had a shank because when shank buttons are stitched on the surface of a crazy block they tend to wobble, normally that wobble is is of no concern to me and if I do want the button to sit still a few beads around the shank will stabilize it but sometimes, very occasionally, I do want the button to sit flat on the fabric…
This was one of those times, the the gift charm is 3 dimensional and I wanted it to overlap the gift button but the gift button is thick and has a big thick shank and the only way to get any overlap was to disappear the shank into the fabric…To disappear the shank into the fabric I used a skewer to make a hole in the fabric (if the skewer is hard to push through use a big needle to start the hole) and rather then just push the skewer through, gently twist the skewer so that it screws its way through the fabric. Most times the skewer hole is big enough to push the shank through, if it is not quite big enough use a pencil point or something thicker then the skewer to expand the hole, if the hole is still not big enough resort using scissors (only tiny snips are needed), which is really no problem because there is nowhere for the fabric to fray to. When the shank is through to the back of the fabric it needs to be held there, I used to use a short length of beading wire with the ends twisted into loops that I could stitch to the back but when I was doing this button a friend suggested using ribbon through the shank, it works well, it is easy to stitch on either side of the shank and makes for a softer finish.
Below is the combination Chevron and Cretan stitches on my sampler.

|
|
|

