
Last night I put beads onto the arms of the Cretan Stitch, Today I have put beads onto the spaces between the arms.
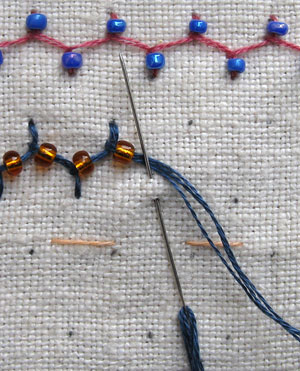 I have also taken an in progress photo to show how I put the bead on the thread while stitching the seam…you do need to use a thread that will fit through the eye of a needle that will fit through the hole of the bead… I have also taken an in progress photo to show how I put the bead on the thread while stitching the seam…you do need to use a thread that will fit through the eye of a needle that will fit through the hole of the bead…
The black spots in the photo are the pencil spots that I use to mark the position of the stitches when the thread count of the fabric is to many to count.
This photo also shows a finer point of how I form the cretan stitch…You can see that my needle is at a slight angle with the point of the needle coming up a thread width behind where it went in for the end of the arm, the reason I do this is because if I make the stitch straight up from the end of the arm then that next thread pull push the arm thread to the right causing the arm to be on a slight angle and look slightly bent but when the stitch is done at a slight angle as illustrated then it will sit beside the now straight arm thread.
Leave a Reply
|


May 7th, 2008 at 12:39 pm
Annie, I came over from Sharon’s blog after reading about your sampler in her post. I’ve been skimming over your entries for the last few months and am enchanted with what you’re doing! I’m going to keep this in mind and perhaps do a version of my own sometime in the future :- )
May 7th, 2008 at 1:39 pm
Sorry I’ve been gone so long. A variety of things going on. I love all the work you’ve been doing on the cretan stitch. You almost make me like it. Your castle is coming along splendidly! What fun to do this with Lily.
June 6th, 2008 at 6:37 am
Annie all of your bead seams are lovely. How well they would lift any dull area.