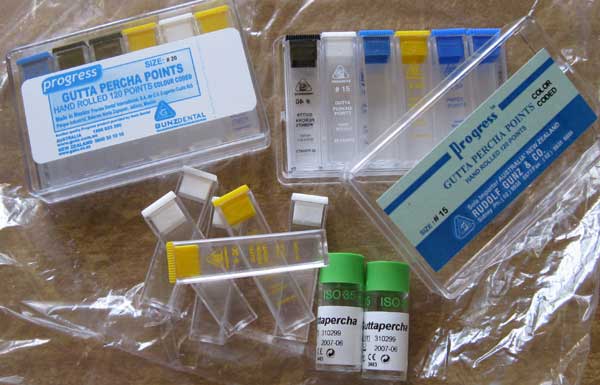
Dentists aren’t commenly connected to crazy quilting but for me they are or at least one is…Visits to the dentist with my daughter used to be Very traumatic for both of us until she started seeing Dr T and his assistant E, 2 very special people, they talked to Jessie about things she was interested in and got her confidence so she didn’t mind going which took the trauma out of going to the dentist…and as they got to know us and what I do they started saveing the little bottles for me and every visit they would give me a few…we haven’t seen them for a while and the today I was in there to see another dentist but we passed Dr Tang in the corridor and he said Hallo, and could I wait a tic because he had something for me, he went back to his surgery and came back with a bag of little bottles, he is still saveing them for me which I think is really lovely…These little bottles from the dentist are my favourite bead bottles.
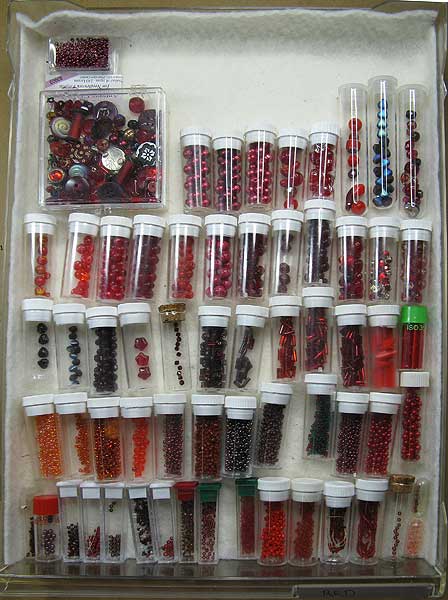
I clouded and/or scratched the plastic of a few bottles trying to remove the labels from the round ones, in the end it turned out easy to remove them the trick is to soak them in soapy water, overnight so that the water can soak in under the plastic coating, then let the labels dry before soaking them again for a few hours after which the label simply peels off.

My Bead Storage is based on small bottles including purpose made bead bottles, my dentist bottles, perfume bottles, medicine bottles and any other odd bottles.
Originally I stored the bottles in chocolate boxes, they are now stored in stationary draws…There is enough flexability in the plastic to pull the draws out of the unit, I use plyers to snap off about half the little plastic bits that are there to stop the draws coming out, leaving just enough to catch so that I know the draw is nearly out but allowing me to keep pulling so that the draw comes out as a tray.
I line each draw with cotton batting so that the bottles don’t rattle about when I am using them.
Holiday Snaps Day 24
|
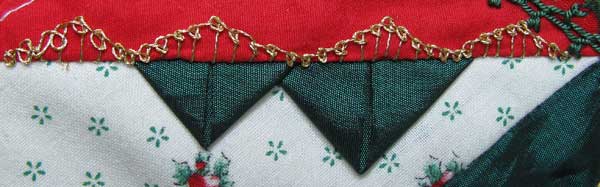
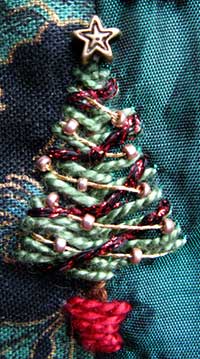 As Sharon suggested, Thorn Stitch, this weeks TAST Stitch, makes good trees and I have used it to make a Christmas tree on a stocking. As Sharon suggested, Thorn Stitch, this weeks TAST Stitch, makes good trees and I have used it to make a Christmas tree on a stocking.
I started with a brown Stem stitch for the trunk and worked the Thorn Stitches close together…The red metalic thread, that didn’t work for Chain Braid Stitch, did make nice tinsel on the tree, I also used gold metalic thread, petit gold beads and a gold star bead for decoration…a Satin Stitch pot completes the tree.
Holiday Snaps Day 23
|
Doing some TAST stitches catch up…The Stitch for week 27 was Chain Braid Stitch.
I Started with a thick metalic thread, almost impossible to pull through the fabric and it snagged on itself forming the twists and I was having trouble forming the stitch and have ended up with individual knots.
For my second attempt I chose a thinner, smoother metalic thread and had no difficulty stitching with it but whereas I had thought that it would hold the stitch shape well it actually slipped pulling the knot down to the bottom, so again I have something different to what I thought I would.
Third time lucky! Using a size 5, cotton perle thread I tried again…I was starting to think that I really didn’t like this stitch but by this stage I had worked out how to do the stitch and with the suitable thread I enjoyed doing the stitch.

Holiday Snaps Day 22
|
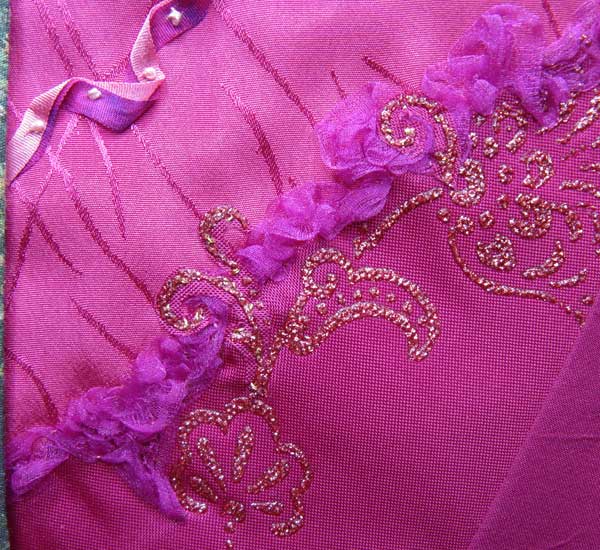
 Again I have changed my mind mid seam…I chose to do a ruched ribbon because I wanted to cover some parts of the gold design on the fabric…Next I was going to add beads as I usually do to the ruched ribbon…But the reason for covering parts of the gold was to show off the shapes of the gold design and beads would have been to close to the gold and be distracting. Again I have changed my mind mid seam…I chose to do a ruched ribbon because I wanted to cover some parts of the gold design on the fabric…Next I was going to add beads as I usually do to the ruched ribbon…But the reason for covering parts of the gold was to show off the shapes of the gold design and beads would have been to close to the gold and be distracting.
I thought about leaving it with no further embellishment but it didn’t look finished, I was a bit flumaxed as to what else I could do until I looked at the other seams that border the gold design…that was it a little repetition would work…I found the fabric and cut out a couple of extra bits of the design, because they are small pieces as well as putting them on with fusible webbing, I used a gold thread to stitch them on.
Holiday Snaps Day 21
|
 After doing Herringbone Stitch and Colonial Knots on this seam, I looked at it and thought a thicker thread would have looked better because, when working in monochromatic colours, it is the texture of the stitch against the surface that I look for…I thickened the thread by overlaying the first row of Herringbone Stitch with a second row worked over the threads of the first row. After doing Herringbone Stitch and Colonial Knots on this seam, I looked at it and thought a thicker thread would have looked better because, when working in monochromatic colours, it is the texture of the stitch against the surface that I look for…I thickened the thread by overlaying the first row of Herringbone Stitch with a second row worked over the threads of the first row.
Holiday Snaps Day 20
|
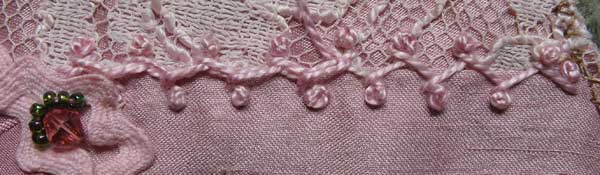
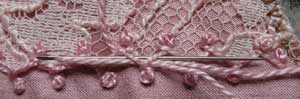
When I started this seam it was going to be the ric-rac held on with herringbone stitch and trimmed with french knots…
With a loop on the right so the I could poke the end of the ric-rac under itself…
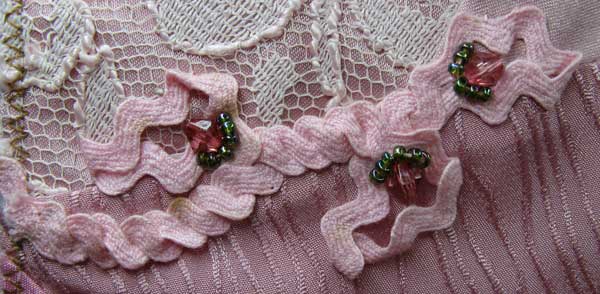
When I made the loop I thought instead of cutting it short I could twist the ric-rac for the length of the seam…When I started twisting the ric rac I thought umm if I can make a loop at the end I could maybe make extra loops along the length…I liked the shape that it formed and kept the trim simple, using each loop as a background to a pink crystal with green seed beads.
A very different seam to what I started to do.
Holiday Snaps Day 19
|
I chose to do TAST week 42 twisted Satin Stitch on a sample block because I was thinking little flowers and couldn’t see them on any one patch of the pink project
Elizabeth’s comment re detail 421 ‘They look like little pink rosebuds scattered everywhere to me’, gave me a Duh moment as I thought they didn’t have to be confined to a patch they could be scattered everywhere or along a path as the rose petals where on the wedding day…I have added a pathway of scattered rose petals across the bottom of the block…by starting them under the Ooh La La detail they also assist in bringing the eye back around into the block

Holiday Snaps Day 15
|

I Don’t particularly like stitches with straight edges so when I saw Sharon’s sample of Pekinese Stitch with 3 rows of backstich I thought OK I will do a solid centre line, with staggered outside rows…It didn’t work quite as I had imagined and I don’t really like the finished seam but having said that it does suit the seam that I did it on.
Holiday Snaps Day 14
|
Doing a little catch up on the missed TAST Stitches. This one is the Twisted Satin Stitch from week 42…My first thought for this stitch was to do it with green thread and bead so that it would look like little flowers scattered across a patch.
Holiday Snaps Day 13
|
When I start an embellishment it doesn’t mean that I know what the finished embellishment will look like, often I have no idea…
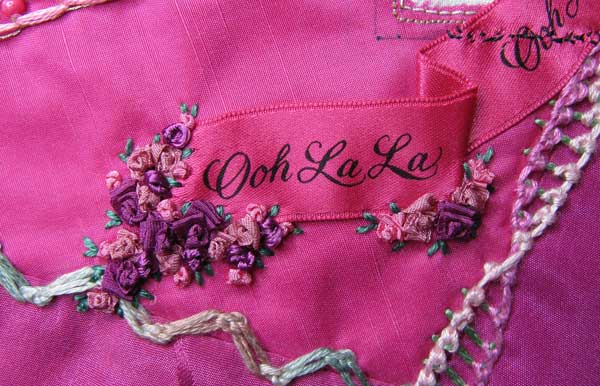
I purhased this ‘Ooh La La’ ribbon (1/2 inch wide) in the Vivian Westwood exhibition shop at the Victoria Albert Museum when I was in London in 2004…It is the right colour, I like the words, It would cover a small glitch in the piecing under the photo and I stitched it in place and that might have been that except that I didn’t like how the end looked…
…Maybe a few Silk Ribbon Roses, and I will need a few on the other corner to balance them…
…Needs some smaller roses, some the same but with only 1/2 inch of ribbon gathered and some Colonial knots in a lighter colour pink…
…That’s better now it just needs some little green straight stitch leaves…
  
…I thought with the leaves I was finished…but when I looked at it in relation to the whole block it looked cramped above the seam…what to do…add more roses so that they crossed the seam putting the seam into the background.
Holiday Snaps Day 12
|


