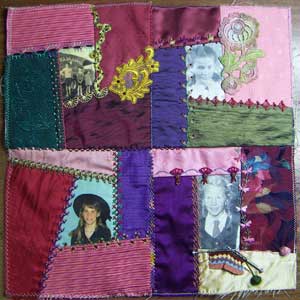
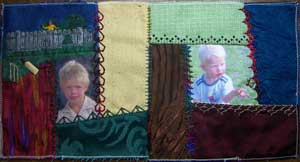
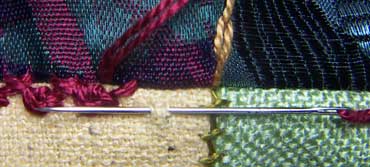
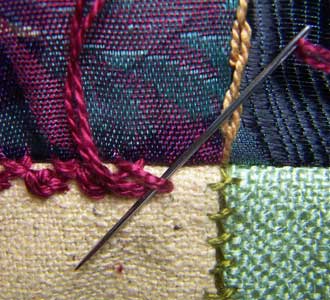
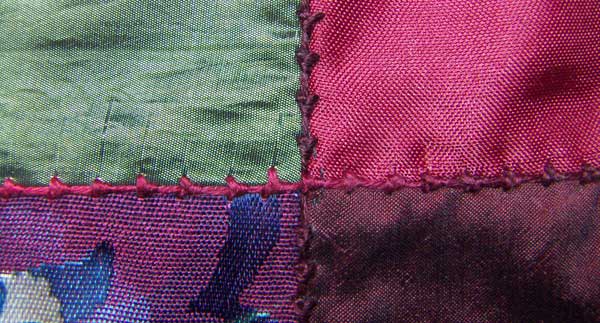
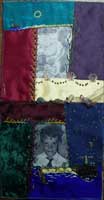
Annies Crazy World


  • About

    This is Annie Whitsed's Crazy World a world where I stitch the joys and chaos of life into beautifull crazy quilts. email annie@loopylace.com
September 2024
M T W T F S S
« Nov    
 1
2345678
9101112131415
16171819202122
23242526272829
30  
Locations of visitors to this page Subscribe with Bloglines
 
Details 311 to 313 June 28th, 2007

Join 19

The Third unit of 6 blocks is done.

The stitches across the new join are…

In the first section I have used Silk Ribbon to do Pistol Stitches set end to end…Pistol Stitches are formed by working a Colonial Knot or French knot but instead of going down close to where you came up go down a stitch length away so that you end up with a knot on the end of a straight stitch….I also added an extra red heart bead.

Pistol Stitch

The stitch in the third segment of the join is Triple Palestrina Stitch

Triple Palestrina Stitch

The seam in the middle section of the join is a combination of Herringbone and Palestrina Stitches Done with the thread doubled to make it thicker.

combination Herringbone and Palestrina Stitch

To work the above variation start with a Herringbone Stitch

Herringbone/Palestrina Stitch Step 1

Work a Reverse Palestrina Stitch over the thread.

Herringbone/Palestrina Stitch Step 2Herringbone/Palestrina Stitch Step 3

Slip the needle under the end of the Stitch.

Herringbone/Palestrina Stitch Step 4

A Tip I have done the above illustrations with the point of the needle for clarity, what I actually do is use the eye of the needle so that it doesn’t catch on the fabric but as you can see it looks messy in the photo.

Herringbone/Palestrina Stitch Tip

Just Perfect – Additions to Detail 266 and Details 308 to 310 June 27th, 2007

Join 18Another pair of blocks joined.

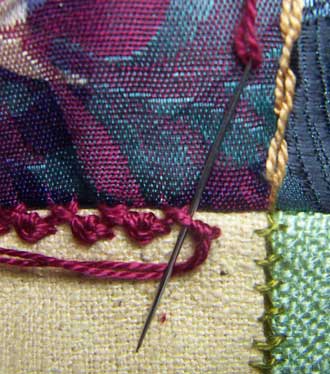
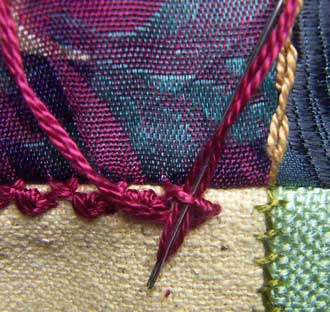
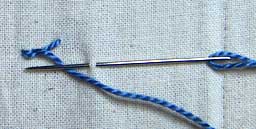
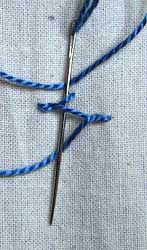
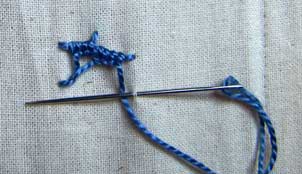
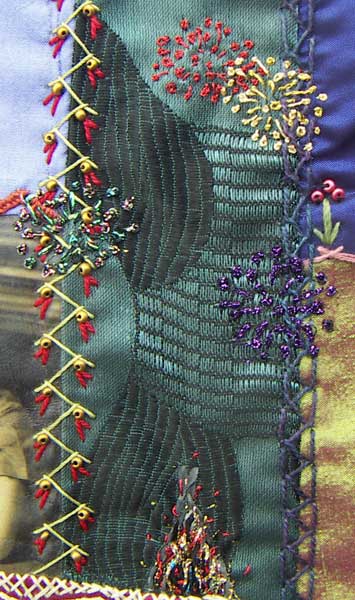
The Stitches down this join are Loop Stitch,
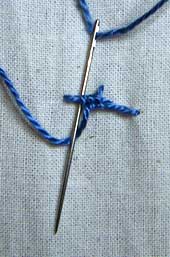
Loop Stitch

Cretan Stitch,

Cretan Stitch

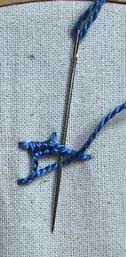
The third stitch is Portugese Stem Stitch done with a tubular nylon floss and misstitched in that I didn’t do the wraps aroung the right part of the stitch…misstitching is an easy way to discover new stitch variations.

Portuguese Stem Stitch

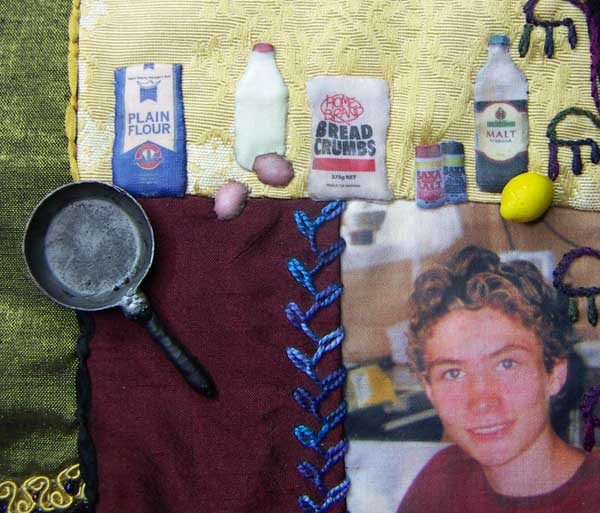
Next…When I did the Fish for Dinner Scene I was asked if I was going to put a frying pan on it, too? my answer at the time was Yes….No…Maybe…When I join the blocks there is room for one on the left hand side…I do Have one in my dolls house…but the one I have is plastic and the handle would be at risk of breaking so there may be technical problems in attaching it.

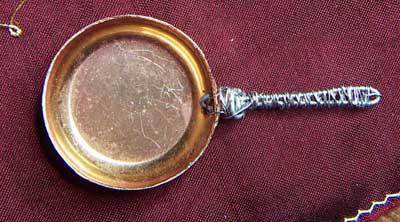
Today when looking through some boxes I found a miniature copper frying pan…pity the handle had been broken off

miniature frying pan with broken handle

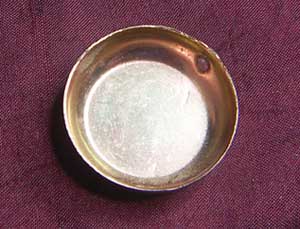
Could I add a handle…wire is the only thing that I could think of that would be strong enough…I drilled a couple of extra holes in the pan and used a stiff wire to form the base of the handle

miniature frying pan mend step one

I then used a fine beading wire build up the structure of the handle.

miniature frying pan mend step two

At this stage I was thinking that I would wrap the handle with thread held in place with PVA White wood Glue but before doing that I did a mental wish list of what would work well if only I had the materials/skillsm some sort of resin to mould the handle is what came to mind and then I remembered that I had just what I needed….I used My Acrylic fingernail resin to mould a handle around the wire.

miniature frying pan mend step three

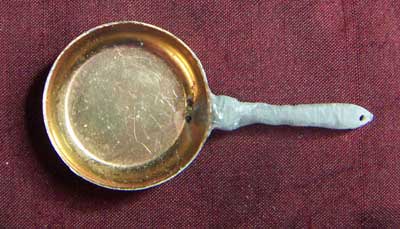
Then it was just a matter of painting the frying pan, The bottom of the pan won’t even be seen once I sew it on but I still felt compelled to paint it.

miniature frying pan painted bottom

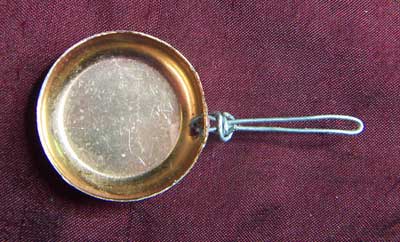
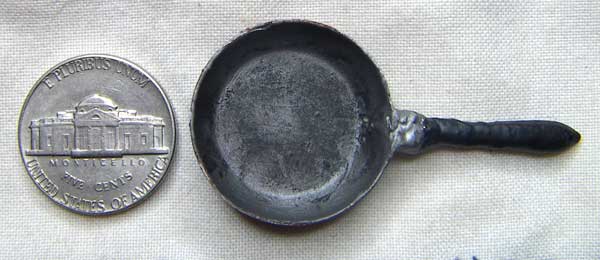
And the top of the Frying Pan, photographed with a coin to show the size.

miniature frying pan painted top

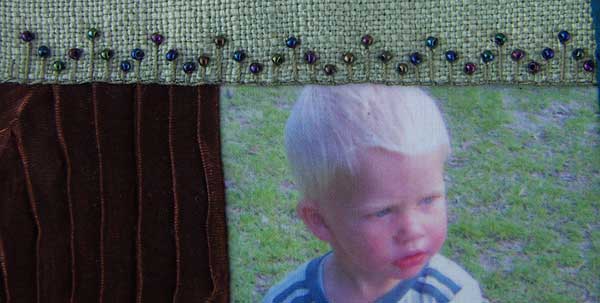
At the bottom of the same Fish for Dinner Post I commented that I would have to go shopping to try and find a lemon button…The next Day Kathy M contacted me and said that she had some lemon beads that she would love to send me…They arrived today together with some adorable kangaroo buttons.

lemon beads

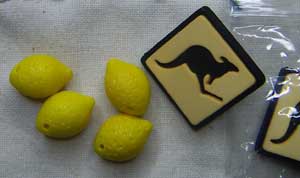
…I hadn’t dared hope that they would actually be exactly what I wanted…I did a happy dance when I opened the package to find that they are just that the exact size perfect little lemons for my scene…

…And the little lemon is even more perfect because most of our lemons came from the neighbours tree and now the lemon for my quilt has come from a cyber Neighbour…Just Perfect.

Detail 266 with additions

TAST Week 26 Half Chevron Stitch – Details 306 and 307 June 26th, 2007

twisted chain in the visual journal
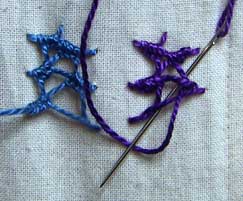
The first stitch that I did today was a seam of detached Twisted Chain Stitch from this page of ideas I did in my visual Journal back in January.

I like to use Metalic thread for twisted chain stitch…My spacing went a bit astray towards the end of the seam but I had finished the seam before I noticed just how off skew the stitching had got and figured that if I didn’t notice it till I had finished then it was probably not worth redoing it so I left it as is.

To finish of the top edge I added a row of Stem Stitch.

twisted Chain Stitch

Note re TAST Week 25 the long and short stitch…I haven’t forgotten it, I do have plans to use it but it will have to wait because it is not one I can fit along a seam which is what I have been concentrating on.

And TAST Week 26 to the rescue…I have been struggling to think of seam treatments for this block that I haven’t already done so I was delighted this morning when I looked to see what this weeks TAST stitch was and found Half Chevron Stitch which was just perfect for the last seam on this block. I introduce a little more colour on the seam I added gold seed beads into the little spaces formed by the stitch.

Half Chevron Stitch

To finish the block I added a small butterfly button just above my nephews hand because it looks to me as if he has just been holding something very delicate.

Block 27 Finished

Just for the record I have just noticed that the perma link for this post indicates that this is my 500th post for this blog.

Italian Insertion stitch – Detail 305 June 25th, 2007

Italian insertion stitch

This stitch is a variation of Italian Insertion Stitch…click here to see Italian Insertion Stitch and a couple of variations.

I have googled Italian Insertion Stitch but found no link to any instructions so tonight I have worked a sample to photograph the steps for working the Stitch.

Start by working 2 cretan stitches, make tiny stitches spaced wide.

Italian insertion stitch step 01

Go back up to the first stitch, on the left and work a buttonhole stitch over the threads.

Italian insertion stitch step 02

work a total of 4 buttonhole stitchs from the centre out to the edge.

Italian insertion stitch step 03

work another cretan stitch below the first one and then Go back to the second cretan stitch, on the right and work 4 buttonhole stitches over the threads from the centre to the edge.

Italian insertion stitch step 04

work the next cretan stitch below and repeat working from side to side.

Italian insertion stitch step 05

For the Variation I have done work as above except the 4 buttonhole stitches are worked from the edge to the centre, the first of the 4 buttonhole stitches is worked over 2 threads…

Italian insertion stitch step 06

…the other 3 buttonhole stitches are worked over 3 threads.

Italian insertion stitch step 07

Further variations can be achieved with different spaceing of the creatan stitches and different numbers of buttonhole stitches. Different threads will also change the appearance of the stitch.

Detail 304 June 24th, 2007

I chose the fabric and embroidery thread colours for this seam so that they would blend in with the photo so that I could add more background to the top of this photo so that it wouldn’t look cramped…after working the varied length Buttonhole Stitches I added a dark bead to the end of each stitch to form a frame for the top of the photo.

buttonhole stitch and beads

Details 301 and 302 June 22nd, 2007

French Knot flowers

For these flowers work a French knot in the flower colour and then use a thinner green thread to work 3 french knots around the flower knots.

I have also joined the right side blocks to make this into another unit of 6 blocks…I had a bit of difficulty with the lower part of the seam with the ball of wool makeing it bulky and the velvet making it slippery…I had to unpick my first effort and unpick the ball of wool and then I tacked the seam before machine stitching the seam.

join 17

I have used double knot stitches in both directions on the new intersection.

double knotted stitch

Detail 300 June 21st, 2007

knotted cretan stitch

knotted cretan stitch

Tonight I went to the canberra crazy quilters monthly meeting, I often resist taking any of the fabric that is always there to share but tonight I grabbed several pieces that might go well in the last few blocks that I have to make for this quilt.

fabric

The Units are getting bigger – Detail 299 June 20th, 2007

A unit of 6 blocks
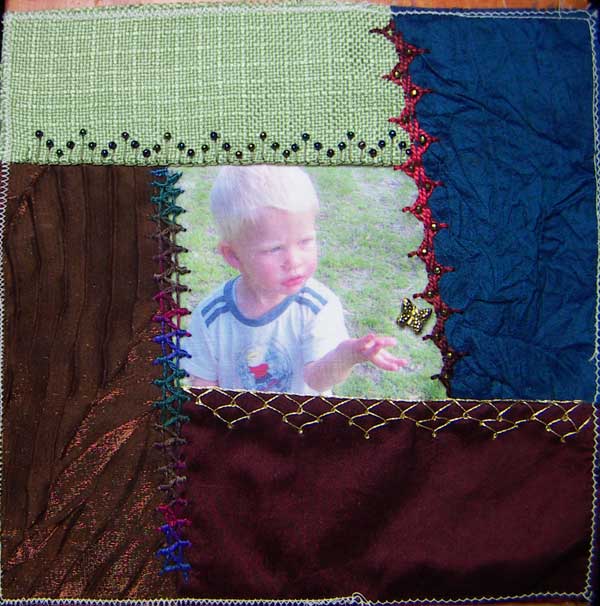
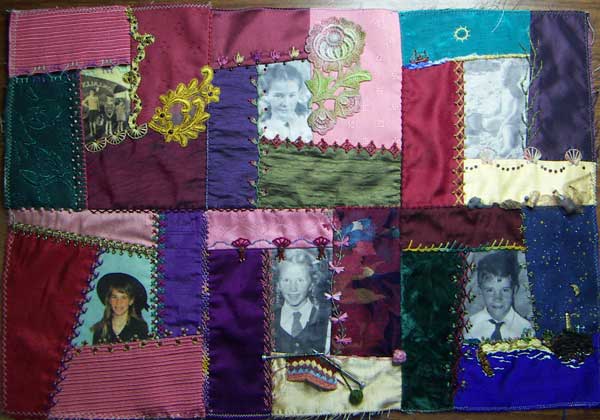
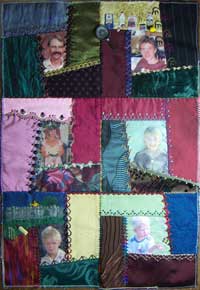
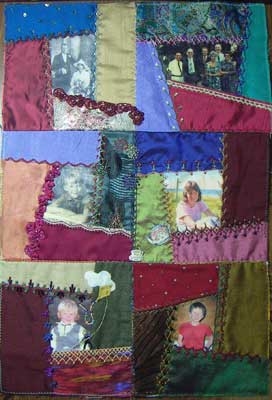
I now have a unit of six blocks…I used a 6″ in wide strip of Freezer Paper to size the blocks, I ironed it on to what was to be the middle row matching one edge to the seam below and stitching along the top edge.

How to measure the block size

I have done Up and down buttonhole in the last section of this new seam.

Up and Down buttonhole stitch

North Creek – detail 298 June 19th, 2007

join 15We lived a block from North Creek and probably spent more time at the creek then the coastal beaches. As well as swimming and fishing we collected oysters off the rocks, sun bathed, built sand castles and chased soldier crabs, as my sister said it was both a place to be when needing time alone and a place of fun.

I also used this seam to put the miniature coke bottle for the memories that my brothers made their pocket money by collecting discarded glass drink bottles and returning them to the shop for the 5 cents refund.

north creek

TAST Week 24 French Knots – Details 295 to 297 June 18th, 2007

Bon Fire and fireworks
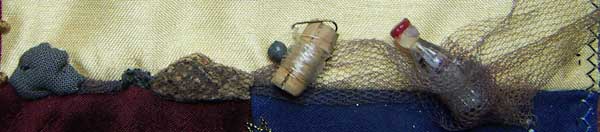
Last week was the Queen’s Birthday long weekend which is cracker night in states that still allow fireworks to be sold but the fireworks sold today are nothing like the crackers of our childhood…Each year my uncle would build a 6 foot high bon fire in the cow paddock next to his house where several familys congregated, each bringing a box of crackers, we would dress in our little great coats and walk around the corner for what was one of the best nights of the year…

French Knots,This weeks TAST stitch combined with tiny straight stitches done in metalic thread make perfect fireworks.

The Bon Fire is straight stitches done with black, grey and red silk ribbon and black, red and gold metalic threads.

I have also used french knots to start the embroidery on the seam across the middle of the 4th unit of 4 blocks.

join 14

For the first part of this seam a couched green silk ribbon with pink silk ribbon French Knots.

green silk ribbon couched with pink french knots

the next part of the seam is a narrow herringbone stitch done on one side of the seam, on the other side of the seam I did french knots on the herringbone, this is very subtle in that the french knots are barely visisble but the addition of the french knots anchored the herringbone to the other side of the seam.

herringbone and french knots