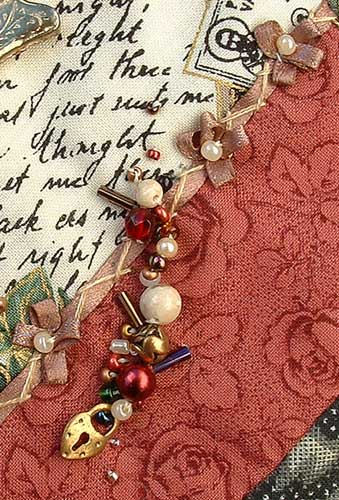
Todays detail is a bead trail that crosses over a looped ribbon seam treatment.
For bead trails make a selection of mixed sized beads and decide where you want your bead trail to be.
Stitch the biggest beads along the centre line with random spaces between them.
Fill the spaces with medium sized beads.
Then nest bugle and seed beads along the edges.
Finish with a scattering of seed beads at each end.
For the Looped Ribbon seam treatment I created the ribbon loops as described below and then worked Herringbone Stitch over the ribbon between the loops.
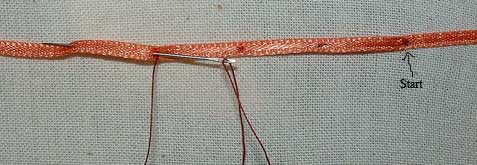
Make a secure backstitch at the start point which is the point that you want the looped rosette to form.
Put the needle through just the ribbon at the start point and make a long stitch (approx5/8″ 1.5 cm) at the back of the ribbon.
Take a tiny stitches on the top of the ribbon and long stiches on the back until you have 4 stitches on the back of the ribbon, finishing with the thread at the front of the ribbon.
Note: the loops will be half the length of your long stitches and and the number of long stitches is the number of loops that will form.
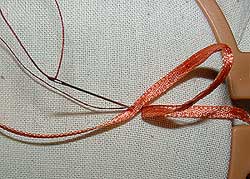
Stick the point of the needle through the ribbon and back through the background next to the start point and pull excess thread through to the back…
When the ribbon begins to gather pull remaining thread through with a quick tug, the quick tug snaps the loops into a more regular formation then a slow tug does.
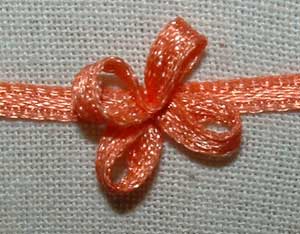
loops can be rearranged and held in place with tiny stitches and beads can be added to the centre.
Leave a Reply
|


June 29th, 2006 at 12:06 am
Ooooh, this is exactly what I needed to finish my block! What a lovely idea! Thanks, Annie!
June 29th, 2006 at 2:46 am
This looks really fun…what a great idea! I’m going to have to try this…
June 30th, 2006 at 10:24 pm
Love this rose and the bead trail that goes with it… yummy!
July 7th, 2006 at 9:18 pm
This is an exciting method. I have a collection of stiff and difficult ribbons in lucious colors that become very managable thanks to your instructions. I will be using this pair of techniques often.