| |
About
This is Annie Whitsed's Crazy World a world where I stitch the joys and chaos of life into beautifull crazy quilts. email annie@loopylace.com
April 2024
| M |
T |
W |
T |
F |
S |
S |
| « Nov |
|
|
| 1 | 2 | 3 | 4 | 5 | 6 | 7 |
| 8 | 9 | 10 | 11 | 12 | 13 | 14 |
| 15 | 16 | 17 | 18 | 19 | 20 | 21 |
| 22 | 23 | 24 | 25 | 26 | 27 | 28 |
| 29 | 30 |
|
All That Jazz
Annie\'s Website
Bags-of-Fun
Blogroll
Websites


|
|
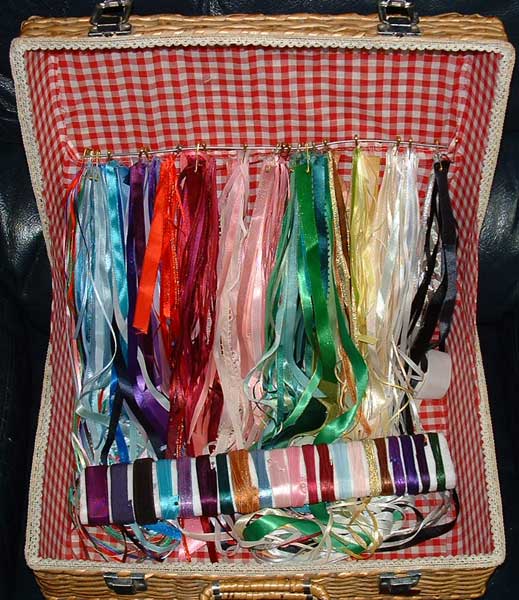
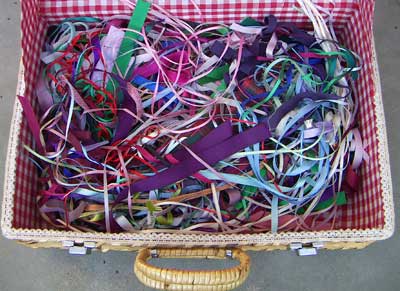 Or maybe that should be ‘On Track’ because organizing my stash is one of my goals for this year…I was side tracked from stitching today when I went to get a piece of satan ribbon to put a bow on the birthday block…confronted with this tangled mess I started sorting them, I started by dividing them into rough colour groups which I held together with a pin stuck through close to the end of each ribbon…I then took the colours one at a time, I put pieces shorter than 6″ into a small box and rolled the longer lengths around a piece of styrene foam, the remaining pieces I further sorted into wide and thin ribbons and held each group together with safty pins, so that I don’t have to open the pins everytime I want a piece of ribbon the pin is very close to the end of each ribbon so that I lose less than 1/4″ of ribbon when I cut pieces from the pin. Or maybe that should be ‘On Track’ because organizing my stash is one of my goals for this year…I was side tracked from stitching today when I went to get a piece of satan ribbon to put a bow on the birthday block…confronted with this tangled mess I started sorting them, I started by dividing them into rough colour groups which I held together with a pin stuck through close to the end of each ribbon…I then took the colours one at a time, I put pieces shorter than 6″ into a small box and rolled the longer lengths around a piece of styrene foam, the remaining pieces I further sorted into wide and thin ribbons and held each group together with safty pins, so that I don’t have to open the pins everytime I want a piece of ribbon the pin is very close to the end of each ribbon so that I lose less than 1/4″ of ribbon when I cut pieces from the pin.
I threaded the pins onto a length of coat hanger wire which I attached to the lid of the basket so that when I open the basket the lid pulls up the end of every piece of ribbon so that I can see what is there.
|
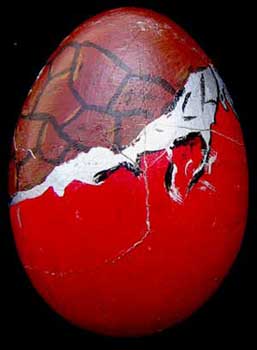
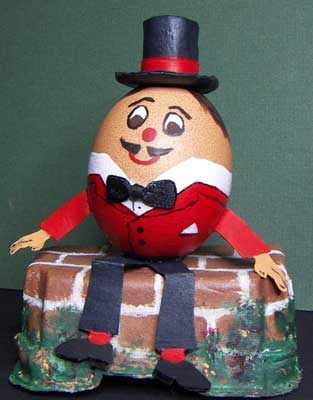 I am glad that I decided to paint Humpty’s coat onto the shell, his legs provide just enough balance to let him sit upright and I love how he turned out…His arms, legs and hat are are made from cardboard and his bowtie is ribbon with thread wrapped around the centre. I am glad that I decided to paint Humpty’s coat onto the shell, his legs provide just enough balance to let him sit upright and I love how he turned out…His arms, legs and hat are are made from cardboard and his bowtie is ribbon with thread wrapped around the centre.
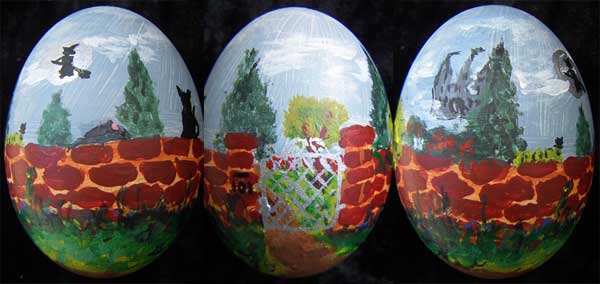
I made the wall from the end of an egg carton lid, the side of the wall in the photo was supposed to be the back because I thought that the moulding of the egg carton would look out of place and the other side is nicely square but as it happens the back turned out better than the front.
When I first thought of doing a humpty egg I was going to paint him and then let him have a little fall and put him back together but once I started making him I realizes that I wouldn’t be able to bring myself to deliberatly crack him, just knowing that I could put him back together is enough.
|
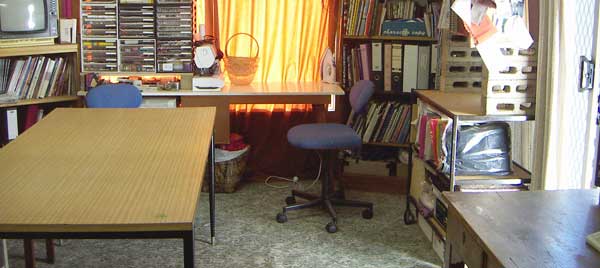
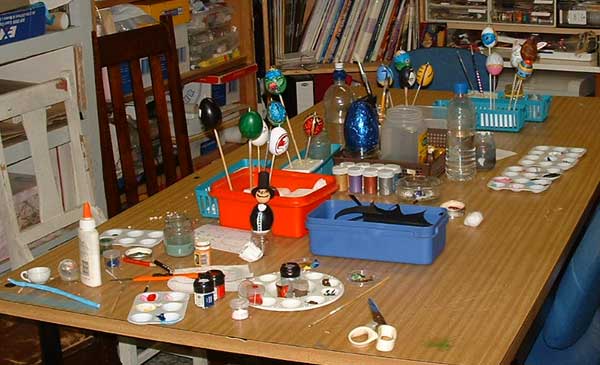
So that we would have plenty of room to work at painting our Easter Eggs, I cleaned off the table and all the benches in my study, I occasionally see the top of my table but clear benches are a rare sight
 My neice shows off one of the baskets of equipment that she helped me put together…each basket held a pencil, 2 paint brushes, a piece of styrene foam, water bottle, a paper towel, skewers, 2 blown eggs and a chocolate egg…These are the paints we use. My neice shows off one of the baskets of equipment that she helped me put together…each basket held a pencil, 2 paint brushes, a piece of styrene foam, water bottle, a paper towel, skewers, 2 blown eggs and a chocolate egg…These are the paints we use.
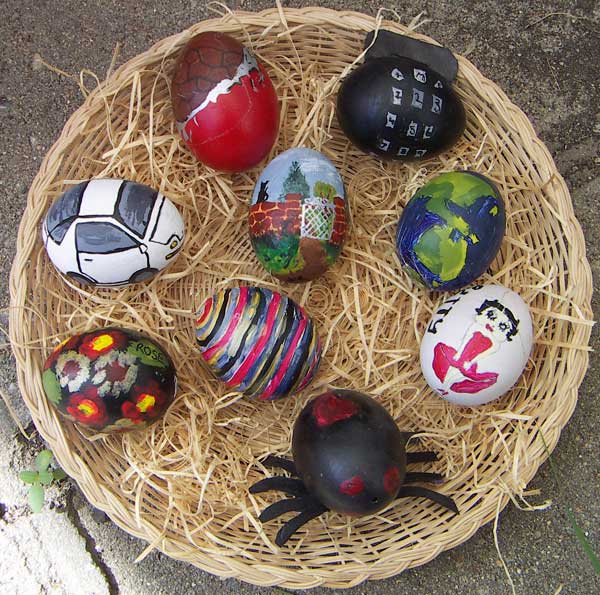
Today we had 9 Painters, painted some delightful eggs and had a lovely time…I will take the detail photos tomorrow in the daylight in the meantime here they are on the table after everyone had gone home.
|
In my neices words Painting Eggs has become a family tradition, Easter 2005 I blogged how the tradition got started and 4 years of painted eggs.
I didn’t get Our 2006 eggs blogged…initially because I wasn’t very organized to get them dated, lacquered, photographed and put away…subsequently because while they were waiting for me to finish them I knocked them on the floor….Oooooooops
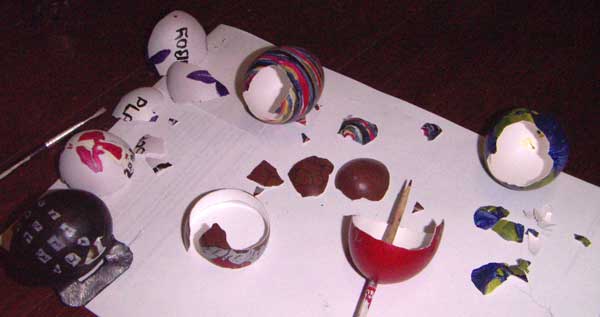
I was upset with myself but not devasted because from the beginning I had let them be touched because really they have to be held and turned around to appreciate their full beauty, they are a living collection which means they are at risk of being broken…still I didn’t know what I would do if one did get broken…
I picked up the pieces, put them in a box and put the box on a shelf in a dark corner. I just couldn’t bring myself to throw the pieces out.
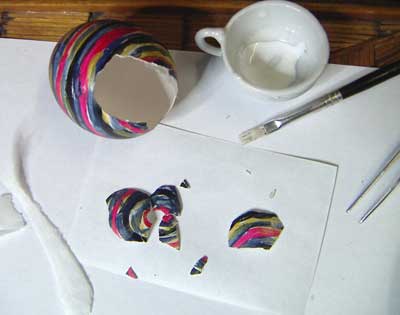 A couple of weeks ago I pulled the box out and wondered if it was possible to repair them, what if I glued strips of paper under one side of the join with half the paper sticking out so that I could glue the matching bit of shell to the paper as well…nothing ventured nothing gained…I seperated the pieces for each egg, 2 of them broken into largeish pieces, 2 of them with shattered ends, each egg with about 15 pieces to be joined…it took time because I had to let the glue dry before joining the next piece… A couple of weeks ago I pulled the box out and wondered if it was possible to repair them, what if I glued strips of paper under one side of the join with half the paper sticking out so that I could glue the matching bit of shell to the paper as well…nothing ventured nothing gained…I seperated the pieces for each egg, 2 of them broken into largeish pieces, 2 of them with shattered ends, each egg with about 15 pieces to be joined…it took time because I had to let the glue dry before joining the next piece…
…the joins are far from perfect but the eggs are in one piece and the cracks give them character.
I am well aware that this is a crazy thing to have done and you are allowed to laugh, Everyone else has…what I find more amazing than the fact that I was able to do it is that when I picked the pieces up off the floor 11 months ago I actually found every last chip of all the shells.
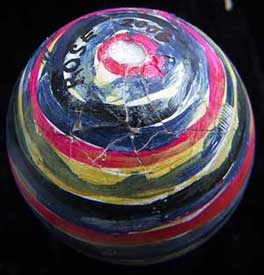 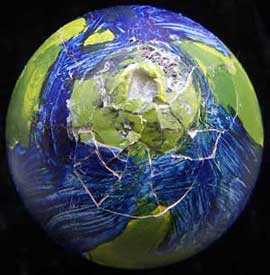
Below are all the 2006 eggs
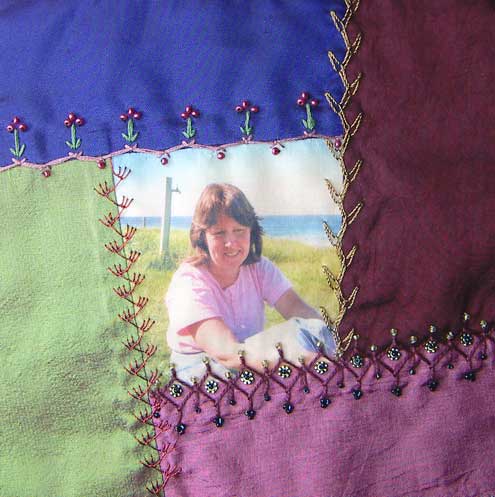
Some of you may recognize the wall on my egg, as the one on my Bags of fun, ‘A Charming Garden’ bag.
I am organized this year…I have all the eggs blown and undercoated, have purchased new fine brushes and have the paints all ready….Wishing you all a happy, safe Easter.
|
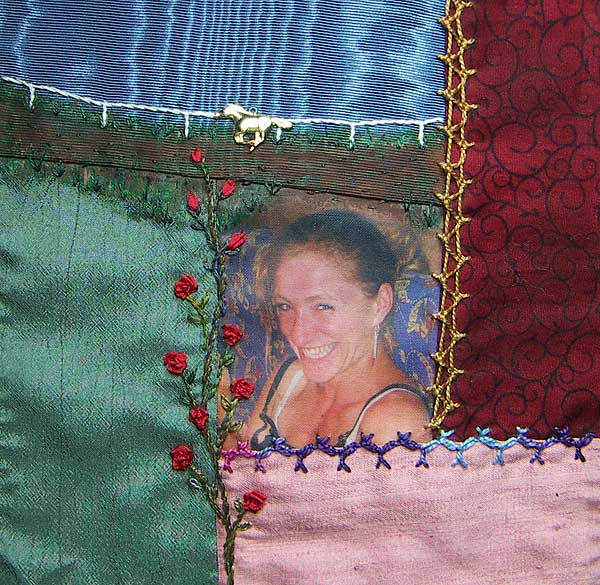
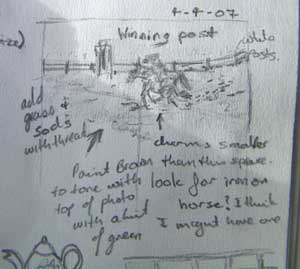 The pencil sketch is my first ideas for a picture seam to represent that my 2 youngest brothers and a sister in law worked with horses. The pencil sketch is my first ideas for a picture seam to represent that my 2 youngest brothers and a sister in law worked with horses.
I thought that an embroidered track would be to textured for the scale of my horse charm so I decided to paint the track…scary decision, paint can’t be undone like stitches if it doesn’t work…best have a practice which I did in my visual journal.
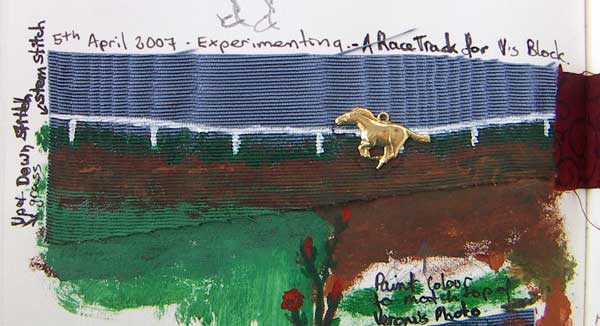
I used acrylic paint and the fabric was easier to paint than I thought it would be and I think it will work…time to be brave and put paint on my block…
I built the scene up in layers letting the paint dry each time before adding the next layer.
I started by covering the area with brown…..
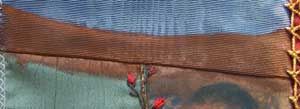
The second layer is splodges of dark green along the edges and a little bit on the track.
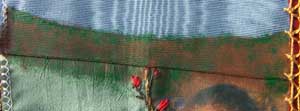
I then used lighter browns and greens and a finer brush to blend the track area and add grassy details to the edges.
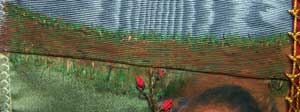
I used single strands of brown and green embroidery thread to add just a little bit of texture and finer details, stem stitch for the fence and finished the seam by extending the tip of the climbing rose to make it apart of the picture.

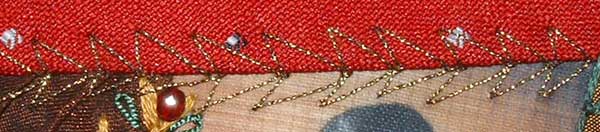
The 19th block for my mum’s memory quilt.
|
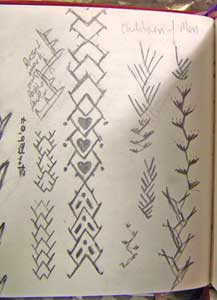
Having done a couple of story seams I need to do a few more so that they blend in and look as if they belong…I was having trouble coming up with ideas because I was overly influenced by my memories so today I rang mum got her to have a look at the ones that I have done and explained to her what sort of ideas I was needing, at first she said that her memory isn’t what it used to be but as we chatted memories started coming to the surface and I with pencil in hand scribbled them down in my visual journal so that I now have a page of ideas that I can think about and process how I could interpret them as a story seam.

|
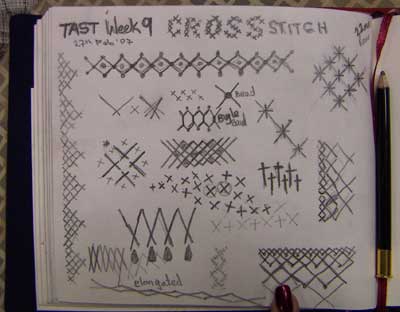 I will be interested to see what everyone else does with this stitch, personally I have found it quite a challenge as I have never thought about Cross Stitch other than cross stitch done on a grid to form a picture and initially I had no thoughts as to how I could use it as a seam treatment on crazy patchwork. I will be interested to see what everyone else does with this stitch, personally I have found it quite a challenge as I have never thought about Cross Stitch other than cross stitch done on a grid to form a picture and initially I had no thoughts as to how I could use it as a seam treatment on crazy patchwork.
Sitting down with my visual journal I started by writing the word cross in little crosses and then drew a pattern, using crosses down the left side of the page, I then did some bigger crosses (because as a seam treatment I think that they will need to be bigger) and then I did different angled crosses and ones that didn’t cross in the middle and arrangeing different sized crosses together, I don’t know how they will translate into thread but at least they give me a starting point.
|

 following on from feather stitch I played around in my visual journal with double feather stitch and it was one of those sketchs ( on the right hand side of the page) that I chose for this seam…I used a metalic thread and like the way it turned out. following on from feather stitch I played around in my visual journal with double feather stitch and it was one of those sketchs ( on the right hand side of the page) that I chose for this seam…I used a metalic thread and like the way it turned out.
and this was the last seam on the 11th block for my mum’s memory quilt.
|
Fly Stitch another very versatile stitch and once again I started by playing in my visual journal….I have used fly stitch in so many different ways it was hard to think of a way I haven’t used it before so while I was thinking I drew the different shapes that fly stitch can form and some of the ways I have used it, which includes decorating around shi shas, one large and 2 small fly stitches make a lovely heart shape and the legs of my spiders are fly stitch…
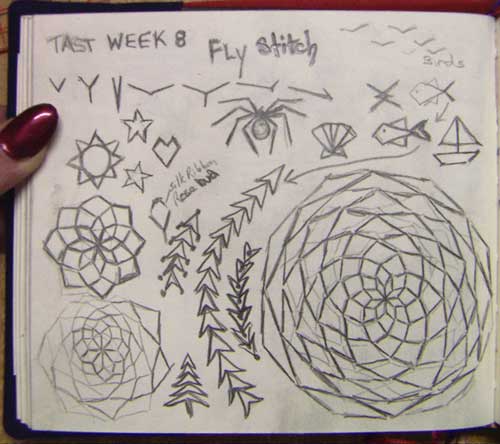
…The shi sha thoughts inspired a bit of doodling with the circle shape but it was the fish that gave me a seam cover, when I drew the single fly stitch tailed fish (which I have stitched before) I looked at it and thought a second fly stitch would give it a solid tail and when I looked at that drawing I liked the tail shape and repeated it end to end which gave me the seam treatment below.
|
Some time back, when I saw my blog on a friends computer, I was stunned by how good my images looked, images that were dark and almost blurry on my monitor looked bright and crisp on my friends monitor. I went home and tried to adjust the brightness etc on my monitor but it made no difference, my monitor was old and being unable to afford a new one I would just have to accept it…Since then whenever I have had access to another computer I take a peek at my blog and have a little dream about how lovely it would be to have a good moniter on my computer, in the meantime I have been saving to buy a car, a high priority as Canberra is not an easy place to live without a car…
That is how life was but after a visit to the optomitrist on yesturday I rethought my priorities, as inconvient as it may be not to have a car I can live for a while longer without one but I can’t live without my eyes, these are the only 2 I will ever have which means I can’t afford NOT to look after them which makes a new monitor a necessity rather than a luxury.
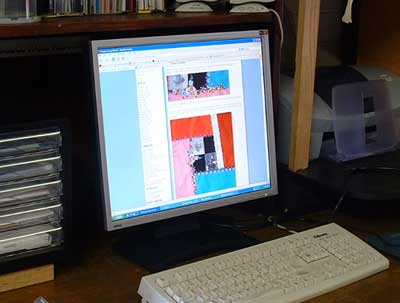 …Today I have struck while the iron is hot, before I could change my mind and decide that a car really was more important, I got a friend to drive me to the shops where I have purchased a BenQ 19″ LCD Moniter. …Today I have struck while the iron is hot, before I could change my mind and decide that a car really was more important, I got a friend to drive me to the shops where I have purchased a BenQ 19″ LCD Moniter.
In all likelyhood dear readers of my blog won’t notice any difference but their is a huge difference between what I was seeing on my old monitor and what I can see now…It looks so good I am doing the Happy Dance and Singing with Joy.
|
|
|

