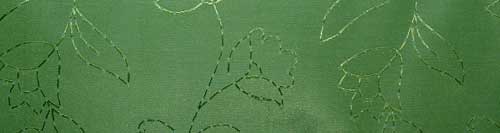
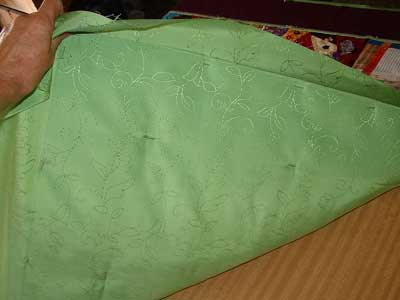
This is the backing fabric…A silk/cotton mix, woven with a vine and flower pattern, it is a beautiful fabric and lovely to work with…and the colour is about 2 shades darker than the narrow green border on the front making it a great backing for All that Jazz…it is a more expensive fabric than I would usually have bought for a backing and for this perfect fabric We have got to send a Huge THANK YOU to Jenny at Addicted to Fabric for Donating it, as well as the muslin for my messy back and the batting…thank you Jenny it looks wonderful.
I taped the backing to the table wrong side of fabric up.
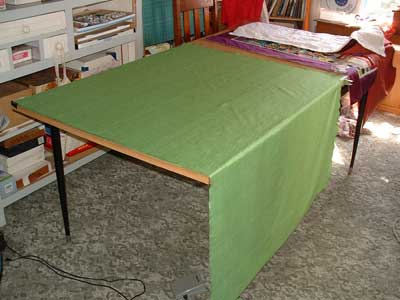
I placed the Quilt on top of the backing.
Put a pin near each corner and pinned around the edges.
I then lifted one corner to check that the pins had gone through to the back.
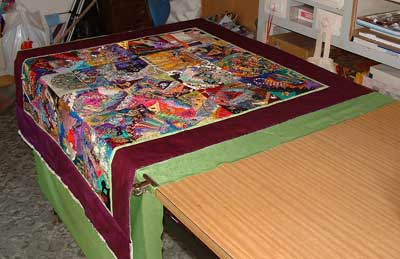
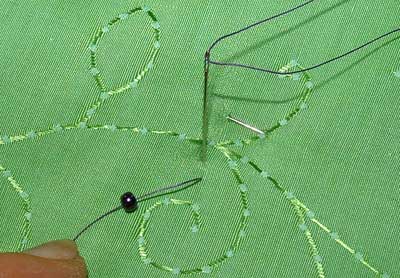
Time to do the tying..before I describe how I stitched the ties on this quilt….please note that the fine stitches that I have used to avoid any of my stitches showing on the front is more detailed than normally requried as most crazy quilts are tyed with buttons, ribbon bows or cross stitches at the intersections.
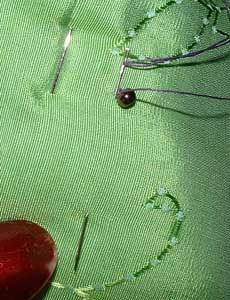
I don’t remember wether I mentioned that when we decided not to put buttons on the front, I decided that I would put beads on the back, I thought that they would give me a good anchor point, which they did, as well they make the back a bit different and they look good.
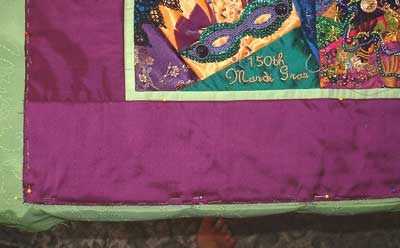
I did think that it would be a bit tricky to get a secure tie with such a small stitch but the bead did make a good anchor on the back and there was plenty of layers of seam for the stitches to get a good hold so I needn’t of worried…Putting the threads into the corners before putting on the back was also a good idea because I didn’t have to find the exact point to start each tie on the back.
For each tie I Put the needle straight down through the corner….

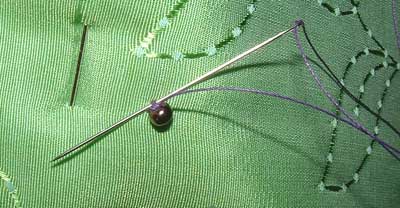
I put a bead on the thread and re entered the fabric a beads width away…
and then slopped the needle back towards the corner on the front coming out in the fold of a seam from where I could go straight back down the same spot as the first time…I went through each bead 3 times.

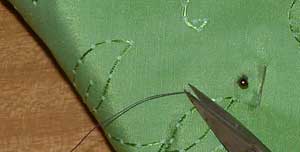
To secure the thread take a tiny stitch under the bead, when the thread is nearly pulled through a small loop forms close to the fabric, put your needle through the loop and then pull the thread tight.
 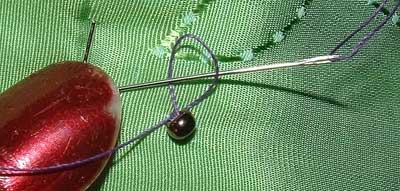
To hide the tail of the thread run the needle through the batting for about an inch.
Cut thread close to the fabric to finish.
Leave a Reply
|


February 19th, 2006 at 5:43 am
This is going to be sooooo gorgeous! Man, HOW I wish I could see it in person… *sigh*… bummer. Thanks again, Annie!
August 4th, 2007 at 8:24 am
I would love to see a picture of a finished quilt which has been tied. I am helping my neice with her first quilt.
October 27th, 2007 at 4:34 pm
Hi…Man i just love your blog, keep the cool posts comin..