This post is in response to the following comment made when one of the email lists I am on was discussing Tatting.
“Don’t knock the first tatting efforts. I remember Our Annie learning at Toorak and coming up with knotty efforts (are you here Annie) but what she did with them on her CQ was beautiful. Wonder if Annie has a pic somewhere?”
Yes I am here Maureen and here are those first knotty efforts…when the thread knotted I just started again.
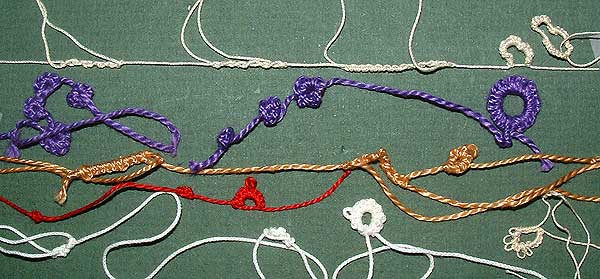
I found that when I started using a thicker thread I could see what was happening with the knot…I could see that it was the looped thread that needed to be kept slack so that it would loop around the shuttle thread when I pulled it tight, which is the flick of the wrist that tatters refer to…I practiced doing just half the knot, which is known as a Josephine Knot, it makes a slightly twisted loop which is rather nice on its own, I then practiced the second half of the knot until that felt comfortable, this also gave me practice in closing the loops and starting the next…once I had the hang of each half of the knot I was able to put them together…by this stage I had enough control to leave the space between knots that form picots.
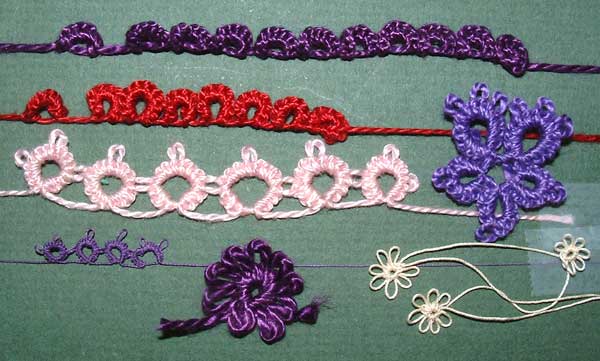
Once I had mastered the knot I was able to use finer threads….That is about all I learnt about tatting because that is all I need to know to be able to tat cute little butterflies to add to my crazy quilts.
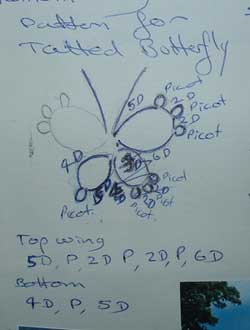
The butterfly is an adaptation of a larger one that I was given and this is the pattern as I wrote it in my visual journal…D = double knot and P = Picot….try them for yourself and as Maureen said don’t knock those first efforts.
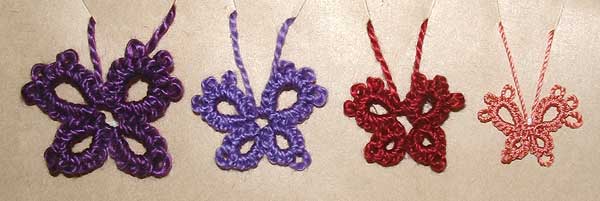
All the butterflies below use the same pattern the difference between them is the thread used…The little pink one is a silk thread which is expensive to tat with but it Tats up lovely. I add a bead for their body when I am stitching them to a the crazy block…
Leave a Reply
|


September 7th, 2006 at 1:11 am
Annie, these butterflies are so dear! I especially love the tiny pink one! I love tatting but haven’t tried it myself, I just collect other people’s work. I should take a page from your book and learn just enough to do a few motifs!
September 7th, 2006 at 4:03 am
Annie, I didn’t keep my first knots (over 30 yrs. ago) with regular tatting thread. I soon discovered as you did that the larger thread makes the stitch easier to see and control. By the way when you only do one half of the stitch it is known as “The Josephine Knot”. Thanks for posting and that’s one of my favorite butterfly patterns.
September 7th, 2006 at 7:19 am
Annie, thank you for explaining your tatting. I hadn’t thought of doing half the stitch until it became comfortable. I am sure this will encourage the newbies.
Did you not use some of your first efforts in a cq? I thought I saw one you worked on at Toorak. Maureen
September 7th, 2006 at 9:38 am
Annie, my attempts at shuttle tatting is a mess, I can needle tat.
So after seeing yours here, and how you have done so well, I’m going to keep trying.
Thanks hugs
September 7th, 2006 at 10:08 am
Hi Annie, these butterflies are gorgeous and I loved the knotted pictures too.
Hugs Maria
September 7th, 2006 at 12:46 pm
Well done! You have mastered this art well in one colour. It is easy to learn using 2 colours, that way you can see what is happening with the “flip”. The butterflies are so cute, time now to adventure a bit more!Jenny in Oz
September 7th, 2006 at 9:14 pm
Oh Annie
your butterflies are so cute- heavens you can teach me – I love the little apricot one is so pretty!!
love n hugs bear xoxoxoxox