Annies Crazy World


  • About

    This is Annie Whitsed's Crazy World a world where I stitch the joys and chaos of life into beautifull crazy quilts. email annie@loopylace.com
April 2024
M T W T F S S
« Nov    
1234567
891011121314
15161718192021
22232425262728
2930  
Locations of visitors to this page Subscribe with Bloglines
 
butterfly beads March 11th, 2006

I don’t know if you want to see another messy back but I thought that those girls who have a block in this quilt might like to see where I attached there blocks. To get a random placement for the butterflies on the front I actually used pins to mark the locations from the back where I fitted them in between where I had stitched the blocks down, if I had done it from the front I would have been distracted by the exact placement of the sashings and the random scatterings would have been more contrived…a bit like the theory that if you want to copy a picture turn the picture upside down because then you wil draw what you are seeing and not what you think it should look like.

messy back of Jazz #2

I used the same trick of adding all the threads for the ties so that all the knots are hidden by the real back…Here are the 20 needles all threaded and knotted.

needles ready for action

because this quilt has sashing strips, that I can put beads in, I don’t have to hide my tie stitches so I have used a different method of tying this quilt…I have used a bead on the front and on the back, much easier and quicker than hiding the stitches on the front, just a matter of going through the bead on the front and then the bead on the back about 3 times, the end of the thread is easily finished under the bead on the back then finishing the thread with a backstitch under the bead on the back and running it into the batting…The Gold butterflies are on the front and the purple butterflies are on the back.

butterfly beads

Reactions March 9th, 2006

white hearts

Sometimes I am very amused by peoples reactions to works in progress…Sometimes the reaction is a stunned silence as the person just doesn’t know how to tell me that what their seeing is not good, my sister has no such hesitation, when she saw this quilt pinned on the wall like this she said “Annie, your NOT putting white hearts on it”…you will probably be releived to know that I’m not, I cut the white hearts from sticky labels to get an idea of the shape and placement and to Quilt around with red crochet thread, sashiko style…But I’m not going to do that now, I change my mind because time is slipping by and tying it with beads will be much quicker and just as effective..

The finished Quilt March 4th, 2006

thumbnail of all that Jazz

All that Jazz is finished and you can see a Big pictur on Flickr.

OH&S March 2nd, 2006

Tonight at the monlthy Canberra Quilters meeting we had a lady talking about OH&S, that is Occupational Health and Saftey, in our sewing space…

Prevent back aches

For me a timely reminder that a brick under each leg of my table raises it to a comfortable working height which prevents the back ache caused by leaning over a to low table…a backache like the one I had today after pinning the 9 block top to the batting and Muslin (Calico in usa) inner messy back and starting to stitch the layers together.

And the Big news of the day is that this afternoon I picked up Al that Jazz #1…Anne E. has done a beautiful job of stitching the binding down…all it needs now is a name label….tomorrow I will take a photo and put a real big picture of the finished quilt up on Flickr….

First Day of Autumn March 1st, 2006

There was a few days last month when I didn’t work on the All that Jazz Quilt because the days were so hot and I didn’t want to perspire on it…I felt Justified today when I heard on the radio that it had been the Hottest Canberra Summer in recorded history (records where started in 1938)…The weather man’s predeicted temperatures for the next week are a lovely 27 degrees Celsius (F 82 degrees).

Down on hands and knees February 28th, 2006

I have used a different technique to put the borders on All that Jazz #2, I have used the simpler technique because the borders are not complicated by the second narrow border and ATJ#2 is a smaller and lighter quilt than #1 which means that it does not need as much structural engineering to support the weight as #1 did…

Starting with the side borders and then the bottom and top borders, I pin the border lining to the back of the blocks then pin the border to the front of the blocks…I do it this way because it is easier to keep the border lined up with the edge and get a good straight seam when the border is the only layer on top of the blocks, being underneath the lining takes care of itself, if it does slip a little it is not a problem and the other advantage is that the border, being at the back of the blocks, it also takes care of the seams between the blocks holding them in place so that they don’t get caught and flip over as they are wont to do.

pin border to front and lining to back

Stitch the seam and iron lining seam open from the back.

iron lining from back

Then iron the border seam open from the front.

iron border from front

The smaller size/lighter weight has also made this quilt much easier and quicker to work on…the strips between the rows are 2 1/2 inches wide.

All that Jazz #2

While I have had these blocks/quilts I have shown them off at every opportunity, they have been examined in fine detail and appreciated by all…the whole time I have wished that the makers of the blocks could hear the lovely things that have been said about there blocks…Tonight when I took this quilt to show my friendship quilt group, I took my camera so that I can at least show you how they get down on the hands and knees to get a better look at the detail.

down on hands and knees

The Competitors All That Jazz Blocks February 26th, 2006

There are 14 All that Jazz Competitpors blocks to be made up into another quilt…14 is not a number that divides into a quilt shape so lets make that another 2 quilts…How to split them 3 x 4 works as a quilt but that leaves only 2 blocks, that’s not enough for a second quilt…3 x 3 would also work as a quilt and leaves 5 blocks which does work as a second quilt by setting them with 4 plain blocks into a 9 patch.

The next question is which blocks to put in which quilt?…I reasoned that the 9 block quilt would blend more different styles of block and that the set of 5 blocks would need to be reasonably well matched blocks….so decided to start by chooseing 5 blocks that I liked together.

On closer examination of the blocks I found that the embroidered area of one was 1″ oversize, normally that would have been a problem because I wouldn’t have liked cutting it back to size but if I put it at the centre of the 5 block set then it can stay full size…and that gave me a starting point for spliting the blocks into 2 quilts.

When I took All that Jazz quilt to Anne to finish the binding I also took the competitors blocks and we lay them out on her bed and tried different combinations…

one possabilityanother possabilityyet another possability

We didn’t make a final decision but I got a feel for the blocks and we layed out a couple of combinations that worked…I then visited Sharon, and showed her the alternative combinations, she prefered the brighter combination so we left them layed out on the floor and layed out the 9 blocks to cross check that both quilts would be well balanced, we did swap a couple of blocks, Stephnie’s fantasticaly beaded fan looked great in both quilts but enhanced and did more for the 9 block quilt so that is where we put it…we also decided to use a dark purple fabric from my stash for the borders.

These are the 5 blocks for one quilt.

5 blocks for one quilt

And the 9 blocks for the other quilt…which I have trimmed to size and stitched into rows of 3…The photo shows the blocks on my sister’s floor so that we could decide how wide to make the strips that I am putting between the rows…I suggested adding the strips between the rows to make the finished quilt a rectangle rather than a square because I personally prefer rectangular quilts, Sharon liked it because these 2 quilts are reasonably small and the strips make it a slightly bigger quilt…seeing it layed out with the purple between the rows I think that setting the blocks like this will give this quilt a distinctive look.

9 blocks for the other

Part 13 – Bindings February 24th, 2006

For the binding I used a straight grain double binding with mitred corners…don’t be afraid of the word mitre, if you follow the instructions step by step they are really quite easy and very neat and satisfying to do.

The bindings are 3/8 of an inch wide for which I cut the strips 2 1/2 inch wide (being 6 times the finished width plus 1/4 allowance for the thichness of the quilt)…

The binding needs to be as long as the total of the 4 edges of the quilt plus about 6″ which means joining a few strips together.

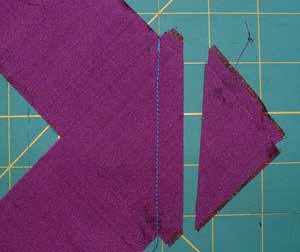
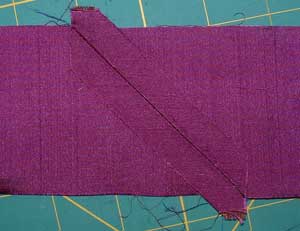
I joined the binding strips with mitred joins because they are far less bulky than straight joins. Place the two ends to be joined at right angles with the ends overlapping each other by a 1/4″….Stitch across the diagonal as per photo, mark the line with pencil if needed to get a straight seam.
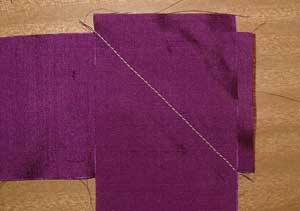
overlap ends of binding

Trim the seam back to a 1/4″.

Trim seam

Iron the seam open

Iron seam open

Iron binding strip in half lengthwise.

iron binding in half lengthwise

I start stitching the binding on about 2/3rds the way across the bottom of the quilt, I usually start by turning the straight end of the binding in before folding it in half as per sample on the left of the photo…For this quilt I decided to be smart and do a mitred join as per the sample on the right of the photo.
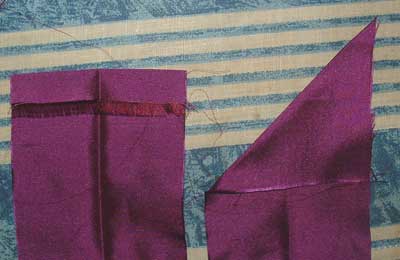
2 ways to start stitching binding

And guess what it will be mitred joins I do from now on…not only does it look more impressive being mitred, the mitre makes the join much less bulking making it far easier to stitch the join and turn it to the back neatly.

When the border was stitched on and I was back to the starting point I cut the end of the binding (see photo) so that it could be poked in neatly under the diagonal fold that I started with.
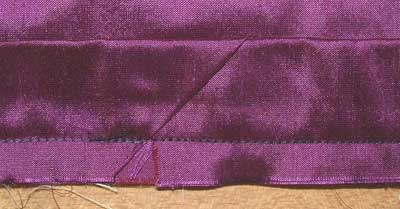
poke overlap under diagonal fold

Hand stitch the join before turning the binding over to the back.
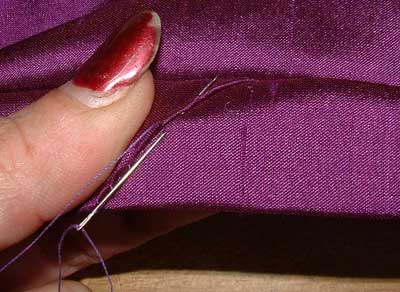
Stitch join in binding

I got ahead of myself a little there so that I could explain the beginning and end of the binding together…I will now go back and explain how to put the binding on between the start and end point.

Match up the raw edges if the binding and the quilt and stitch the seam the width the finished binding will be…when you come to the corner stop the width of the binding from the corner of the quilt…it is OK to stop a few stitches short of that point but if you stitch to far your mitred corner will not work…
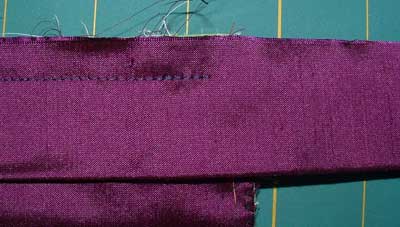
stitch to finished corner of quilt

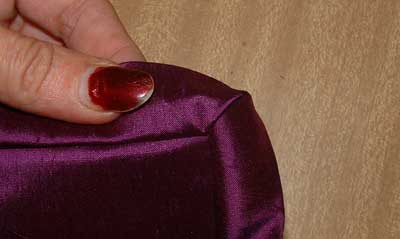
To Make the mitre fold the binding upso that it forms a straight line with the next edge of the uilt, the diagonal fold should start at the very corner of the quilt and go down at 45 degrees.
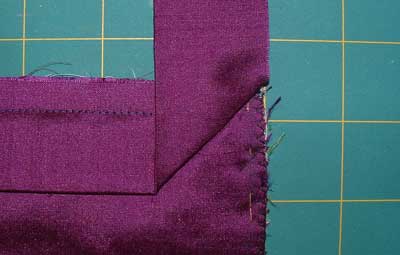
fold binding up

Now fold the binding down, the top fold should be level with the top raw edges of the quilt…If you don’t fold it down far enough your mitred corner will be pointy…If you fold it down to much then your mitre will be rounded…If you have never done one of these mitered corners it worth doing a sample corner before doing them on a big quilt.
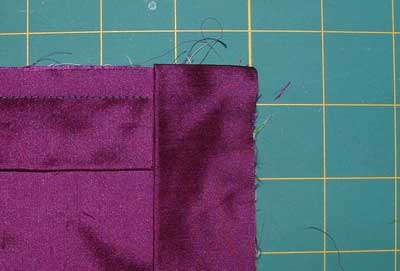
fold binding down

Stitch from the top down to the next corner and repeat…the following photo shows how the seams should look on the back.
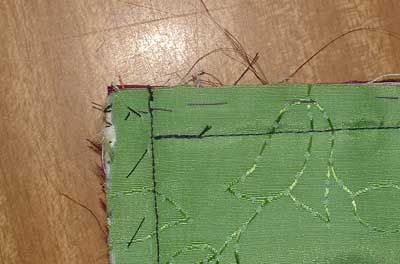
 the place to stop

To turn the mitred corners to the back hold the edge that has the bulk from the fold in the corner.
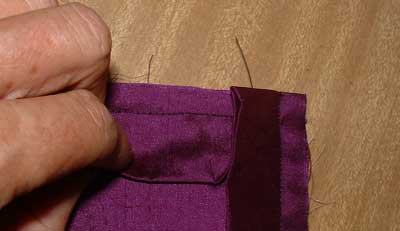
hold bulky corner edge

flip binding to the back

fold binding to back

Fold the bulky edge that you are holding in first.
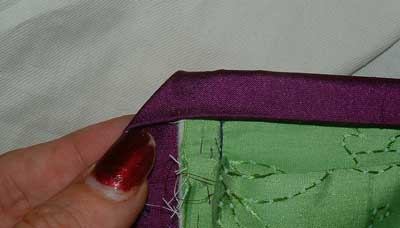
fold first edge to back

Then when you fold the second edge to the back the bulk of it will even out the corner…
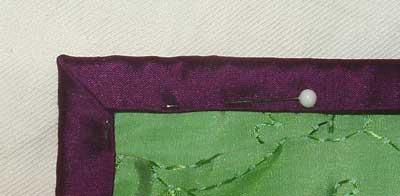
fold second edge to back

There are a few different stitches that can be used to hand stitch a binding any of are suitable.

The stitch that I describe below is my favourite stitch…I like it because each stitch travels nearly 1/2 an inch making it quick to do and I particularly like the way it pops into the fabric and disappears so that I don’t have to match the thread to the binding…I do usually stitch light colours with a light thread and dark colours with a dark thread…I have used a dark thread for the following instructions so that it would photograph clearly.

Put the needle into the lining One thread behind where the thread comes out of the fold of the binding…that one thread is the secret to this stitch.
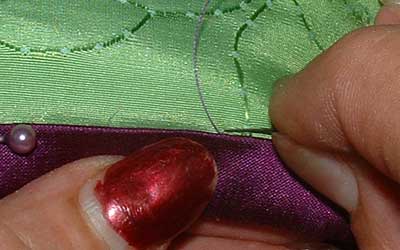
first stitch a thread behing

Take a 1/4″ stitch under the Lining…As soon as the tip of the needle comes out of the lining pop it into the fold of the binding.
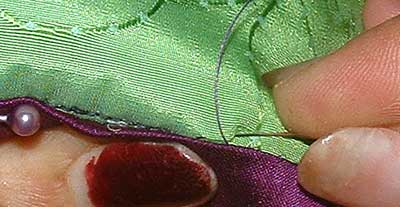
stitch in lining

Push the needle through the fold of the binding for about a 1/4″.
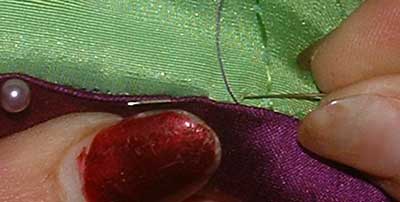
stitch through fold of binding

When you pull the thread through give the last bit of thread a tug and watch the stitch disappear….If you can see the stitch then you need to go back a tad further….If the binding puckers and doesn’t sit flat then you are going back to far..it literally is only a thread behind that is needed to make the stitch pop.
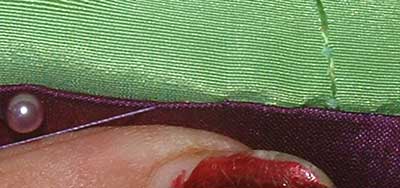
tug the thread to pop the stitch

I did only stitch enough of the binding down to demonstrate the how to, once I had the photos that I needed I delivered All that Jazz to Anne Eccleston, my friend and fellow Canberra Crazy Quilter, she is delighted to be a part of this wonderful quilt and I left her contendly stitching the bindings down.
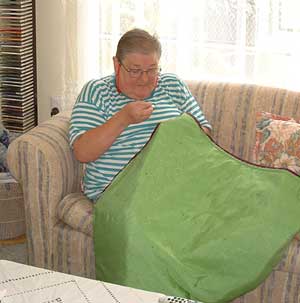
Anne E. stitching the binding

My next Project – The Competitors all that Jazz blocks.

Part 12 – Rod Pocket February 21st, 2006

I put a rod pocket on the back so that when All that Jazz is hung on a wall it will be supported across its full width…because crazy quilts are often heavy I like to put the rod pocket on so that it is incorporated with the binding to give it maximum strength.

I make the rod pocket so that I it finishes about 1″ from each side of the quilt, this is so that it won’t get caught up in the side bindings, it also makes space so that hooks on the wall for the rod can be hidden behind the quilt.

The other thing about rod pockets is that they need to be made with a pleat to accommodate the thickness of the rod, without the pleat the rod will cause the top of the quilt to bulge on the front.

how rod sits in pocket

The strip of fabric for the rod pocket needs to be cut 1″ shorter than the width of the quilt by about 9″ (that is 3″ for the pocket + 1/2″ under binding + 1″ for the pleat and then doubled so that the pocket is lined.

Fold the strip right lengthwise and stitch a 1/4″ seam at each end…Turn right side out and iron.

fold and stitch ends of rod pocket

Before pinning the rod pocket to the quilt I folded the top border, back out of the way so that I could machine stitch through all the other layers and have the seam covered by the top border.

front border folded back

I positioned the rod pocket and stitched close to the fold…As I have mentioned when manourvering the whole quilt through the machine a Little help goes a long way, below is a photo of my not so little son, Sam, and how he sits behind the sewing machine he supports the weight and keeps the bulk of the quilt moveing along at the same speed as I am stitching which leaves me free to concentrate on stitching the seam straight.

A little help

After stitching the rod pocket on I reposition the top border which covers the seam that I have just stitched.

Pin border in place

Pin the rod pocket to the top of the quilt.

Pin rod pocket in place

Hand baste all the layers together, there are now a lot of layers on this edge and you need to take care that all the raw edges are well lined up so that you have a true straight edge to put he binding on.

Baste all the layers together

Part 11 – Tying the Quilt February 18th, 2006

the backing fabric

This is the backing fabric…A silk/cotton mix, woven with a vine and flower pattern, it is a beautiful fabric and lovely to work with…and the colour is about 2 shades darker than the narrow green border on the front making it a great backing for All that Jazz…it is a more expensive fabric than I would usually have bought for a backing and for this perfect fabric We have got to send a Huge THANK YOU to Jenny at Addicted to Fabric for Donating it, as well as the muslin for my messy back and the batting…thank you Jenny it looks wonderful.

I taped the backing to the table wrong side of fabric up.

tape backing to table

I placed the Quilt on top of the backing.

place quilt on top of lining

Put a pin near each corner and pinned around the edges.

pin near each intersection and edges

I then lifted one corner to check that the pins had gone through to the back.

Check to see that pins have gone through all layers

Time to do the tying..before I describe how I stitched the ties on this quilt….please note that the fine stitches that I have used to avoid any of my stitches showing on the front is more detailed than normally requried as most crazy quilts are tyed with buttons, ribbon bows or cross stitches at the intersections.

I don’t remember wether I mentioned that when we decided not to put buttons on the front, I decided that I would put beads on the back, I thought that they would give me a good anchor point, which they did, as well they make the back a bit different and they look good.

I did think that it would be a bit tricky to get a secure tie with such a small stitch but the bead did make a good anchor on the back and there was plenty of layers of seam for the stitches to get a good hold so I needn’t of worried…Putting the threads into the corners before putting on the back was also a good idea because I didn’t have to find the exact point to start each tie on the back.

For each tie I Put the needle straight down through the corner….

Put needle down in corner

I put a bead on the thread and re entered the fabric a beads width away…

a beads width away

and then slopped the needle back towards the corner on the front coming out in the fold of a seam from where I could go straight back down the same spot as the first time…I went through each bead 3 times.

come out in fold near corner

To secure the thread take a tiny stitch under the bead, when the thread is nearly pulled through a small loop forms close to the fabric, put your needle through the loop and then pull the thread tight.

take a tiny stitch under the bead put needle through the loop in the thread

To hide the tail of the thread run the needle through the batting for about an inch.

run tail of thread into the batting

Cut thread close to the fabric to finish.

cut thread close to fabric