Annies Crazy World


  • About

    This is Annie Whitsed's Crazy World a world where I stitch the joys and chaos of life into beautifull crazy quilts. email annie@loopylace.com
April 2024
M T W T F S S
« Nov    
1234567
891011121314
15161718192021
22232425262728
2930  
Locations of visitors to this page Subscribe with Bloglines
 
Shi sha mirrors made from recycled CD’s September 2nd, 2007

Cutting shishas from old CD’s makes a good substitute if you don’t have access to the real thing…Cutting shishas from old CD’s also enables you to cut different sizes and shapes.

soak CD in warm water to softenDraw the shape you want to cut with a permanent ink pen and

Soak the CD in warm water to soften the plastic so that it cuts rather than shattering…I have also found that sitting the CD beside the heater softens it enough to cut and I daresay that putting the CD out in the sun would work in summer.

Use large sized scissors and make short cuts using the bit of the blade nearest the pivot point of the scissors.

use the part of the blade closest to the fulcrum

You will find the cutting easier to manage if you cut a wedge from the CD and then you can nibble bits from the side…I seldom bother but you can smooth the sides with an emery board…and don’t worry if your edges are a little jagged, they round up when you stitch them on and they are probably more authentic if they are a little jagged because the original shishas (on the right of the image) are small chips of thin mirror and are very odd shaped and jagged on the edges.

CD shishas and a real shisha

Expect a few cuts to shatter as you get the hang of cutting them, you will have to experiment to get the right temperature water to suit your climate and the season of the year. And try a few different brands of CD, I think the composition of the plastic may vary because I am sure some shatter easier than others and they must be made by different processes because the label side peels of some but stays stuck on others.

OH&S – Occupational Health and safety September 1st, 2007

When I read Elizabeth’s post on the hazard of shi sha dust I was moved to write this post, thankfully no damage done and alls well now but I was reminded of the OH&S module that I studied as part of my Diploma of Visual Arts and Crafts, Until then I had never thought about it and was surprised to learn that my Gentle Art of Needlework could Actually be a dangerous occupation.

When you do think about it we work with pins, needles, scissors and rotary cutters, all sharp objects, irons are hot and burn, fabric sheds dust, poor light causes eye strain, then there is RSI and cramps from sitting in the one place for to long, back ache from working at bad angles and lugging heavy sewing machines and bags to workshops/classes, then there is the toxic elements of some of the products we use, even financial stress when we overspend our sewing budget…sounds a bit doom and gloom but that is not my intention, it is just that Health and safety for needlework studio’s is not often talked about and I think that it should be because I believe that we need to be aware of the hazards in order to prevent or at least minimize their damage.

I would like to invite readers to comment with any tips they have for good work practices that could help make all our studio’s healthy, safe environments to be.

How to Make a Christmas Stocking – Detail 392 August 30th, 2007

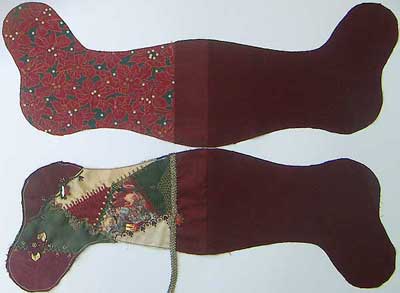
Constructing christmas stocking step 01To Make the Christmas Stocking

Cut out a back the same size as the front and put a matching band on it.

Cut out 2 linings…(Optional….I cut the linings 1/2 inch shorter at the top so that when the lining is pushed into the stocking the outside rolls 1/4 inch to the inside, which creates a neat top as there is no chance of the lining showing.)

Using a 1/4 inch seam, sew the front to the front lining and the back to the back lining as per illustration.

Iron the seams towards the outside ends.

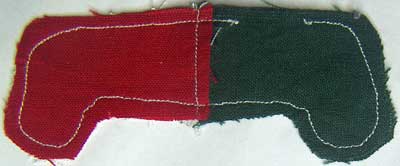
Place front/lining unit right sides together with the back/lining unit, matching the joins…Stitch together using a 1/4 inch seam, leaving a gap in the straight section of the lining.

And this is one I prepared earlier (the miniature sewn with contrasting threads shows the stitching line better than the photo I took of the real one)
Constructing christmas stocking step 02

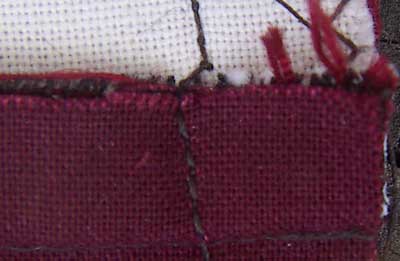
Another Optional refinement…At the fold line of the outside and lining, (which is at the edge of the seam if you have cut lining shorter or on the seam if you have cut the lining the same size as the outsides) increase the seam allowance by about 1/16th of an inch, this makes the lining slightly smaller so that it fits inside better.
Constructing christmas stocking step 03

Clip curves on the outside pieces (it is not necessary to clip the curves of the lining).

Turn stocking right side out through the gap in the lining.

Before slip stitching the Gap Closed I stitched the Braid across the back of the stocking top…I wasn’t going to bead the back section of the braid but it did look a bit bland…and is beaded.
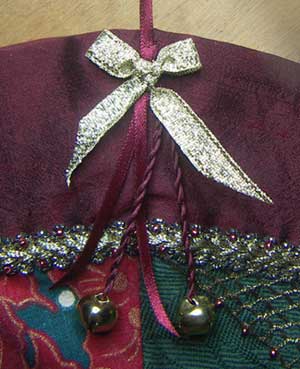
Hanger and trim for christmas stockingFor the Hanger I like to use about a 12 inch length of satin ribbon so that I get a long hanger that is easy to slip over whatever it is to hang from…

The bells are hung with Twisted Ribbon, for which you can use silk or satin ribbon or thick threads.

I Finished the top with a bow tied with a metalic gold ribbon.

A TIP…When stitching the Hanger and Trim on, thread on a bead each time the needle is at the back of the fabric…This turns the potential mess at the back into a sparkling secret.
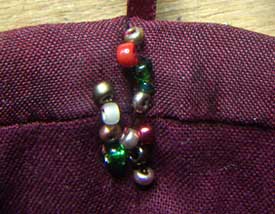
Behind the trim on a christmas stocking

Add your name and the date and your stocking is finished.
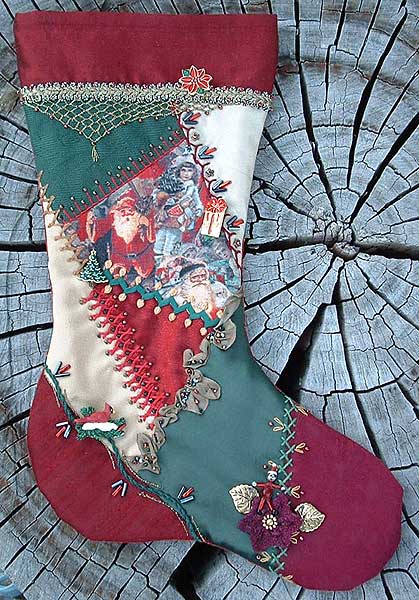
The nearly finished Christmas stocking

Quilt Roll For Transport and Storage of Mum’s Quilt August 11th, 2007

Quilt roll for Under the Mango Tree

So that Mum’s Quilt can be transported safely and stored without being folded I have made a Quilt Roller the same as the one I made for All that Jazz, Instructions for the basic Roller are Here and Part 2 describes the Full Roller.

I used Calico (Muslin/homespun) with left over Fabrics from the quilt to individulize it and T Shirt Transfer to put the name and an image of the Mango Tree on it.

Some Technical Construction Guff July 25th, 2007

In past posts I have explained about freezer paper and how to use it to size blocks when joining rows…When you come to joining multiple rows the pieceing becomes a little more tricky as you need to measure the width of the underside blocks as well as the upper row…I took photos today, as I joined the top and bottom sections of mum’s quilt, to illustrate how I go about joining the bigger units.

I start by ironing a strip of freezer paper to the back of both rows to be joined, I have the freezer paper strips cut longer than the join, the underside piece a little longer than the upper piece so that I can see both when I put the blocks together.

When I put the halves together I put a piece of fabric between them so that embellishments don’t rub together and after pinning the seam I put additional pins on the other side of the freezer paper to help hold the layers together and reduce drag and slippage.

Joining blocks 01

I spear pin through each intersection taking care to put the pin through the seam right next to the paper on the top and the bottom.

Joining blocks 02 Joining blocks 03

I then pin between the blocks checking with every pin that it is right next to the paper on the underside, weraing glasses makes this a bit difficult, every time I lent forward to check the location of the pin on the back my glasses slipped off.

Joining blocks 04

When I have The seam pinned I Tack the intersections, doing a backstitch around the point where the joins do intersect, before taking the spear pin out…It is also worth tacking any patches of velvet.

Joining blocks 05

I set my sewing machine up on a small table that is slightly lower than my studio table and put a box behind the machine so that I have a level surface for the quilt to move over.

Joining blocks 06

Umm…maybe it is worth tacking the whole seam…because even with all that care in pinning when I checked the back I had some slippage…I unpicked and realigned and restitched these in small sections.

Joining blocks 07

Remembering Mothers – Details 339 and 340 – Double knot Stitch how to July 18th, 2007

join 25

Remembering MothersRemembering Mothers…This is the cover of a book Published by the Northern Rivers Family History Writers’ Group, It is an anthology of Short Stories, Letters and Poetry to which my Mum contributed a 16 page story of her Mothers life.

Down the new join I finished the tail of the bow to cover the upper portion of the seam and did Double knot stitch on the lower section…

Flip Flopped Double knot Stitch

I enjoy doing Double Knot Stitch and as I seem to be repeating it on the join seams I thought that I should make a sample to illustrate how to work it.

Double knot stitch Step 1

Double knot stitch Step 2

Double knot stitch Step 3

Double knot stitch Step 4

A Beaded Seam – detail 327 July 12th, 2007

Beaded edge

Sometimes I have absolutly no idea where ideas come from, for this seam I looked at the fabric and saw a beaded edge on it.

I have left part of the seam unfinished to show that the first row of beads is stitched at 1/4″ intervals with the whole facing down from the seam…I stitched the first row of beads in place because I wanted the beads to sit flat on the fabric and not stitck up.

To work the rest of the pattern I went down through an anchored bead, picked up a brown, a black and another brown bead…Put the needle back up through only the black bead, picked up a brown bead and up through the next anchored bead in the row and take a backstitch on the back before taking the needle to the front again and down through the same anchor bead. you may need to jiggle the thread through the beads to tighten up the loop

beaded edge step 1 beaded edge step 2

Details 311 to 313 June 28th, 2007

Join 19

The Third unit of 6 blocks is done.

The stitches across the new join are…

In the first section I have used Silk Ribbon to do Pistol Stitches set end to end…Pistol Stitches are formed by working a Colonial Knot or French knot but instead of going down close to where you came up go down a stitch length away so that you end up with a knot on the end of a straight stitch….I also added an extra red heart bead.

Pistol Stitch

The stitch in the third segment of the join is Triple Palestrina Stitch

Triple Palestrina Stitch

The seam in the middle section of the join is a combination of Herringbone and Palestrina Stitches Done with the thread doubled to make it thicker.

combination Herringbone and Palestrina Stitch

To work the above variation start with a Herringbone Stitch

Herringbone/Palestrina Stitch Step 1

Work a Reverse Palestrina Stitch over the thread.

Herringbone/Palestrina Stitch Step 2Herringbone/Palestrina Stitch Step 3

Slip the needle under the end of the Stitch.

Herringbone/Palestrina Stitch Step 4

A Tip I have done the above illustrations with the point of the needle for clarity, what I actually do is use the eye of the needle so that it doesn’t catch on the fabric but as you can see it looks messy in the photo.

Herringbone/Palestrina Stitch Tip

Italian Insertion stitch – Detail 305 June 25th, 2007

Italian insertion stitch

This stitch is a variation of Italian Insertion Stitch…click here to see Italian Insertion Stitch and a couple of variations.

I have googled Italian Insertion Stitch but found no link to any instructions so tonight I have worked a sample to photograph the steps for working the Stitch.

Start by working 2 cretan stitches, make tiny stitches spaced wide.

Italian insertion stitch step 01

Go back up to the first stitch, on the left and work a buttonhole stitch over the threads.

Italian insertion stitch step 02

work a total of 4 buttonhole stitchs from the centre out to the edge.

Italian insertion stitch step 03

work another cretan stitch below the first one and then Go back to the second cretan stitch, on the right and work 4 buttonhole stitches over the threads from the centre to the edge.

Italian insertion stitch step 04

work the next cretan stitch below and repeat working from side to side.

Italian insertion stitch step 05

For the Variation I have done work as above except the 4 buttonhole stitches are worked from the edge to the centre, the first of the 4 buttonhole stitches is worked over 2 threads…

Italian insertion stitch step 06

…the other 3 buttonhole stitches are worked over 3 threads.

Italian insertion stitch step 07

Further variations can be achieved with different spaceing of the creatan stitches and different numbers of buttonhole stitches. Different threads will also change the appearance of the stitch.

Using Freezer Paper to Size Blocks June 5th, 2007

I joined another 4 Pairs of blocks today…When I started this quilt in 1993 I cut the foundation blocks 7″, I probably intended them to be 6″ with 1/2″ seams but since I have been working on them again this year I have assumed 1/4″ seams, I measured all the blocks to find the smallest which was 7″ so my finished block size will be 6 1/2 “… When I assembled the all that Jazz Quilts the blocks varied in size by up to an inch and to assemble them I trimmed all the blocks to the same size.…The blocks in this quilt only vary in size by about 1/4 inch and rather than trying to trim them all to the same size I am using freezer paper to size them…Freezer Paper is the American freezer paper that has been adopted by quilters, it has a waxy side that when ironed adheres lightly to the fabric and then peels off easily without causing damage and can be reused many times…I cut a 6 1/2 inch square of Freezer Paper, which is my finished block size and ironed it to the back of the smallest block of each pair and then stitched the seam down the edge of the Freezer Paper, by doing this I can visually see that I have sufficient seam allowance on all edges and that the seams are straight.

The post joining the all that jazz blocks gives tips on how to sew over bulky beads and embellishments.

Using freezer paper to size blocks